


How to deploy Blazor WASM & Azure Functions to Azure Static Web Apps using GitHub

Update 09/28/20: Azure Static Web Apps was officially announced at September's MSIgnite. This tutorial has been updated to include support for Azure Functions.
With ASP.NET Blazor WebAssembly (WASM) you can create .NET web applications that run completely inside of the browser sandbox. The publish output of a Blazor WASM project are static files. Now that you can run .NET web applications without server side code, you can deploy these applications to various static site hosts, such as Azure Static Web Apps.
Check out how to deploy Blazor WASM to these alternative static site hosts:
- Azure Static Web Apps using Azure DevOps (by Dave Brock)
- AWS Amplify
- Netlify
- Cloudflare Pages
- DigitalOcean App Platform
- Heroku
- GitHub Pages
- Firebase Hosting
This walkthrough will show you how to deploy Blazor WASM to Azure Static Web Apps communicating with the built-in Azure Functions integration. Azure Static Web Apps (in preview) is a new free service that let's you host static sites deployed from GitHub. In addition to static site hosting, the service provides additional features:
- Generate continuous integration and deployment using GitHub Actions to build and deploy your static web application
- Automatically create hosting environments for different Git branches and pull requests
- Azure Functions integration
- Custom domain names
This walkthrough will show you how to deploy to Azure Static Web Apps following these high level steps:
- Create Blazor WebAssembly project
- Create .NET Core Azure Functions project
- Commit the projects to a Git repository
- Create a new GitHub project and push the Git repository to GitHub
- Create a new Azure Static Web App
- Integrate GitHub with Azure Static Web App
- Commit GitHub Actions Workflow
- Run GitHub Actions Workflow
Prerequisites:
- .NET Core 3.1
- Azure Functions Core Tools (installation instructions)
- Git
- GitHub account
- Azure subscription
You can find the source code for this how-to on GitHub.
Create ASP.NET Core Blazor WebAssembly project #
Run the following commands to create a new Blazor WASM project:
mkdir AzureSwaBlazorWasmDemo
cd AzureSwaBlazorWasmDemo
mkdir Client
cd Client
dotnet new blazorwasm
To give your application a try, run dotnet run and browse to the URL in the output (by default https://localhost:5001):
dotnet run
# info: Microsoft.Hosting.Lifetime[0]
#       Now listening on: https://localhost:5001
# info: Microsoft.Hosting.Lifetime[0]
#       Now listening on: http://localhost:5000
# info: Microsoft.Hosting.Lifetime[0]
#       Application started. Press Ctrl+C to shut down.
# info: Microsoft.Hosting.Lifetime[0]
#       Hosting environment: Development
# info: Microsoft.Hosting.Lifetime[0]
#       Content root path: C:\Users\niels\source\repos\AzureSwaBlazorWasmDemo\Client
Optional: You can use the dotnet publish command to publish the project and verify the output:
dotnet publish -c Release
# Microsoft (R) Build Engine version 16.7.0+b89cb5fde for .NET
# Copyright (C) Microsoft Corporation. All rights reserved.
#
#   Determining projects to restore...
#   All projects are up-to-date for restore.
#   Client -> C:\Users\niels\source\repos\AzureSwaBlazorWasmDemo\Client\bin\Release\netstandard2.1\Client.dll
#   Client (Blazor output) -> C:\Users\niels\source\repos\AzureSwaBlazorWasmDemo\Client\bin\Release\netstandard2.1\wwwroot
#   Client -> C:\Users\niels\source\repos\AzureSwaBlazorWasmDemo\Client\bin\Release\netstandard2.1\publish\
In the publish directory, you will find a web.config file and a wwwroot folder. The config file helps you host your application in IIS, but you don't need this file for static site hosts. Everything you need will be inside of the wwwroot folder. The wwwroot folder contains the index.html, CSS, JS, and DLL files necessary to run the Blazor application.
Create .NET Core Azure Functions project #
You'll need to install the Azure Functions Core Tools before you can create and run a .NET Core Azure Functions project. Follow the installation instructions from the Microsoft Documentation. Make sure to restart your console/terminal to make the new func commands available.
Use the following commands to create a new Azure Functions project and create an Azure Function called WeatherForecast:
mkdir Api
cd Api
# creates Azure Functions project
func init --worker-runtime dotnet
# creates Azure Function called 'WeatherForecast'
func new --language C# --template "Http Trigger" --name WeatherForecast
Azure Static Web Apps only supports 'HTTP Trigger' functions. Azure Functions triggered by other events like a CRON schedule, queues, etc. are not supported.
Update the Azure Function file WeatherForecast.cs with the code below:
using System;
using Microsoft.AspNetCore.Mvc;
using Microsoft.Azure.WebJobs;
using Microsoft.Azure.WebJobs.Extensions.Http;
using Microsoft.AspNetCore.Http;
using Microsoft.Extensions.Logging;

namespace Api
{
    public static class WeatherForecast
    {
        public static readonly Random random = new Random();
        public static readonly string[] summaries = new string[] {
            "Freezing",
            "Bracing",
            "Balmy",
            "Chilly"
        };

        // This function will create 5 random weather forecasts, matching the format of Client/wwwroot/sample-data/weather.json
        [FunctionName("WeatherForecast")]
        public static IActionResult Run(
            [HttpTrigger(AuthorizationLevel.Function, "get", Route = null)] HttpRequest req,
            ILogger log)
        {
            var forecasts = new object[5];
            var currentDate = DateTime.Today;
            for (int i = 0; i < 5; i++)
            {
                var futureDate = currentDate.AddDays(i);
                var temperatureC = random.Next(-10, 35);
                forecasts[i] = new {
                    date = futureDate.ToString("yyyy-MM-dd"),
                    temperatureC = temperatureC,
                    summary = summaries[random.Next(0, summaries.Length)]
                };
            }
            return new OkObjectResult(forecasts);
        }
    }
}
By default, the Blazor WASM project will make an ajax request to the file located at Client/wwwroot/sample-data/weather.json. The Azure Function mimics the format of that file so you can replace the ajax call to the sample file with an ajax call to the Azure Function.
For now, test out your new Azure Function by running func start and browse to the URL found in the console output. The URL should be http://localhost:7071/api/WeatherForecast. The result should look like an unformatted version of this:
[
    {
        "date": "2020-09-28",
        "temperatureC": 17,
        "summary": "Bracing"
    },
    {
        "date": "2020-09-29",
        "temperatureC": 0,
        "summary": "Bracing"
    },
    {
        "date": "2020-09-30",
        "temperatureC": 18,
        "summary": "Chilly"
    },
    {
        "date": "2020-10-01",
        "temperatureC": 15,
        "summary": "Bracing"
    },
    {
        "date": "2020-10-02",
        "temperatureC": 1,
        "summary": "Freezing"
    }
]
In the next section, you'll integrate the Blazor Client with the Azure Functions API.
Integrating Blazor with Azure Functions #
You need to update the Blazor Client to make an ajax call to your Azure Function instead of the sample data at Client/wwwroot/sample-data/weather.json. Update the Blazor component at Client\Pages\FetchData.razor, by replacing the commented out line below, with the line not commented out:
protected override async Task OnInitializedAsync()
{
    // forecasts = await Http.GetFromJsonAsync<WeatherForecast[]>("sample-data/weather.json");
    forecasts = await Http.GetFromJsonAsync<WeatherForecast[]>("http://localhost:7071/api/WeatherForecast");
}
To run the Blazor client and Azure Function, you'll need to run the following two commands in separate consoles/terminals:
- At the root folder run
dotnet run --project Client - At the Api folder run
func start --cors "https://localhost:5001,http://localhost:5000"
The --cors argument is required to allow communication between localhost:5001 or localhost:5000 and the Azure Function at localhost:7071.
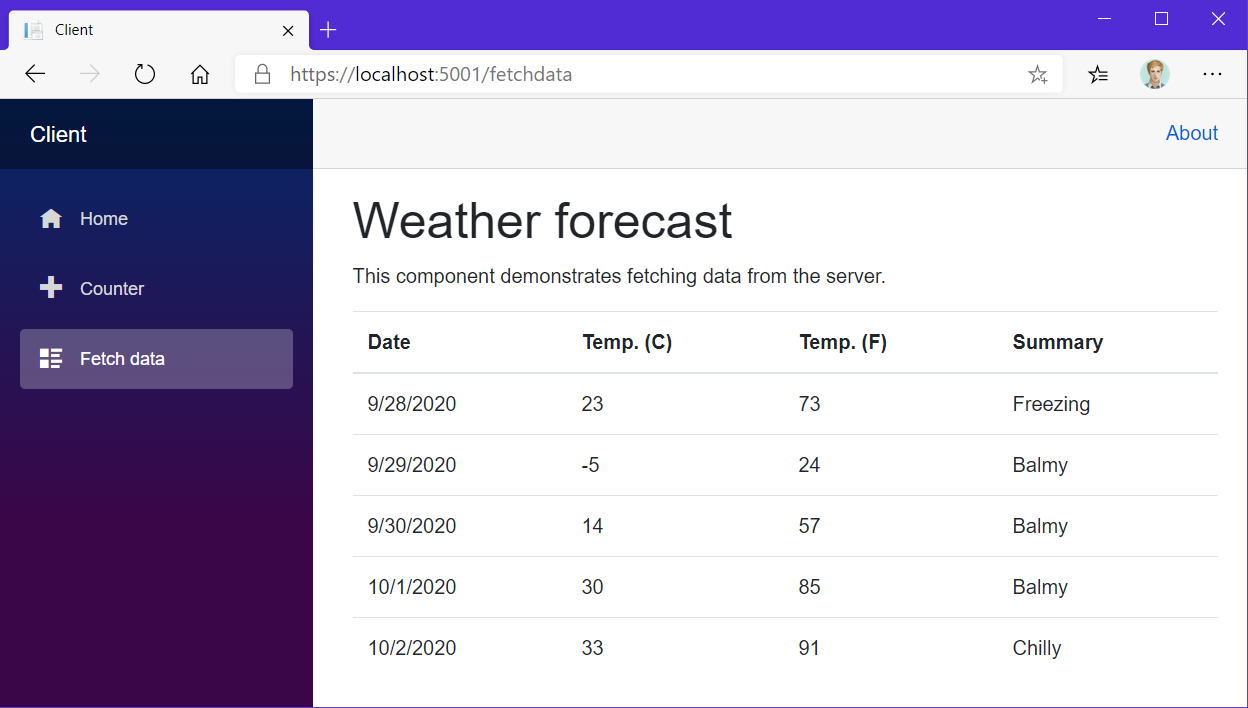
Browse to /fetchdata in your Blazor application and notice how the weather forecasts changes randomly with every refresh.
This works well locally, but the hardcoded URL http://localhost:7071/api/WeatherForecast won't work when anywhere but locally. To make this work both locally and elsewhere, update the following files:
Update Client\Program.cs:
using System;
using System.Net.Http;
using System.Threading.Tasks;
using Microsoft.AspNetCore.Components.WebAssembly.Hosting;
using Microsoft.Extensions.DependencyInjection;

namespace Client
{
    public class Program
    {
        public static async Task Main(string[] args)
        {
            var builder = WebAssemblyHostBuilder.CreateDefault(args);
            builder.RootComponents.Add<App>("app");

            // UPDATE
            var baseAddress = builder.Configuration["BaseAddress"] ?? builder.HostEnvironment.BaseAddress;
            builder.Services.AddScoped(sp => new HttpClient { BaseAddress = new Uri(baseAddress) });
            // END UPDATE

            await builder.Build().RunAsync();
        }
    }
}
Add Client\wwwroot\appsettings.Development.json:
{
  "BaseAddress": "http://localhost:7071/"
}
Update OnInitializedAsync at Client\Pages\FetchData.razor:
@page "/fetchdata"
@inject HttpClient Http

...

@code {
    ...
    protected override async Task OnInitializedAsync()
    {
        // UPDATE
        forecasts = await Http.GetFromJsonAsync<WeatherForecast[]>("/api/WeatherForecast");
        // END UPDATE
    }
    ...
}
Here's what changed:
- in
Startup.csan HttpClient is configured with a BaseAddress. This HttpClient is injected intoFetchDatausing dependency injection.- Locally, the base address will use the
BaseAddressfromappsettings.Development.jsonwhich ishttp://localhost:7071/. - In Azure Static Web Apps, the root address of the Blazor application will be used as the BaseAddress for the HttpClient because the appsettings file won't be deployed.
This will result in ajax calls being made tohttps://yourapp.azurestaticapps.net/api/weatherforecast.
Azure Static Web Apps will intercept any call made to/apiand forward it to the Azure Functions project.
- Locally, the base address will use the
- appsettings.Development.json will not be deployed to Azure Static Web Apps.
- FetchData.razor will receive an HttpClient from the Dependency Injection container and will make ajax calls to the right address whether it is hosted locally or on Azure Static Web Apps.
Push projects to GitHub #
Azure Static Web Apps requires your application source code to be inside of a GitHub repository.
First, you need to create a local Git repository and commit your source code to the repository using these commands:
# add the gitignore file tailored for dotnet applications, this will ignore bin/obj and many other non-source code files
dotnet new gitignore
# create the git repository
git init
# track all files that are not ignore by .gitignore
git add --all
# commit all changes to the repository
git commit -m "Initial commit"
Create a new GitHub repository (public or private). Copy the commands from the empty GitHub repository page under the title: "push an existing repository from the command line". Here's what it should looks like but with a different URL:
git remote add origin https://github.com/Swimburger/AzureSwaBlazorWasmDemo.git
git push -u origin master
These commands will push the repository up to GitHub.
Create Azure Static Web Application #
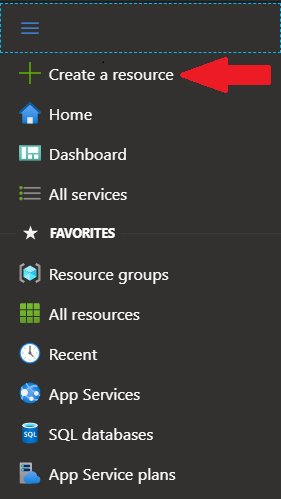
Navigate to the Azure Portal (portal.azure.com) and click on "Create a resource" in the navigation menu on the left.
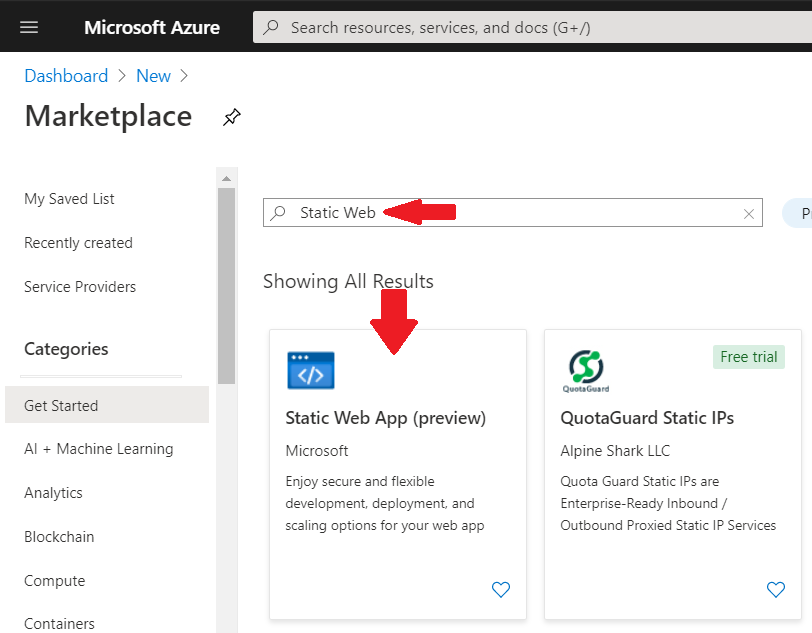
Search for 'Static Web App' and click on the 'Static Web App (preview)' card.
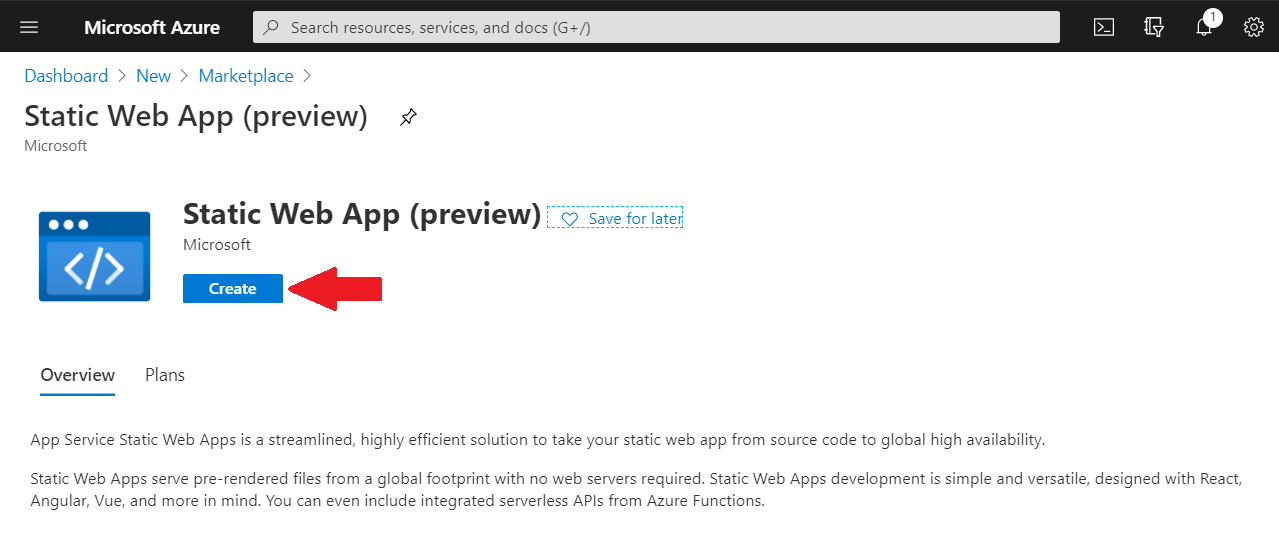
On the Static Web App details page, click the 'Create'-button.
Fill out the fields on the create static web app blade:

Click on the 'Sign in with GitHub' button. This will show a GitHub dialog prompting you to give permissions to Azure. These permissions are required so that Azure can commit the GitHub actions YAML-file for CI/CD and so GitHub can deploy to Azure.
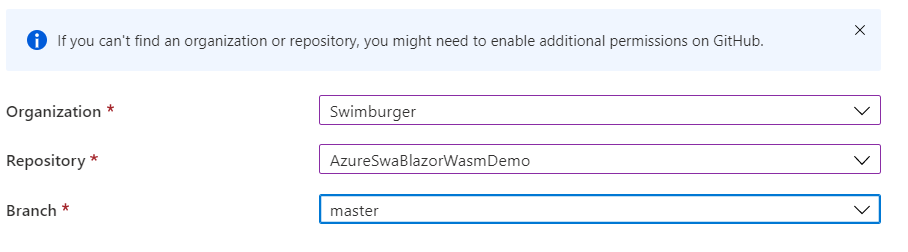
Now that you've connected GitHub to your Azure Static Web App, select your GitHub repository by filling out the 'Organization', 'Repository', and 'Branch' field.
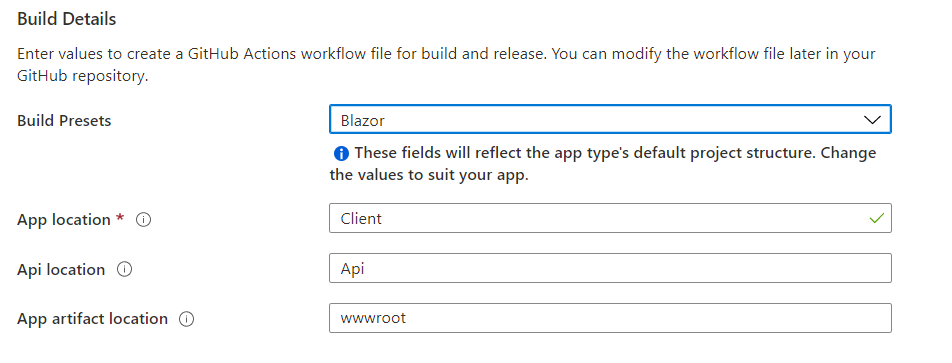
Once you have selected your Git repository, the 'Build Details' section will show up.
In the 'Build Presets' dropdown, select Blazor. This will prefill the next fields:
- App location: Client
This is the folder of your Blazor WASM project. - Api location: Api
This is the folder for your Azure Functions. - App artifact location: wwwroot
Specify the 'wwwroot' subfolder. When GitHub Actions builds your Blazor project, it will grab the files from the published 'wwwroot' folder.
These fields will be used to create a GitHub Actions Workflow YAML-file.
Next, click the 'Review + create' button and then click the 'Create' button.
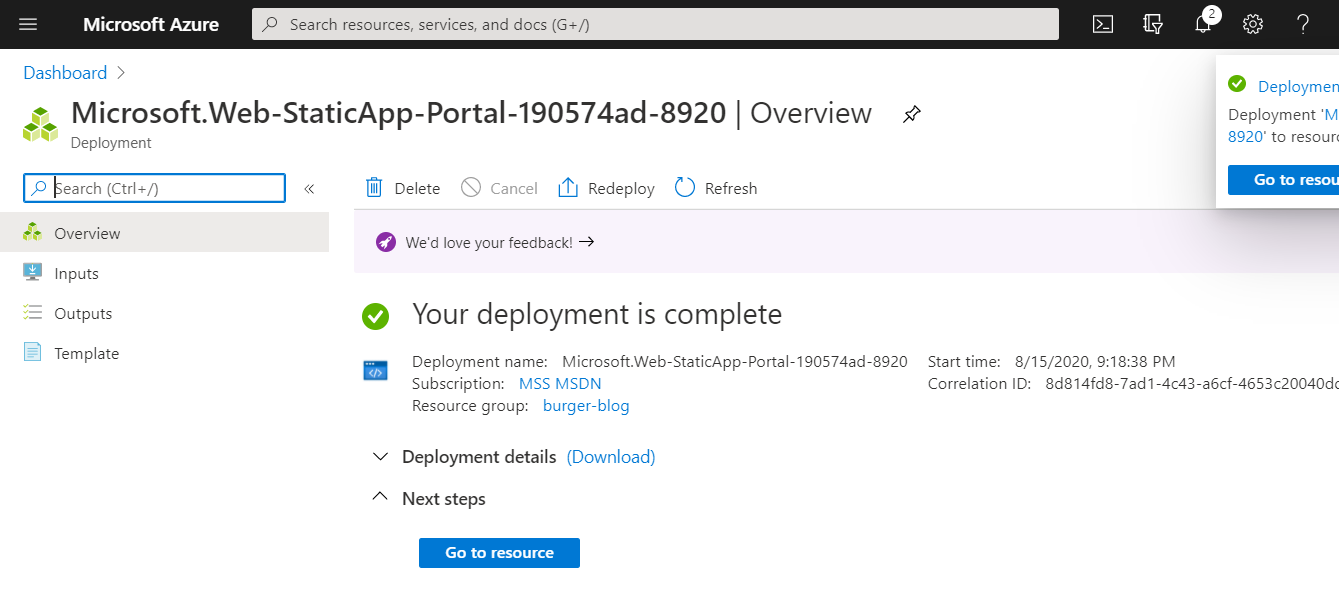
Wait for the deployment to complete and then click the 'Go to resource' button:
On the overview page of your Azure Static Web App you will find a lot of links:
- URL: this is where your web app is hosted
- Source: this is a link to the selected branch in your GitHub repository
- Deployment history: this is a link to GitHub Action in your GitHub repository
- Workflow file: this is a link to the GitHub Actions YAML file in your GitHub repository.
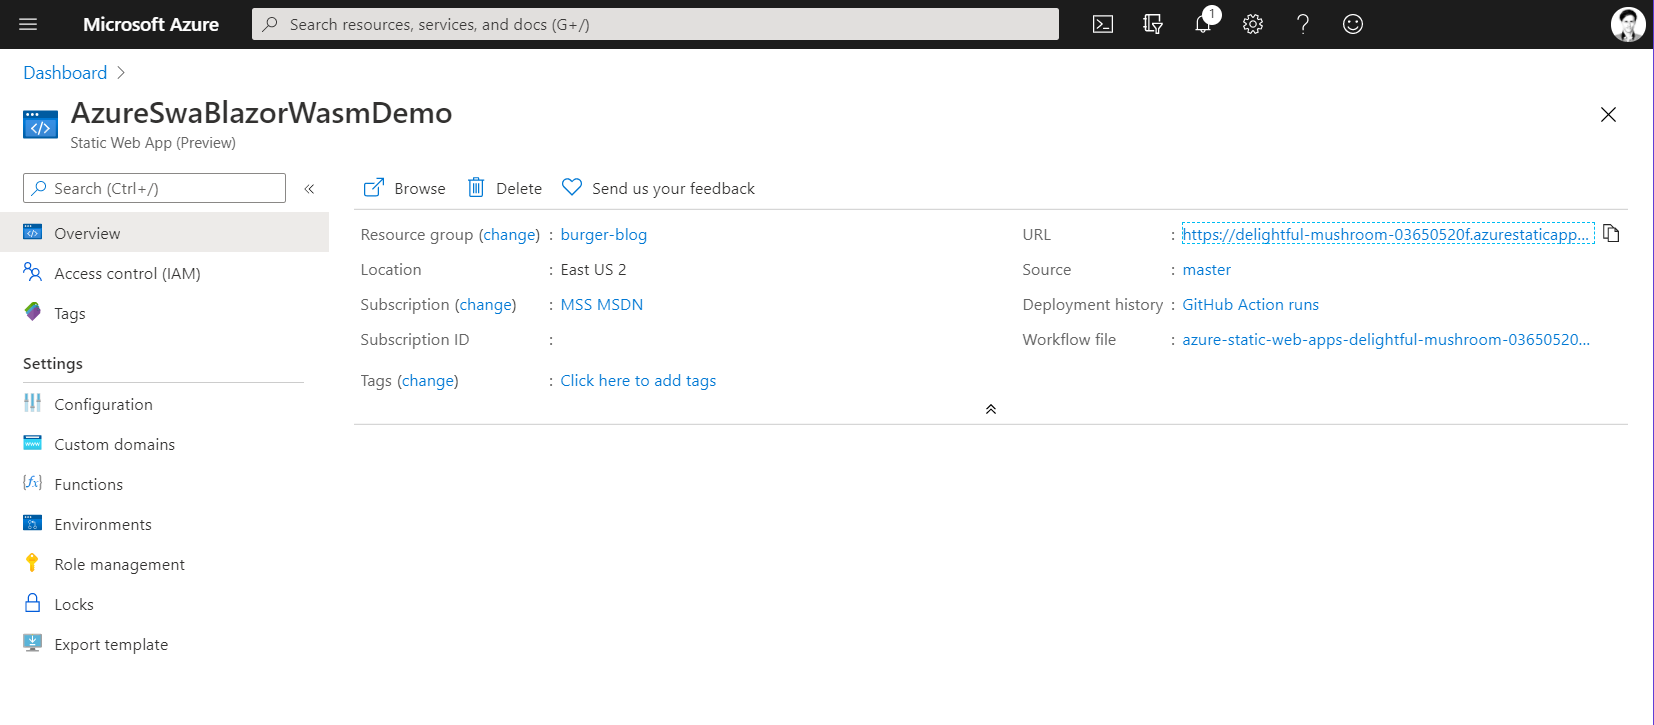
Click on the URL to view your new static web app. At this point, your Blazor application should've been deployed. If not wait a little and refresh the page.
GitHub Actions YAML file explained #
You might be wondering, how did Azure/GitHub know how to build and deploy my application? Let's take a look at the GitHub Actions YAML file that Azure generated and committed into our GitHub repository:
name: Azure Static Web Apps CI/CD

on:
  push:
    branches:
      - master
  pull_request:
    types: [opened, synchronize, reopened, closed]
    branches:
      - master

jobs:
  build_and_deploy_job:
    if: github.event_name == 'push' || (github.event_name == 'pull_request' && github.event.action != 'closed')
    runs-on: ubuntu-latest
    name: Build and Deploy Job
    steps:
      - uses: actions/checkout@v2
        with:
          submodules: true
      - name: Build And Deploy
        id: builddeploy
        uses: Azure/static-web-apps-deploy@v0.0.1-preview
        with:
          azure_static_web_apps_api_token: ${{ secrets.AZURE_STATIC_WEB_APPS_API_TOKEN_PROUD_FLOWER_0EB79A90F }}
          repo_token: ${{ secrets.GITHUB_TOKEN }} # Used for Github integrations (i.e. PR comments)
          action: "upload"
          ###### Repository/Build Configurations - These values can be configured to match you app requirements. ######
          # For more information regarding Static Web App workflow configurations, please visit: https://aka.ms/swaworkflowconfig
          app_location: "Client" # App source code path
          api_location: "Api" # Api source code path - optional
          app_artifact_location: "wwwroot" # Built app content directory - optional
          ###### End of Repository/Build Configurations ######

  close_pull_request_job:
    if: github.event_name == 'pull_request' && github.event.action == 'closed'
    runs-on: ubuntu-latest
    name: Close Pull Request Job
    steps:
      - name: Close Pull Request
        id: closepullrequest
        uses: Azure/static-web-apps-deploy@v0.0.1-preview
        with:
          azure_static_web_apps_api_token: ${{ secrets.AZURE_STATIC_WEB_APPS_API_TOKEN_PROUD_FLOWER_0EB79A90F }}
          action: "close"
The first section 'on' instructs GitHub Actions when to run the workflow. The workflow will run every time a commit is pushed to the master-branch and every time a pull request is made against the master branch.
on:
  push:
    branches:
      - master
  pull_request:
    types: [opened, synchronize, reopened, closed]
    branches:
      - master
The if statements makes it so build_and_deploy_job will always run except when a pull request is closed.runs-on specifies the job to run on an Ubuntu VM. The first step under steps of the job will checkout the latest code from the master branch.
The next step will use Azure's 'static-web-apps-deploy' Action. This Action will build, deploy your code, and also create environments for pull requests. This GitHub Action is hiding all of the 'magic', but more on that later.
For more information on this action and how to configure it, you can read the Microsoft documentation: "GitHub Actions workflows for Azure Static Web Apps Preview".
In the with section, you will find the parameters you configured when creating the Azure resource. The other parameters are secrets created by Azure when you created the Azure Static Web App. These secrets are used to authenticate and securely perform actions in Azure and in GitHub.
jobs:
  build_and_deploy_job:
    if: github.event_name == 'push' || (github.event_name == 'pull_request' && github.event.action != 'closed')
    runs-on: ubuntu-latest
    name: Build and Deploy Job
    steps:
      - uses: actions/checkout@v2
        with:
          submodules: true
      - name: Build And Deploy
        id: builddeploy
        uses: Azure/static-web-apps-deploy@v0.0.1-preview
        with:
          azure_static_web_apps_api_token: ${{ secrets.AZURE_STATIC_WEB_APPS_API_TOKEN_PROUD_FLOWER_0EB79A90F }}
          repo_token: ${{ secrets.GITHUB_TOKEN }} # Used for Github integrations (i.e. PR comments)
          action: "upload"
          ###### Repository/Build Configurations - These values can be configured to match you app requirements. ######
          # For more information regarding Static Web App workflow configurations, please visit: https://aka.ms/swaworkflowconfig
          app_location: "Client" # App source code path
          api_location: "Api" # Api source code path - optional
          app_artifact_location: "wwwroot" # Built app content directory - optional
          ###### End of Repository/Build Configurations ######
The next job will only run if a pull request is closed as specified by the if property. This will use the same Azure GitHub Action but the action parameter under the with section is set to 'close'.
This step will delete the environment in Azure that was generated automatically when a pull request was opened against the master-branch.
  close_pull_request_job:
    if: github.event_name == 'pull_request' && github.event.action == 'closed'
    runs-on: ubuntu-latest
    name: Close Pull Request Job
    steps:
      - name: Close Pull Request
        id: closepullrequest
        uses: Azure/static-web-apps-deploy@v0.0.1-preview
        with:
          azure_static_web_apps_api_token: ${{ secrets.AZURE_STATIC_WEB_APPS_API_TOKEN_PROUD_FLOWER_0EB79A90F }}
          action: "close"
Now, you still might be wondering, how did this 'static-web-apps-deploy' GitHub Action actually know how to build the Blazor application without any hints of it being a .NET Core application?
The GitHub repository of the action readme notes it uses another open-source project by Microsoft called 'Oryx'.
"Oryx is a build system which automatically compiles source code repos into runnable artifacts. It is used to build web apps for Azure App Service and other platforms."
- Oryx GitHub readme.md
When you poke around the project and its source code, you learn that this project tries to build any source code without giving it build instructions or other hints. Oryx will attempt to detect the type of project by scanning through your source code and based on that run the build commands.
You can see this in action by looking at the logs of your GitHub Action Workflow runs. Navigate to details of your GitHub Actions Workflows and inspect the logs:
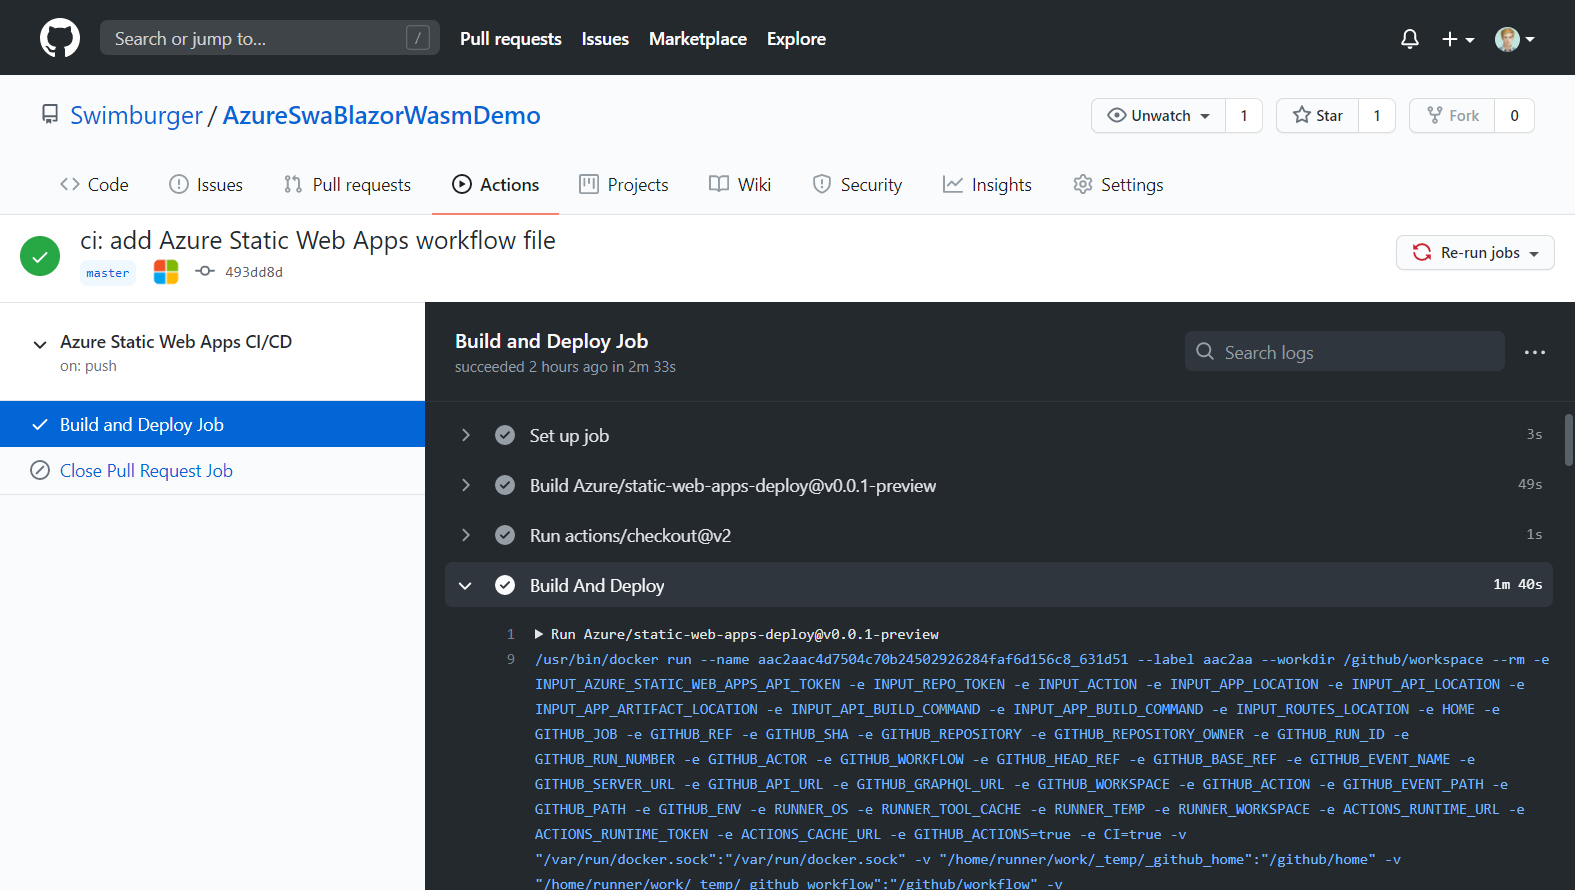
Under Build And Deploy you will find the familiar output of the .NET Core publish command:
Starting to build app with Oryx
Azure Static Web Apps utilizes Oryx to build both static applications and Azure Functions. You can find more details on Oryx here: https://github.com/microsoft/Oryx
---Oryx build logs---


Operation performed by Microsoft Oryx, https://github.com/Microsoft/Oryx
You can report issues at https://github.com/Microsoft/Oryx/issues

Oryx Version: 0.2.20200719.1, Commit: 80603ef82312ab8b6d950149f332638c5707de74, ReleaseTagName: 20200719.1

Build Operation ID: |IuZ/1SZ+OuM=.e7ee18e8_
Repository Commit : 61dc6f43a550eb495c25379fcbc66f9e22c96823

Detecting platforms...
Detected following platforms:
  dotnet: 3.1.8
Version '3.1.8' of platform 'dotnet' is not installed. Generating script to install it...


Source directory     : /github/workspace/Client
Destination directory: /bin/staticsites/ss-oryx/app


Downloading and extracting dotnet version 3.1.402 to /tmp/oryx/platforms/dotnet/sdks/3.1.402...
Downloaded in 2 sec(s).
Verifying checksum...
Extracting contents...
Done in 6 sec(s).


Using .NET Core SDK Version: 3.1.402

Welcome to .NET Core 3.1!
---------------------
SDK Version: 3.1.402

Telemetry
---------
The .NET Core tools collect usage data in order to help us improve your experience. The data is anonymous. It is collected by Microsoft and shared with the community. You can opt-out of telemetry by setting the DOTNET_CLI_TELEMETRY_OPTOUT environment variable to '1' or 'true' using your favorite shell.

Read more about .NET Core CLI Tools telemetry: https://aka.ms/dotnet-cli-telemetry

----------------
Explore documentation: https://aka.ms/dotnet-docs
Report issues and find source on GitHub: https://github.com/dotnet/core
Find out what's new: https://aka.ms/dotnet-whats-new
Learn about the installed HTTPS developer cert: https://aka.ms/aspnet-core-https
Use 'dotnet --help' to see available commands or visit: https://aka.ms/dotnet-cli-docs
Write your first app: https://aka.ms/first-net-core-app
--------------------------------------------------------------------------------------
  Determining projects to restore...
  Restored /github/workspace/Client/Client.csproj (in 2.05 sec).

Publishing to directory /bin/staticsites/ss-oryx/app...

Microsoft (R) Build Engine version 16.7.0+7fb82e5b2 for .NET
Copyright (C) Microsoft Corporation. All rights reserved.

  Determining projects to restore...
  All projects are up-to-date for restore.
  Client -> /github/workspace/Client/bin/Release/netstandard2.1/Client.dll
  Client (Blazor output) -> /github/workspace/Client/bin/Release/netstandard2.1/wwwroot
  Client -> /bin/staticsites/ss-oryx/app/

Removing existing manifest file
Creating a manifest file...
Manifest file created.

Done in 31 sec(s).


---End of Oryx build logs---
Finished building app with Oryx
Starting to build function app with Oryx
---Oryx build logs---


Operation performed by Microsoft Oryx, https://github.com/Microsoft/Oryx
You can report issues at https://github.com/Microsoft/Oryx/issues

Oryx Version: 0.2.20200719.1, Commit: 80603ef82312ab8b6d950149f332638c5707de74, ReleaseTagName: 20200719.1

Build Operation ID: |EUVmP4lReLM=.a5668776_
Repository Commit : 61dc6f43a550eb495c25379fcbc66f9e22c96823

Detecting platforms...
Detected following platforms:
  dotnet: 3.1.8


Source directory     : /github/workspace/Api
Destination directory: /bin/staticsites/ss-oryx/api


Using .NET Core SDK Version: 3.1.402
  Determining projects to restore...
  Restored /github/workspace/Api/Api.csproj (in 6.44 sec).

Publishing to directory /bin/staticsites/ss-oryx/api...

Microsoft (R) Build Engine version 16.7.0+7fb82e5b2 for .NET
Copyright (C) Microsoft Corporation. All rights reserved.

  Determining projects to restore...
  All projects are up-to-date for restore.
  Api -> /github/workspace/Api/bin/Release/netcoreapp3.1/bin/Api.dll
  Api -> /bin/staticsites/ss-oryx/api/

Removing existing manifest file
Creating a manifest file...
Manifest file created.

Done in 11 sec(s).


---End of Oryx build logs---
Oryx installs the .NET Core 3.1 SDK and then runs a dotnet publish.
If for some reason the default behavior of Oryx is undesirable, you can override the build command by adding an extra parameter app_build_command to the Static Site action or build your application in an earlier step.
Fix 404's with SPA routing rule #
You will be greeted with a 404 page if you navigate to the counter or fetch data page and then refresh the page.
You can resolve this by telling Azure Static Web Apps to reroute all requests to the index.html file if no file at the requested path was found. To do this create a routes.json file at Client\wwwroot\routes.json with the following contents:
{
  "routes": [
    {
      "route": "/*",
      "serve": "/index.html",
      "statusCode": 200
    }
  ]
}
This routes.json file has to be uploaded to the root of the Azure Static Web App and that's why it has to be in the wwwroot-folder. To learn more about the capabilities of the routes.json file, check out Microsoft's documentation.
Stage, commit, and push the changes to the GitHub repository and wait for your application to be redeployed:
git add *
git commit -m "Add routes.json"
git push
Browsing directly to /counter or /fetchdata or refreshing these pages should no longer result in 404 errors.
Bonus: Create a pull request #
When you create a pull request to your master branch, a new environment will automatically be created which hosts the version of your application in that pull request.
Create a new branch by running this command:
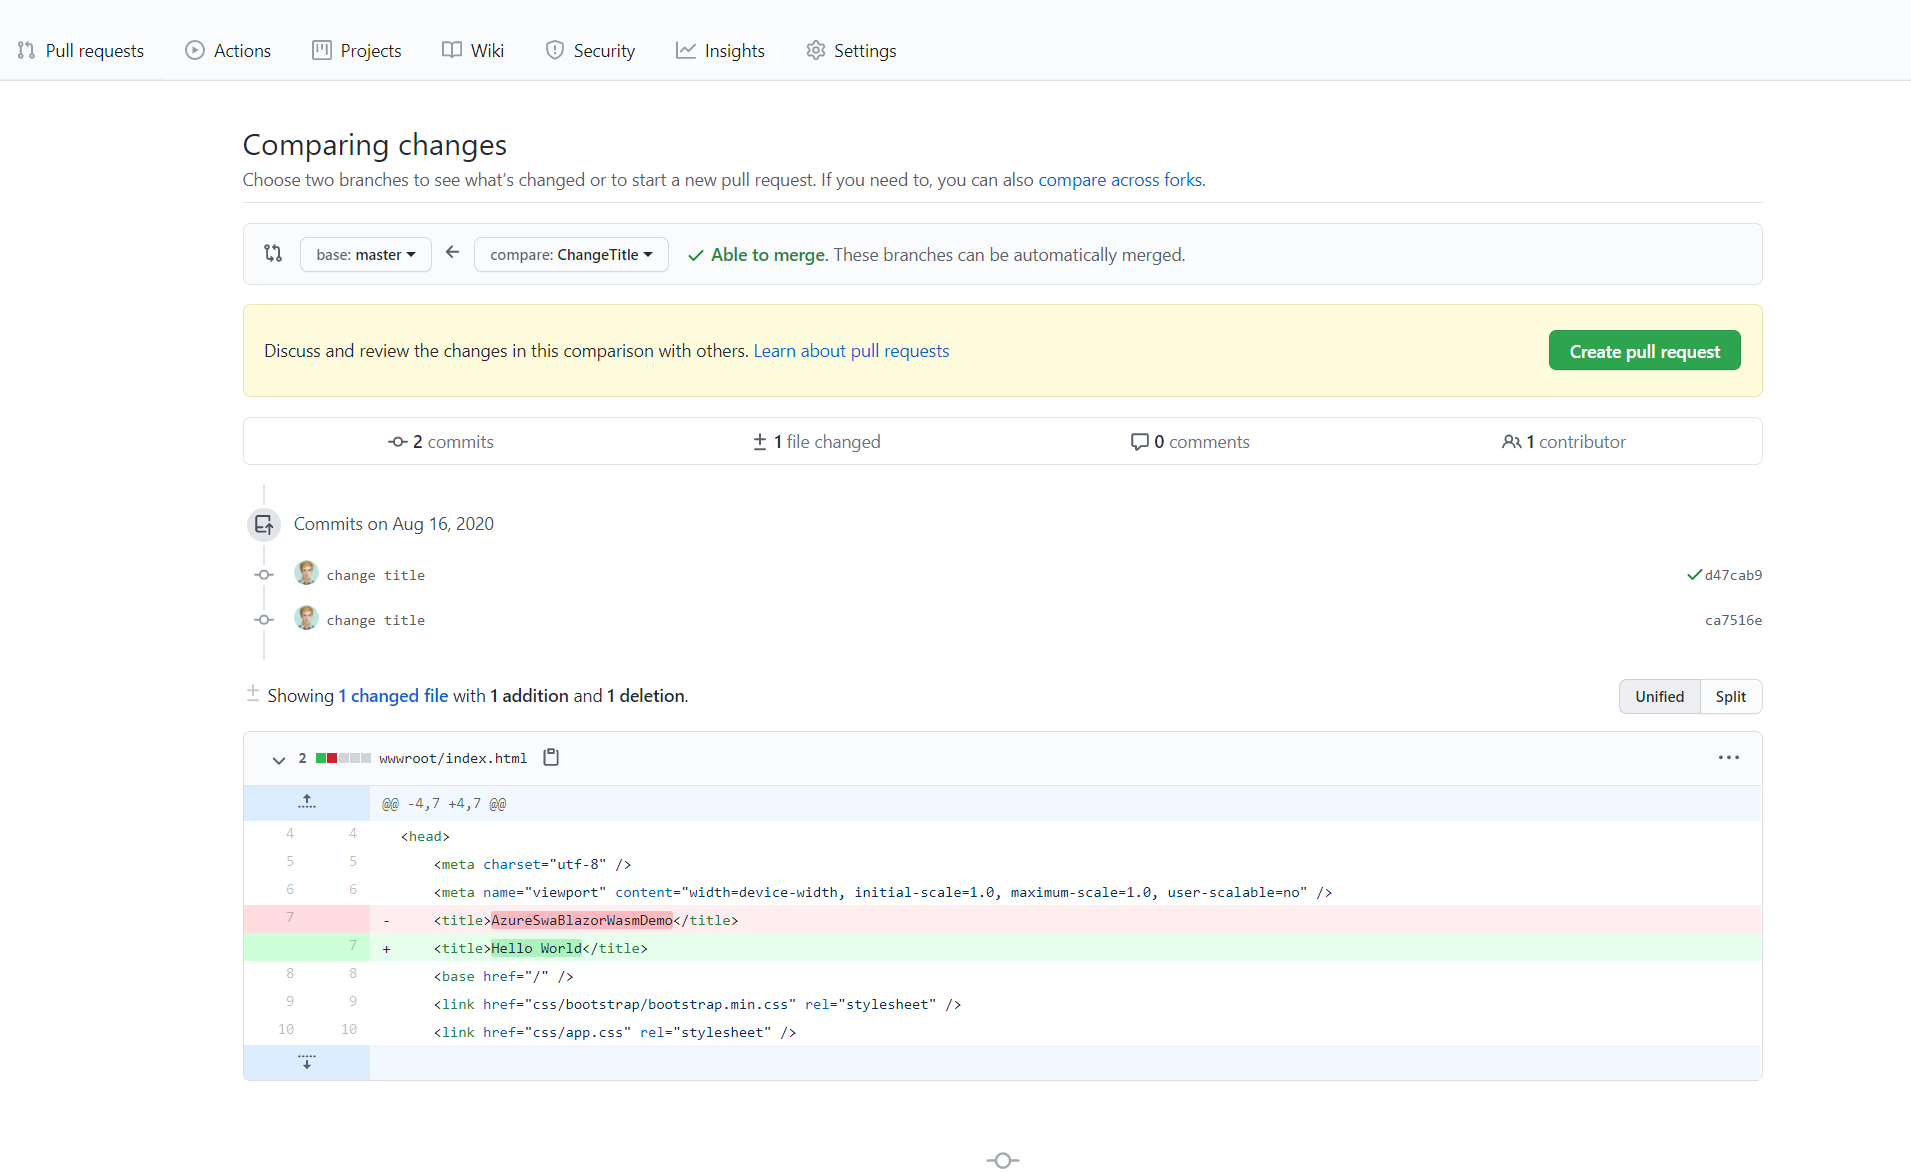
git checkout -b ChangeTitle
Change the title tag text inside of wwwroot/index.html to "Hello".
Run the following script to commit the change and push the branch to GitHub:
git add --all
git commit -m "change title"
git push --set-upstream origin ChangeTitle
Navigate to your GitHub repository and click on the "Pull Requests tab". Click on the "New pull request" button.
Select the 'ChangeTitle' branch as the second dropdown, click 'Create pull request' and click 'Create pull request' again.
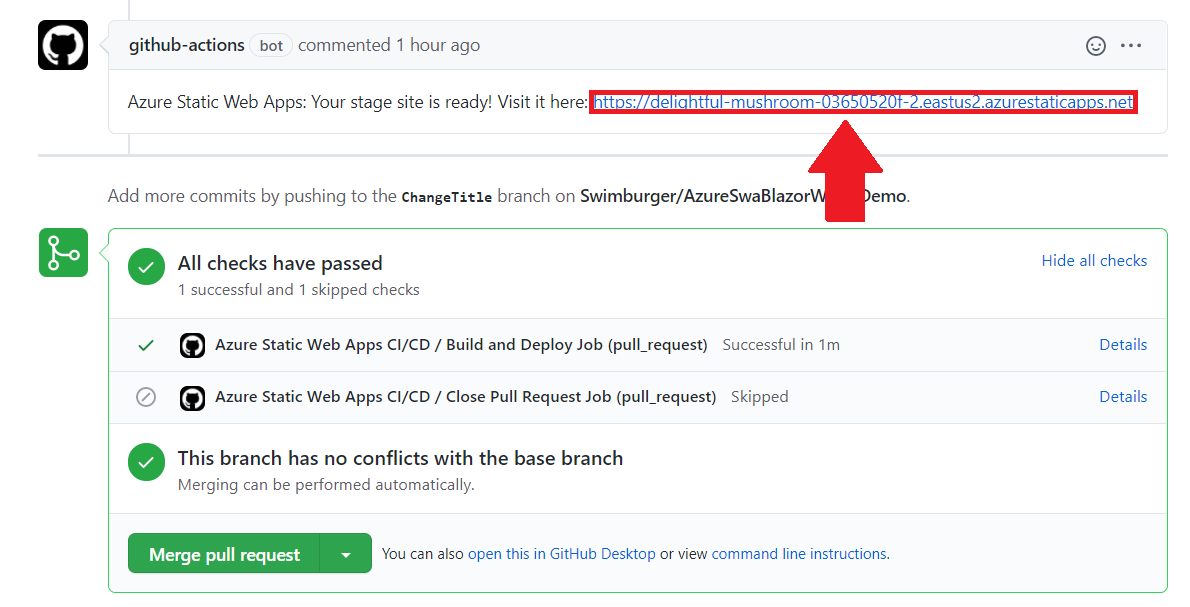
The GitHub Action Workflow will automatically run for your pull request. Once finished, Azure will leave a comment on your pull request with the URL to the new environment where your code change is hosted.
If you close the pull request the workflow will run again, but this time the workflow will delete your environment.
Summary #
Azure Static Web Apps will automatically generate a CI/CD pipeline for you using GitHub Actions. The Azure Static Web App action knows how to build your application automagically by using Oryx. Oryx scans your code to detect what type of code it is dealing with and attempts to run the right build commands for you. You can provide the build command yourself or customize the GitHub Actions YAML to build your project before passing the result to the Static Web Apps action.