


How to deploy Blazor WebAssembly to Netlify

With ASP.NET Blazor WebAssembly (WASM) you can create .NET web applications that run completely inside of the browser sandbox. The published output of a Blazor WASM project are static files. Now that you can run .NET web applications without server-side code, you can deploy these applications to various static site hosts, such as Netlify.
Here are some other tutorials if you're interested in hosting Blazor WASM on other static site hosts:
- Azure Static Web Apps using GitHub
- Azure Static Web Apps using Azure DevOps (by Dave Brock)
- AWS Amplify
- Cloudflare Pages
- DigitalOcean App Platform
- Heroku
- GitHub Pages
- Firebase Hosting
This walkthrough will show you how to deploy Blazor WASM to Netlify. Netlify is a very popular static site host, but on top of hosting static sites, Netlify offers a ton of free and paid features which gives it an edge over the competition.
This guide will walk you through these high-level steps:
- Create Blazor WebAssembly project
- Commit the project to a Git repository
- Create a new GitHub project and push the Git repository to GitHub
- Create a new Netlify site
- Rewrite all requests to index.html
Prerequisites:
- .NET CLI
- Git
- GitHub account
- Netlify account
You can find the source code for this guide on GitHub.
Create Blazor WebAssembly project
Run the following commands to create a new Blazor WASM project:
mkdir BlazorWasmNetlify
cd BlazorWasmNetlify
dotnet new blazorwasm
In this tutorial, the Blazor WASM project is purposely put into the src subfolder to keep source code separate from other assets.
To give your application a try, execute dotnet run and browse to the URL in the output (probably https://localhost:5001):
dotnet run
# Building...
# info: Microsoft.Hosting.Lifetime[0]
#       Now listening on: https://localhost:5001
# info: Microsoft.Hosting.Lifetime[0]
#       Now listening on: http://localhost:5000
# info: Microsoft.Hosting.Lifetime[0]
#       Application started. Press Ctrl+C to shut down.
# info: Microsoft.Hosting.Lifetime[0]
#       Hosting environment: Development
# info: Microsoft.Hosting.Lifetime[0]
#       Content root path: C:\Users\niels\source\repos\BlazorWasmNetlify
# info: Microsoft.Hosting.Lifetime[0]
#       Application is shutting down...
Optional: You can use the dotnet publish command to publish the project and verify the output:
dotnet publish
# Microsoft (R) Build Engine version 16.8.0+126527ff1 for .NET
# Copyright (C) Microsoft Corporation. All rights reserved.
#
#   Determining projects to restore...
#   All projects are up-to-date for restore.
#   BlazorWasmNetlify -> C:\Users\niels\source\repos\BlazorWasmNetlify\bin\Debug\net5.0\BlazorWasmNetlify.dll
#   BlazorWasmNetlify (Blazor output) -> C:\Users\niels\source\repos\BlazorWasmNetlify\bin\Debug\net5.0\wwwroot  Optimizing assemblies for size, which may change the behavior of the app. Be sure to test after publishing. See: https://aka.ms/dotnet-illink
#   Compressing Blazor WebAssembly publish artifacts. This may take a while...
#   BlazorWasmNetlify -> C:\Users\niels\source\repos\BlazorWasmNetlify\bin\Debug\net5.0\publish\
In the publish directory, you will find a web.config file and a wwwroot folder. The config file helps you host your application in IIS, but you don't need that file for static site hosts. Everything you need will be inside of the wwwroot folder. The wwwroot folder contains the index.html, CSS, JS, and DLL files necessary to run the Blazor application.
Push Blazor project to GitHub
For this walkthrough, your application source code must be inside of a GitHub repository.
First, you need to create a local Git repository and commit your source code to the repository using these commands:
# add the gitignore file tailored for dotnet applications, this will ignore bin/obj and many other non-source code files
dotnet new gitignore
# create the git repository
git init
# track all files that are not ignore by .gitignore
git add --all
# commit all changes to the repository
git commit -m "Initial commit"
Create a new GitHub repository (instructions) and copy the commands to "push an existing repository from the command line" from the empty GitHub repository page, here's what it should look like but with a different URL:
git remote add origin https://github.com/Swimburger/BlazorWasmNetlify.git
git push -u origin main
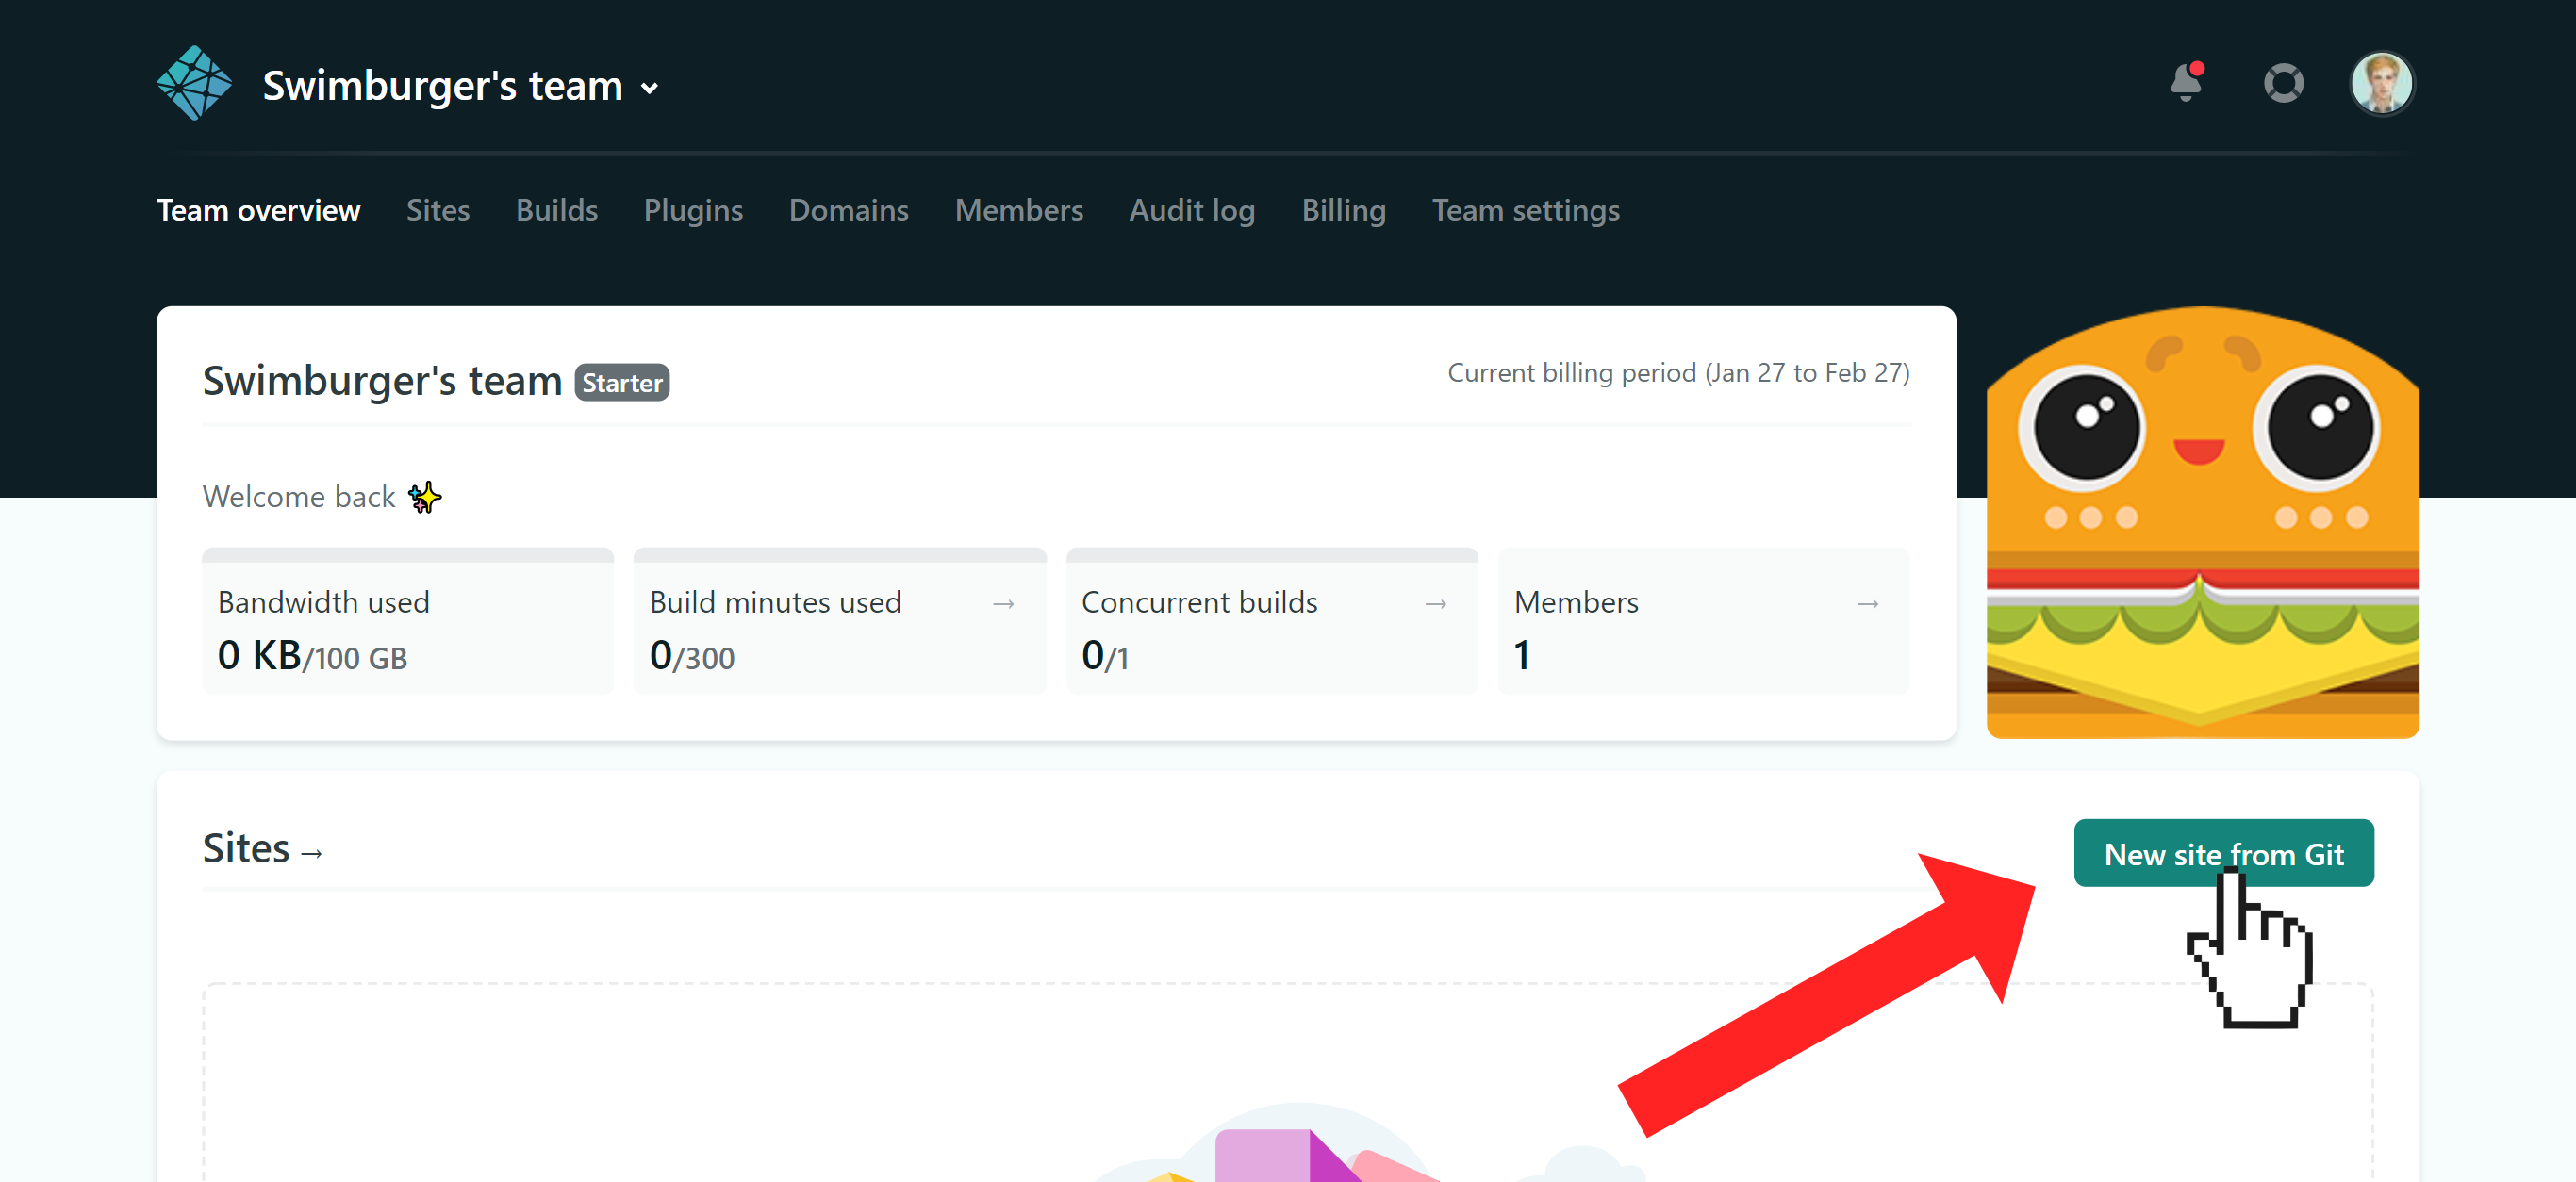
Create the Netlify site #
Log into Netlify and click on the "New site from Git" button on your Team page:
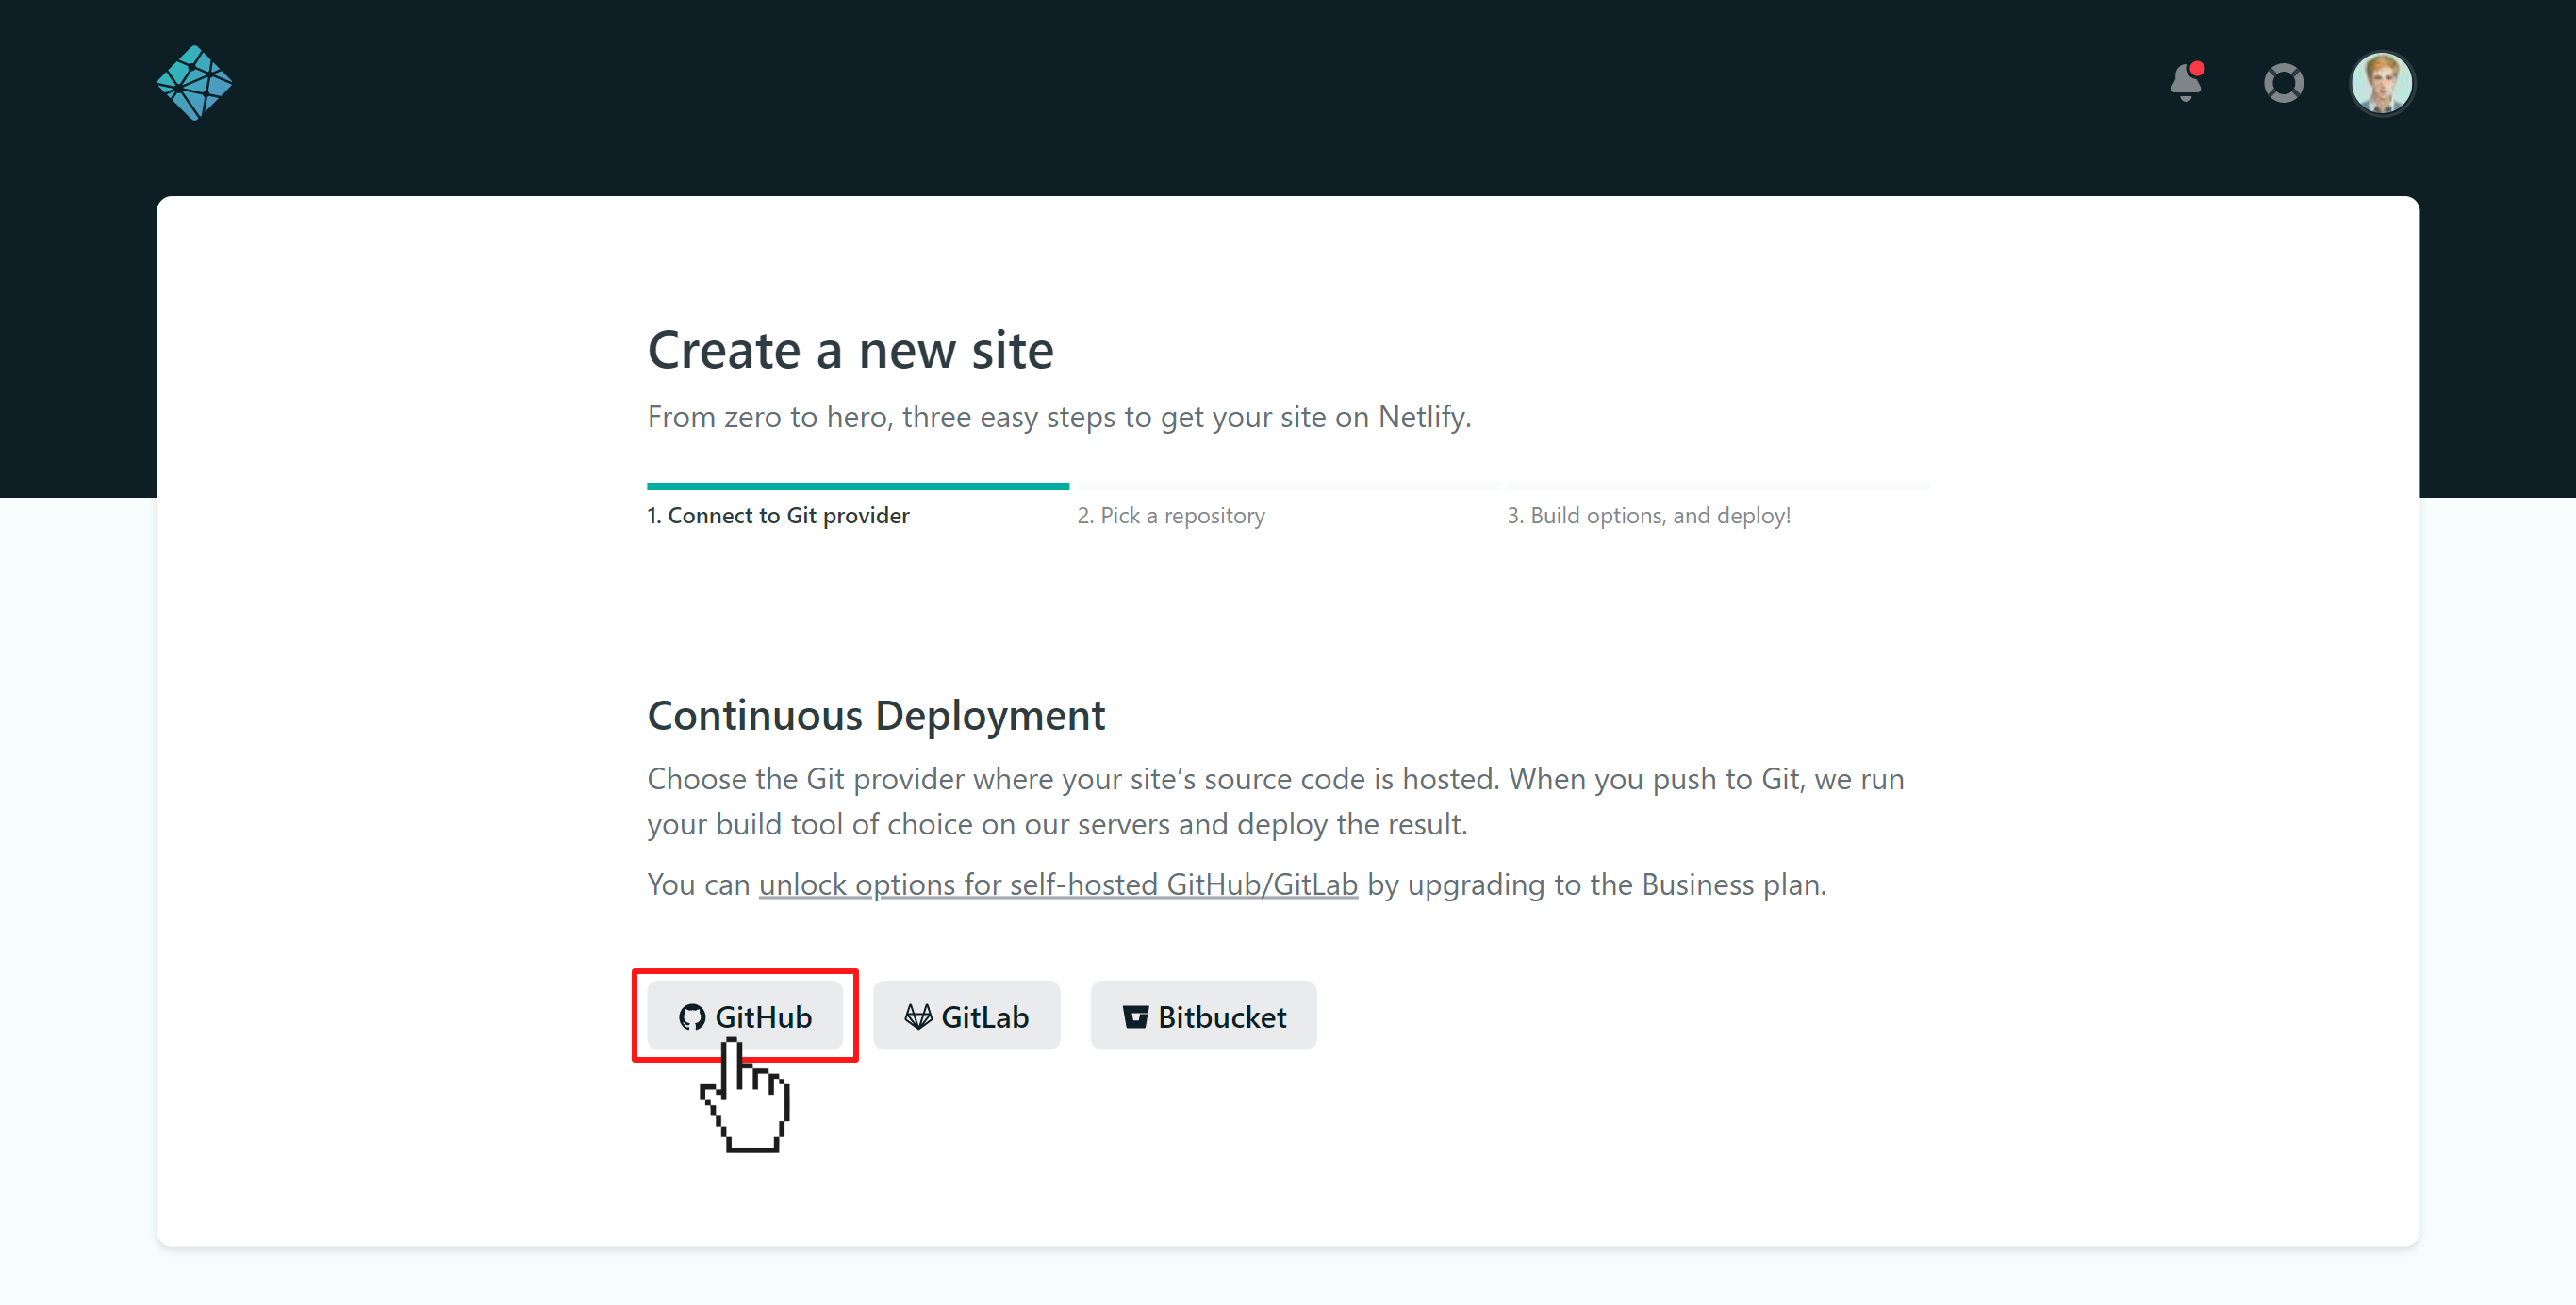
Click on the GitHub button. This will open a new window that will take you through giving Netlify permissions to your GitHub account. Give Netlify the necessary permissions and at least give Netlify access to the GitHub repository you just created.
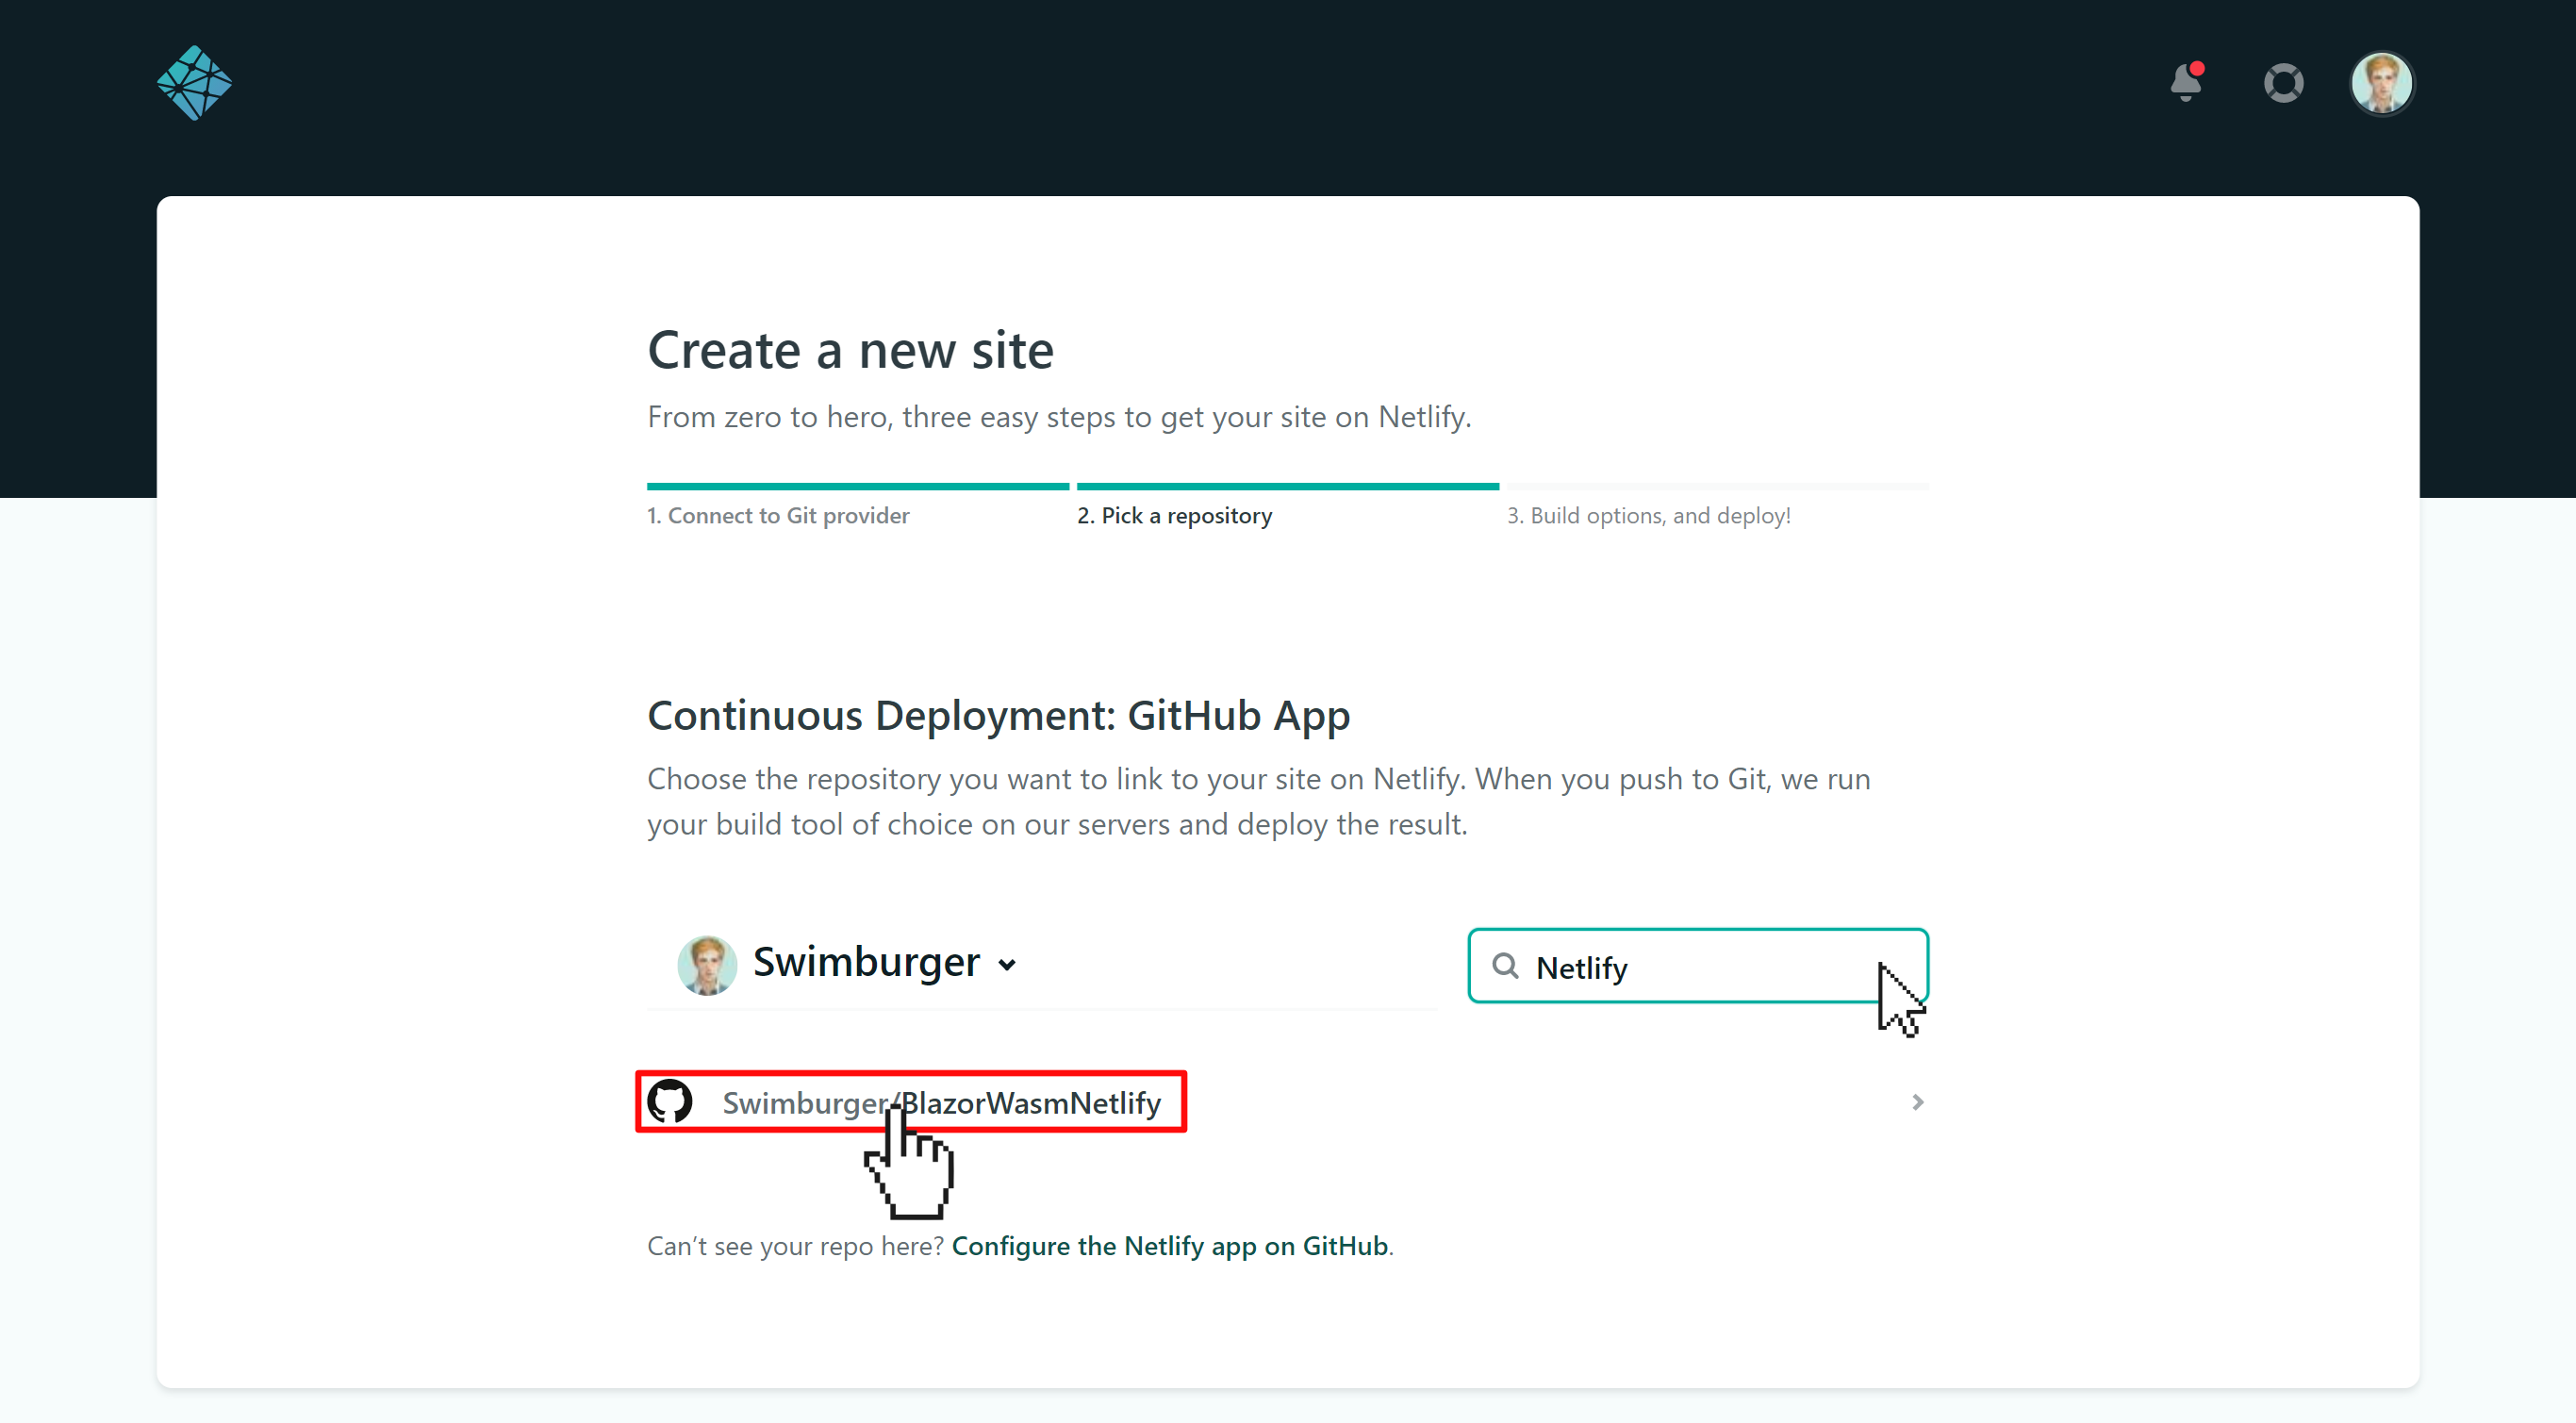
On the second step, search for your GitHub repository and select the repository.
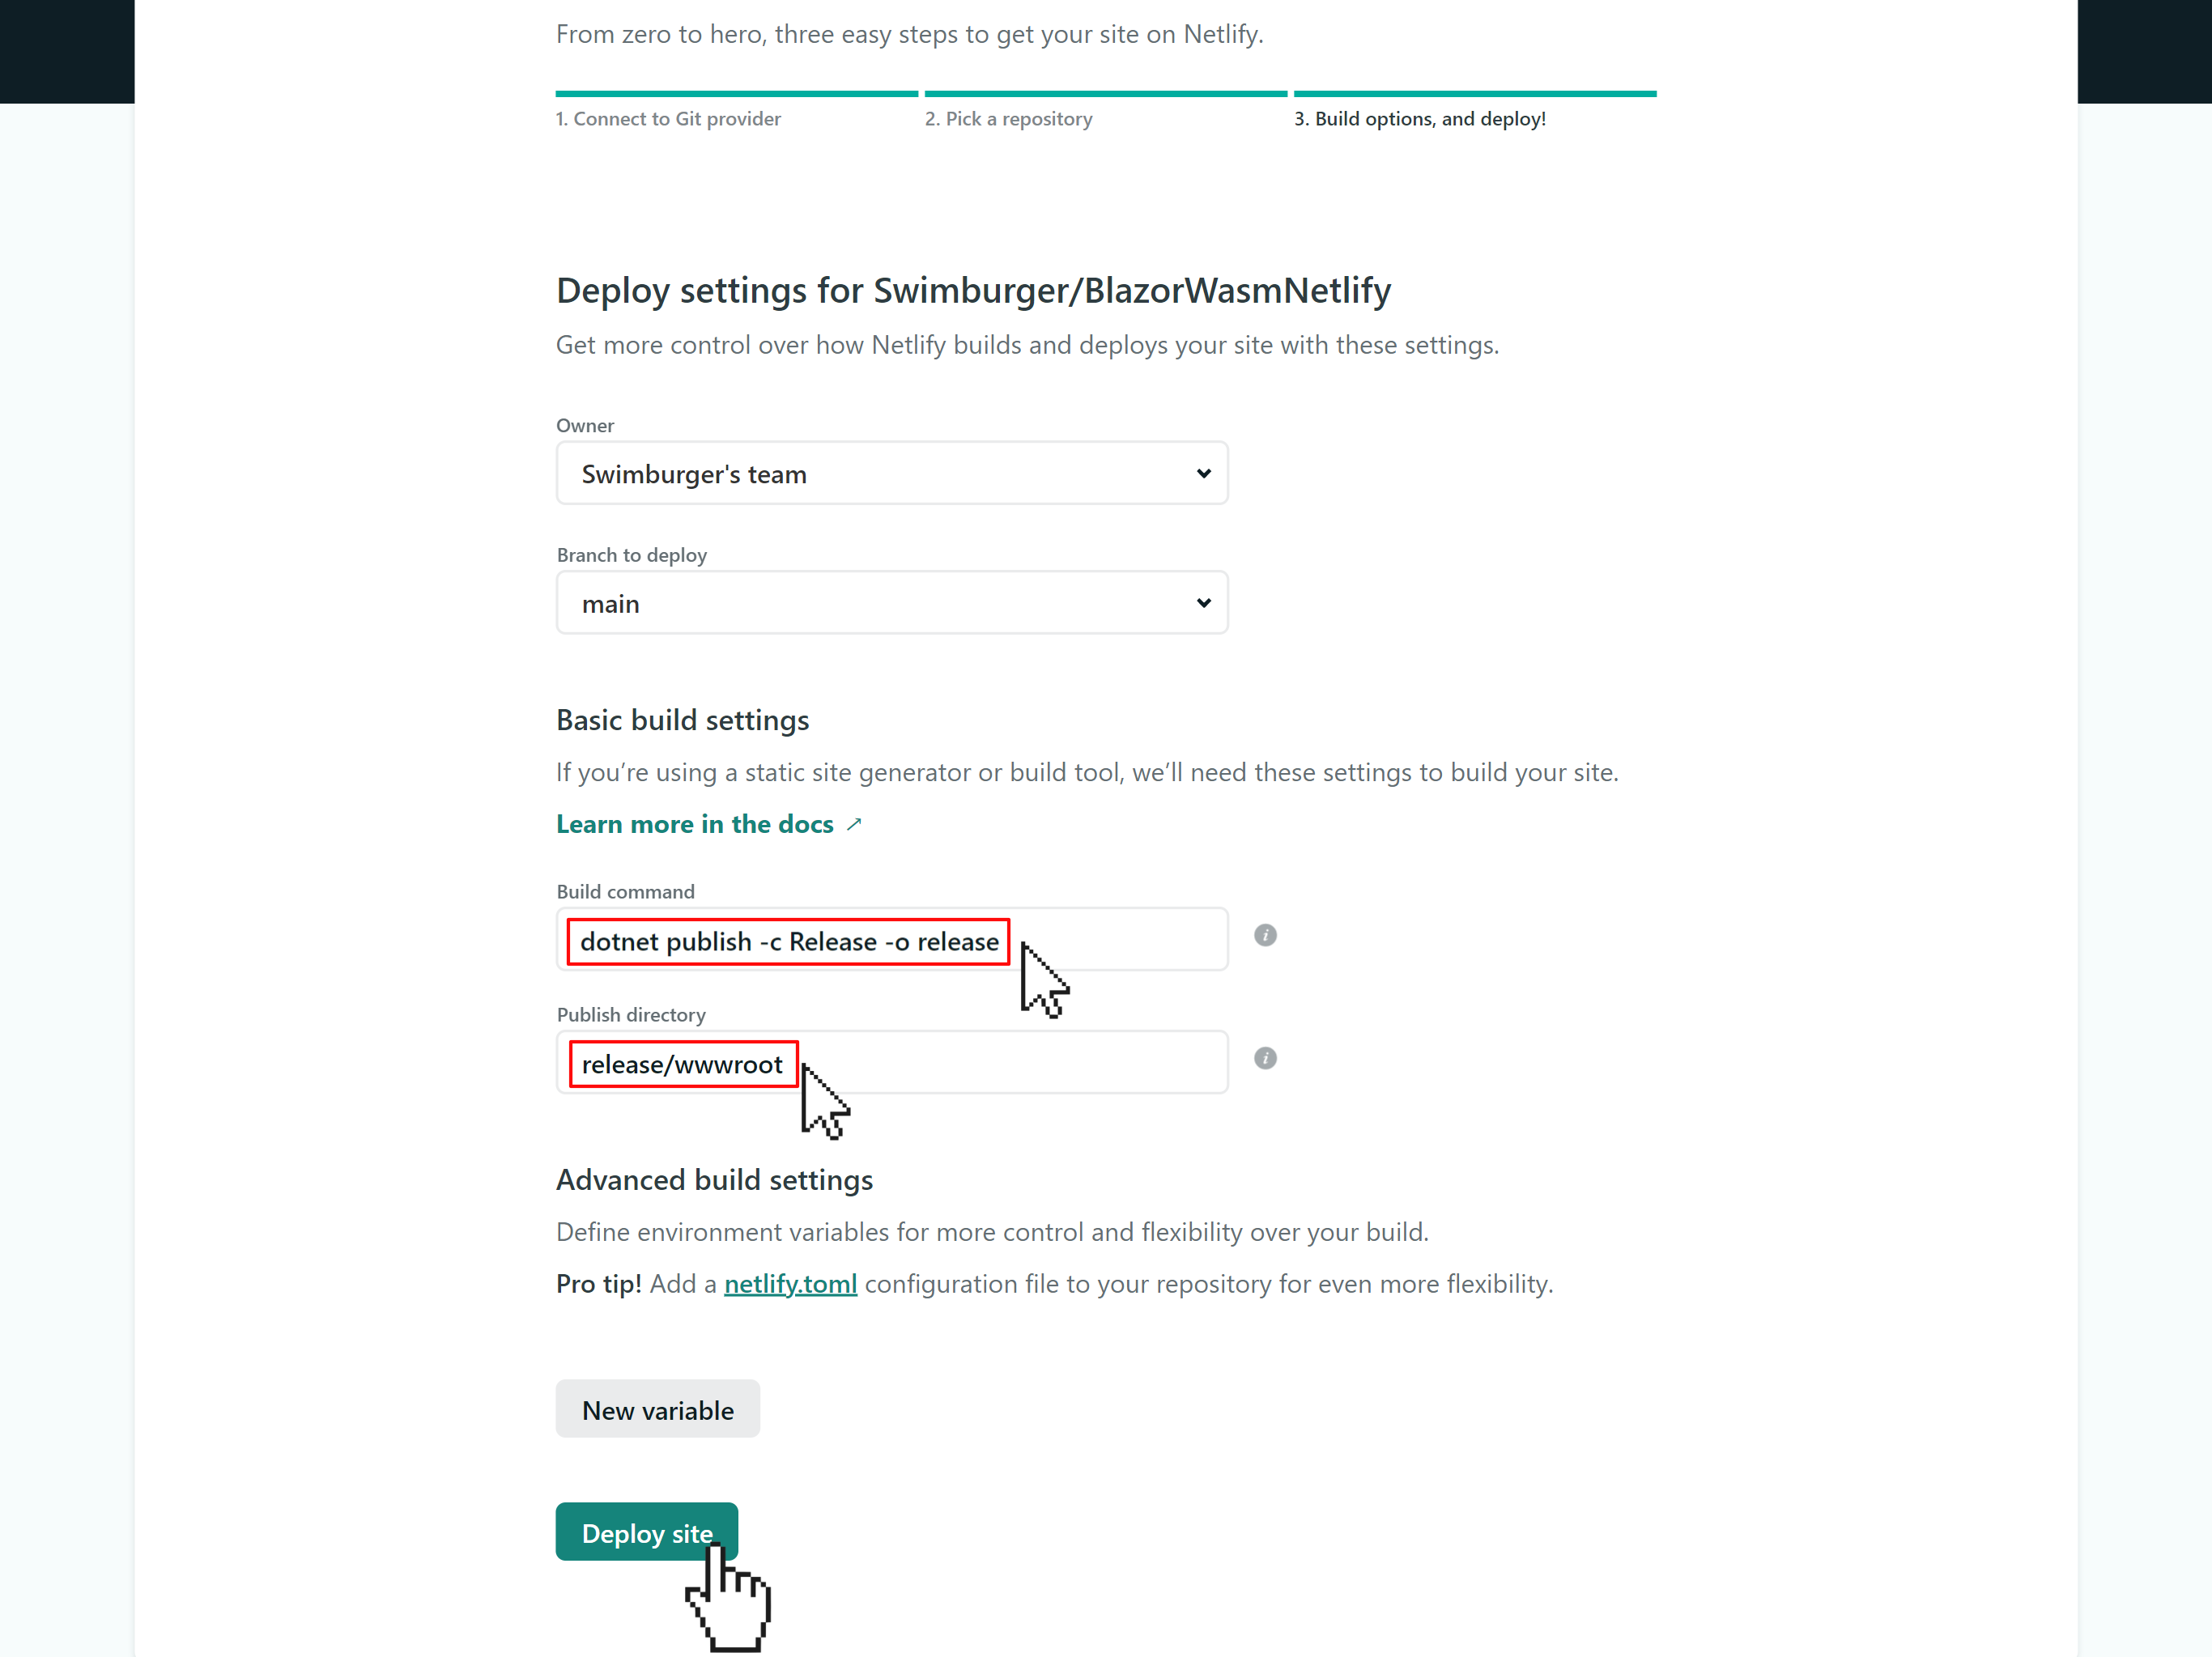
In step 3 you need to provide the build command and where the published files can be found. Netlify's build agent has all the required .NET tooling installed on their Ubuntu build machines.
In the "Build command" field enter dotnet publish -c Release -o release. The c-argument tells the CLI to build in Release configuration. The o-argument tells the CLI to put the output in the release folder.
In the "Publish directory" field enter 'release/wwwroot'. Finally, click the "Deploy site" button.
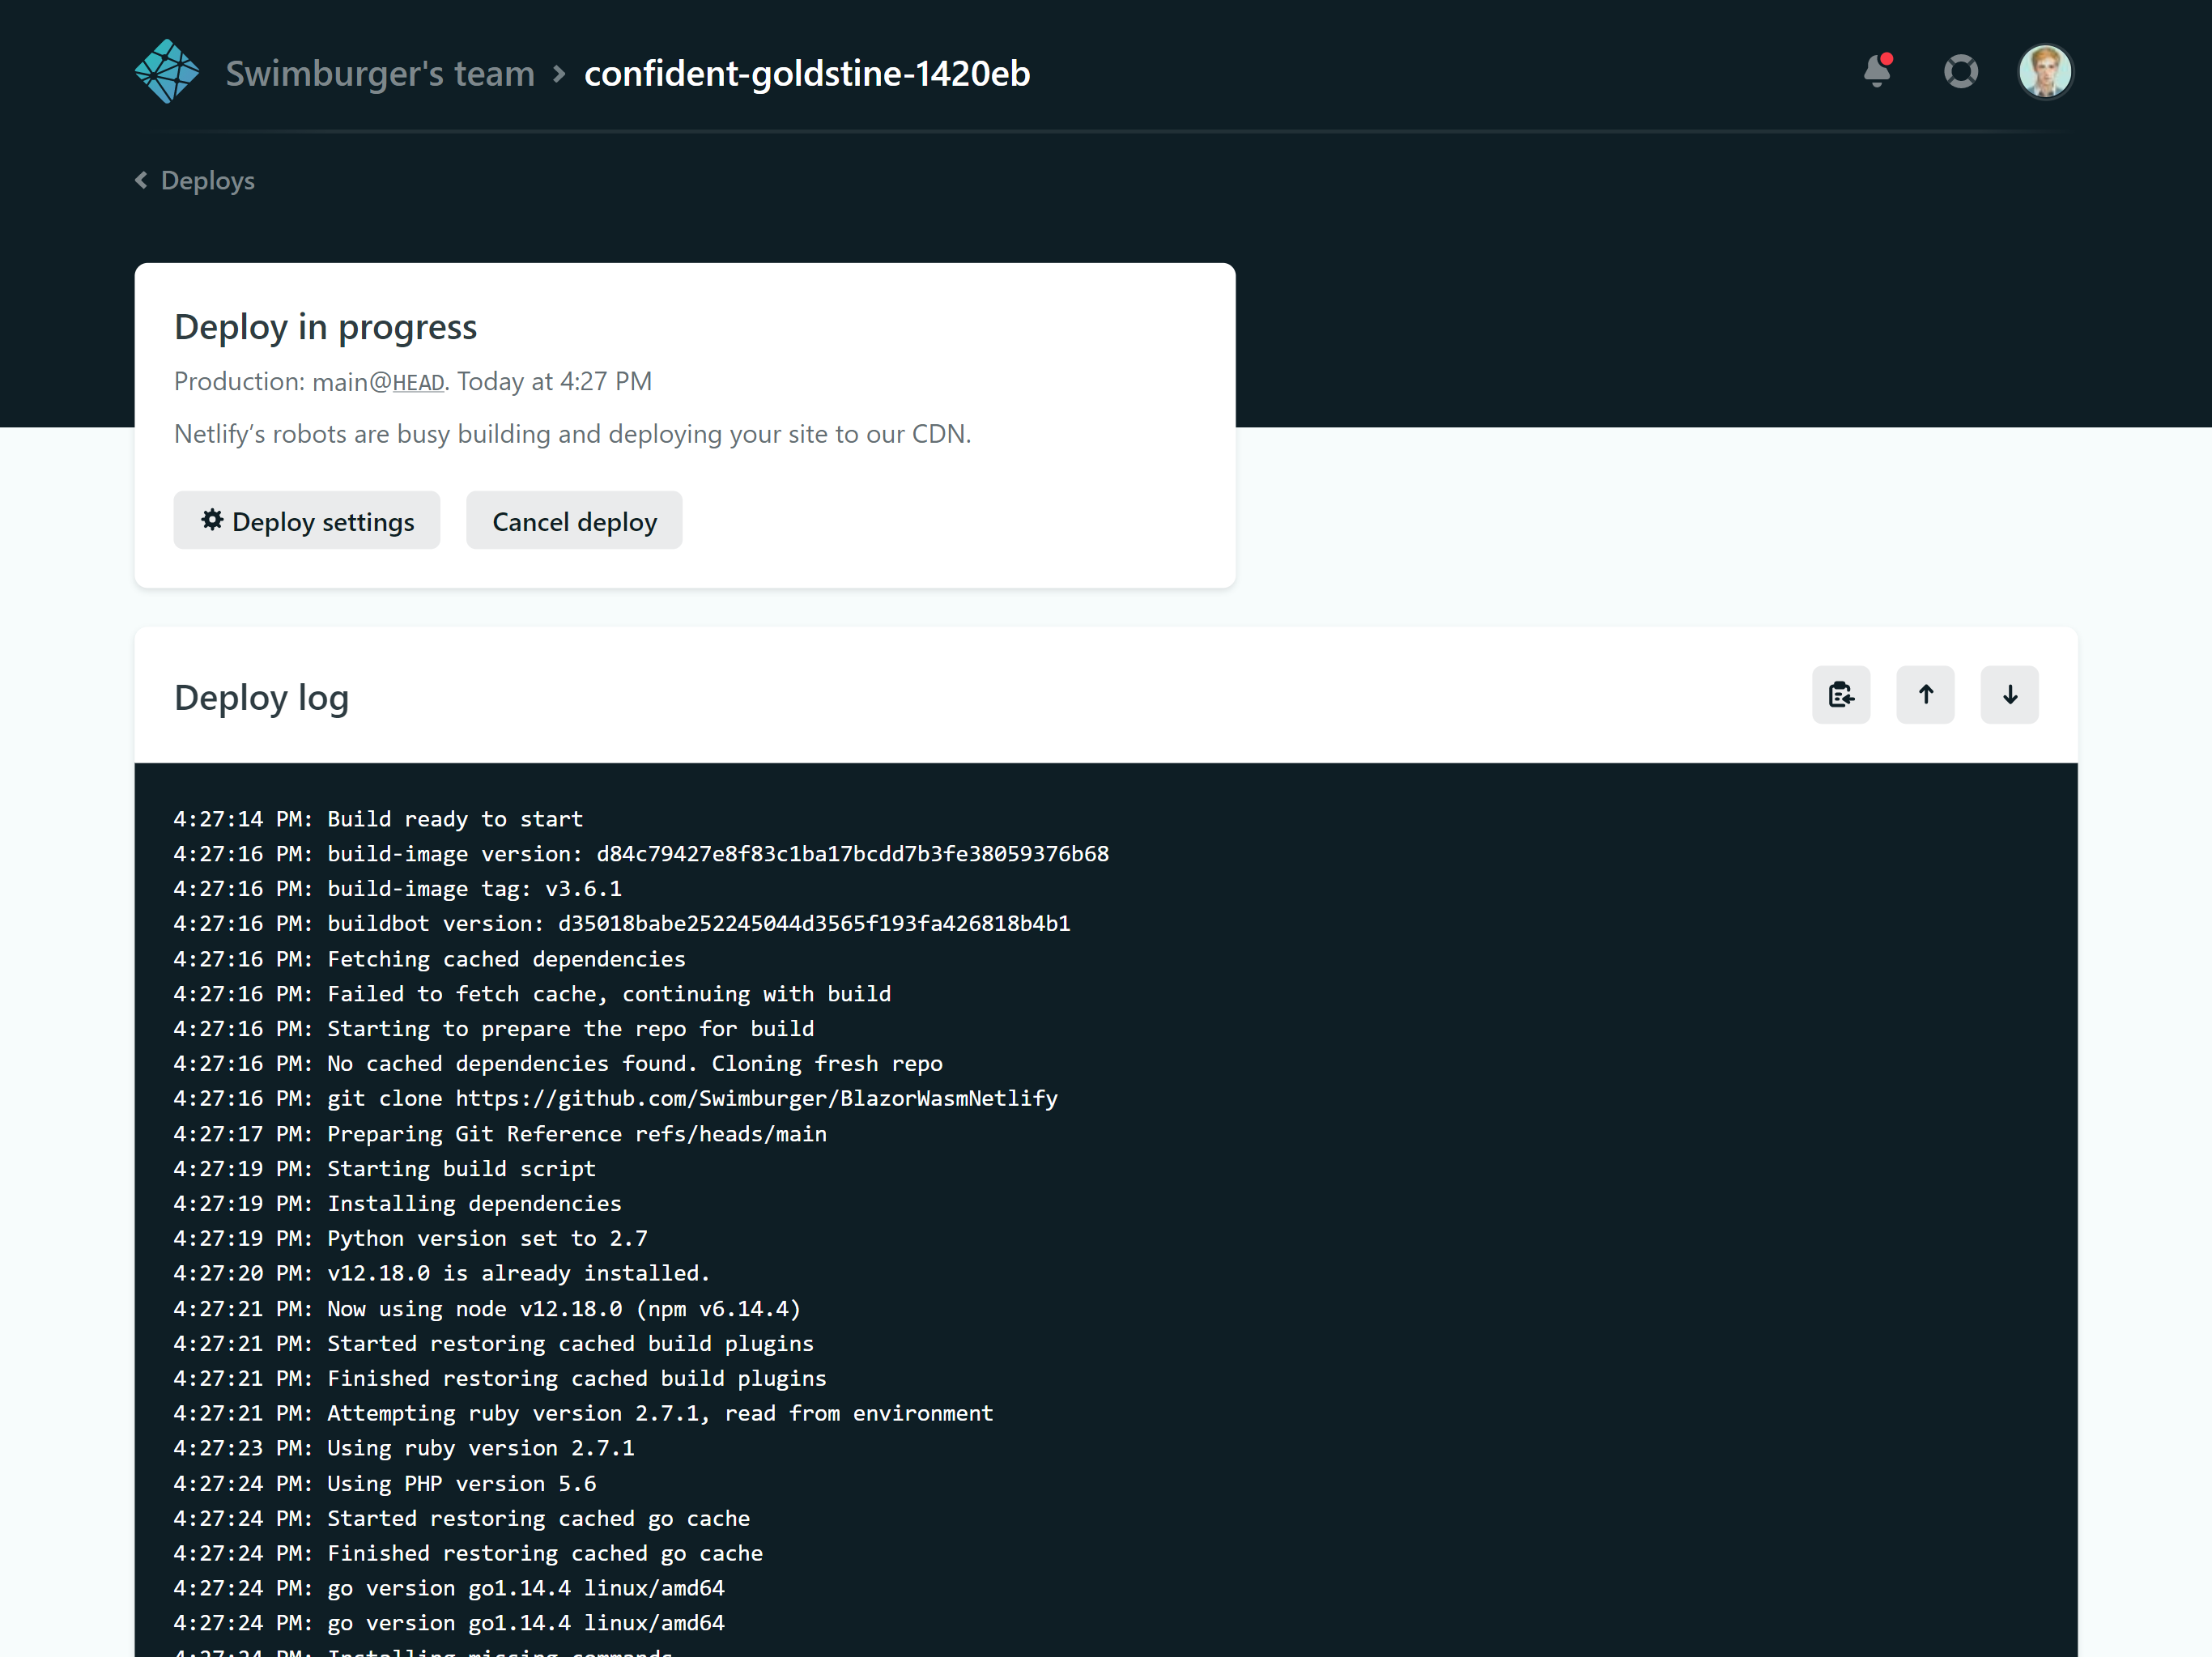
Netlify will create the site and you will be redirected to the site overview page. On this page, you can see the deploy status change in real-time.

When you click on the deploy under the "Production deploys" section, you will navigate the details of the deployment. Here you can see the log output in real-time of your deployment.
When your deployment is finished, you can click on the "Preview" button on the deployment details page. This will take you to your website.
On the Netlify site overview page, there's also a link to your site beneath the name of your website.
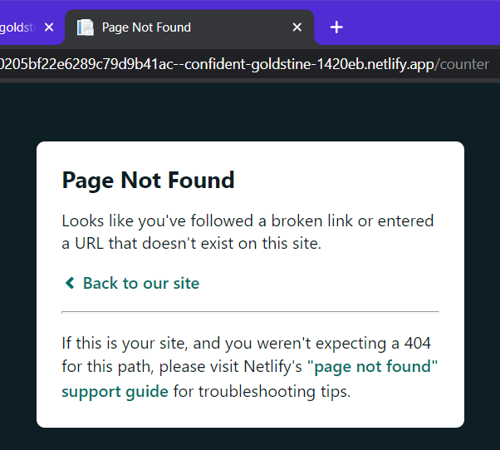
When you navigate to the website you just deployed, you can see the Blazor WASM application is returned and everything is working:

Almost everything that is. When you navigate to the counter page and refresh the page, you will be greeted with Netlify's 404 page:
Rewrite all requests to index.html #
To fix the 404 issues, you need to tell Netlify to rewrite all requests to index.html. The easiest way to do this is to create a Netlify configuration file at the root of your git repository and add a rewrite rule to the file.
Add a file at the root of your repository named "netlify.toml". This configuration file uses the TOML configuration language.
Add the following contents to the Netlify configuration file:
[[redirects]]
  from = "/*"
  to = "/index.html"
  status = 200
To learn more about the redirect configuration, visit Netlify's Redirects and rewrites docs.
Add, commit, and push your changes to GitHub:
git add *
git commit -m "Add netlify.toml and configure SPA redirect for Netlify site"
git push
Netlify will be notified of the change in the GitHub repository and automatically redeploy your site. As part of the deployment, Netlify will read the configuration file and configure your site as specified in the toml-file.
Once the redeploy is finished, navigate back to the counter page and hit refresh. This time you should see the counter page instead of the 404 page.
Summary #
Blazor WebAssembly can be served as static files. These files can be hosted in static hosting services such as Netlify. You can create a new Netlify site using a GitHub repository as the source code. Netlify's build images contain the .NET tooling so you can build and publish your .NET applications using Netlify Build. When you refresh the Blazor WASM application while not at the root path, Netlify will return its 404 page. To return the Blazor WASM application instead, you can create a rewrite in Netlify by creating a 'netlify.toml' file and configuring all requests to be rewritten to index.html.


