


Crawling through Umbraco with Robots

This series is all about making your Umbraco website more crawlable, discoverable for Search Engine Spiders. Last post discussed how to generate sitemaps dynamically, and this week we're covering another thing every website needs: the “robots.txt” file and the “robots” meta tag.
Series:
- Crawling through Umbraco with Sitemaps
- Crawling through Umbraco with Robots (this post 👍)
What is the Robots file? #
The robots.txt file’s main purpose is to tell robots (Google Bot, Bing Bot, etc.) what to index for their search engine, and also what not to. Usually you want most of your website crawled by Google, such as blog posts, product pages, etc., but most websites will have some pages/sections that shouldn’t be indexed or listed in search engines. Some common examples of pages not to index:
- Form Confirmation pages (fe: /contact-us/thank-you)
- Direct link pages such as secret promotions or surveys (fe: /dk89f9/rate-talk?talk=keynote-2018)
- CMS backend section (fe: /umbraco)
Robots.txt basics #
The robots.txt file is a simple text file letting us disallow certain bots from visiting sections of our website.
There’s no guarantee that bots will respect your robots.txt file.
Here’s an example that allows ALL bots to visit the entire website:
User-agent: *
Here’s an example disallowing different sections of the website to different bots:
User-agent: Google
Disallow: /dont-show-google

User-Agent: bingbot
Disallow: /dont-show-bing
Here’s a robots.txt file to disallow bots from visiting the Umbraco admin section:
User-agent: *
Disallow: /umbraco
Robots.txt and sitemaps #
In our sitemap we have to make sure to not list any URL’s that are disallowed by our robots.txt and vice versa. This could lead to your pages unexpectedly indexed or not indexed.
There’s also another property allowed inside of the robots.txt file called “Sitemap”. When you have a sitemap, you can submit them manually to Google and Bing webmaster tools, but many search engines don’t have webmaster tools. Using the “Sitemap” property inside of the robots.txt file, we can share the location of our sitemap.
Sitemap: https://www.swimburger.net/sitemap.xml
User-agent: *
Disallow: /umbraco
Note that the “Sitemap” property has to be an absolute URL. Relative URL’s are not allowed.
Implementing robots.txt in Umbraco #
For our robots.txt we could simply add a file called ‘robots.txt’ the root of our project, disallow the Umbraco admin section, and call it a day. We could also add the “Sitemap” property to the robots.txt and hardcode the full URL, but chances are that you have more than one environment or you have a multi-site setup with multiple domain names.
We’ll dynamically generate the “Sitemap” property and add the ability to add exclusions through Umbraco Content.
Adding a new Sitemap custom document type #
For this tutorial, we’ll be building upon our previous setup from “Crawling through Umbraco with Sitemaps”.
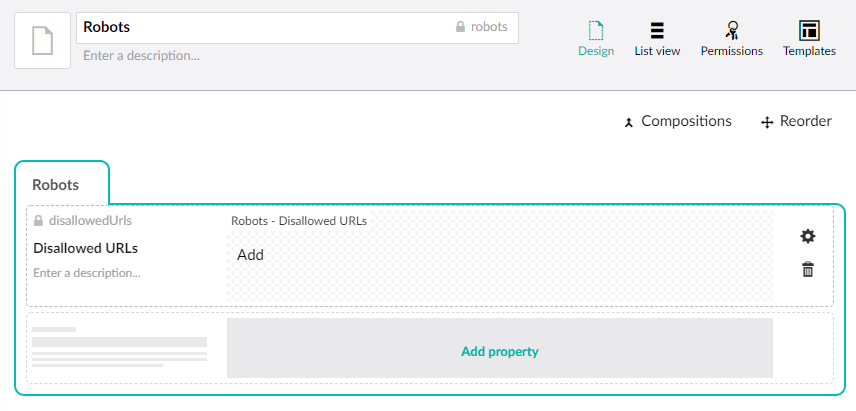
Let’s create a new custom document type (with template) called “Robots”.
Configure the Robots document type as below:
- Robots (tab)
- Disallowed URLs
- Type: Repeatable textstrings
- Alias: disallowedUrls
- Disallowed URLs
Before we can add the Robots content, we need to allow it to be added under the Home page.
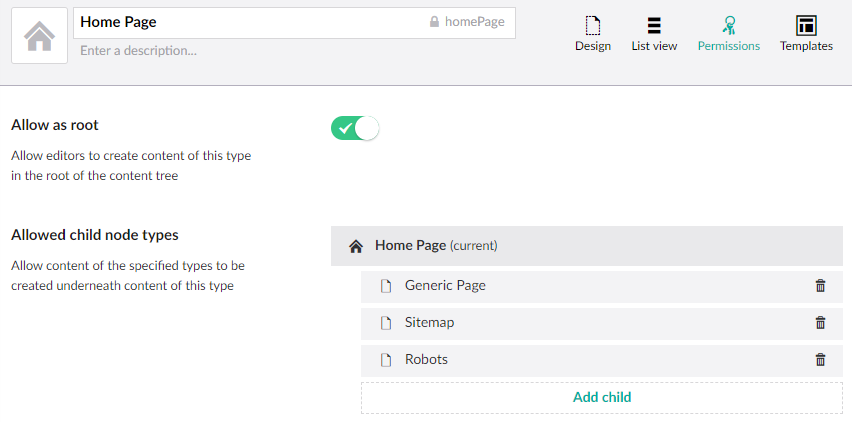
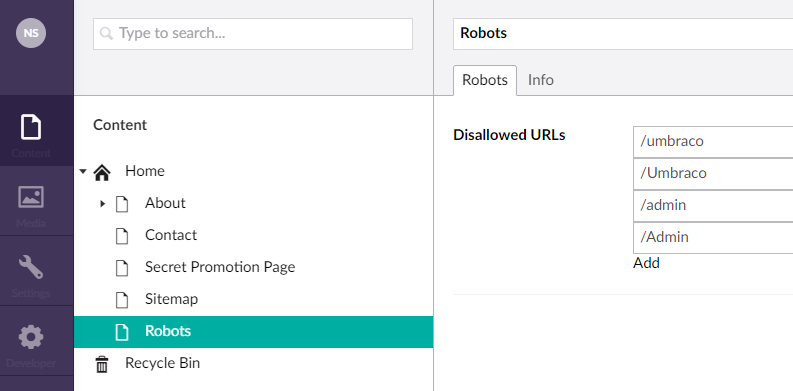
Let’s add the Robots content under the homepage and disallow some URL’s.
Generating the Robots.txt file #
Now that the content is setup, let’s work on our Robots view template.
Change the template to the following code:
@inherits Umbraco.Web.Mvc.UmbracoTemplatePage<ContentModels.Robots>
@using ContentModels = Umbraco.Web.PublishedContentModels;
@{
    Layout = null;
    umbraco.library.ChangeContentType("text/plain");
    var rootUrl = Request.Url.GetLeftPart(UriPartial.Authority);
}Sitemap: @(rootUrl + "/sitemap.xml")
User-agent: *
@foreach(var url in Model.Content.DisallowedUrls)
{
    @Html.Raw(string.Format("Disallow: {0}\n", url))
}
This snippet does three things:
- Set the content type to text
- Dynamically point to the Sitemap file
- Disallow all URL’s we specify in the Umbraco document type
When we browse to `/robots` we should see the following output:
Sitemap: http://localhost:55848/sitemap.xml
User-agent: *
Disallow: /umbraco
Disallow: /Umbraco
Disallow: /admin
Disallow: /Admin
Setting up a rewrite rule to /robots.txt #
Defined by the standard, the robots.txt file has to be accessible at the root of the site using ‘robots.txt’ filename. Currently we only return the content at the /robots URL. Just like we did for the Sitemap, we can setup an IIS Rewrite so the content will be available via /robots.txt.
Add the following rewrite configuration to your web.config file:
<?xml version="1.0" encoding="utf-8"?>
   ...
   <system.webServer>
     ...
     <rewrite>
      <rules>
        <rule name="Rewrite to Sitemap.xml">
          <match url="^sitemap.xml" />
          <action type="Rewrite" url="sitemap" />
        </rule>
        <rule name="Rewrite to Robots.txt">
          <match url="^robots.txt" />
          <action type="Rewrite" url="robots" />
        </rule>
      </rules>
     </rewrite>
     ...
  </system.webServer>
  ...
</configuration>
Both `/robots.txt` and `/robots` now return our new robots file.
What is the robots meta tag? #
The robots meta tag serves the same purpose as the robots.txt file. The difference though, is that you only specify that the current page should be indexed and that robots should follow links on the current page. There are 4 different combinations you can make with this meta tag.
<meta name="robots" content="index, follow">
<meta name="robots" content="noindex, nofollow">
<meta name="robots" content="index, nofollow">
<meta name="robots" content="noindex, follow">
- Index: index this page
- noindex: do not index this page
- follow: follow links on this page
- nofollow: do not follow links on this page
Implementing the robots meta tag in Umbraco #
We want to be able to specify the value for this meta tag for every page we have in Umbraco. Let’s add two checkboxes to our existing BasePage composition from the previous post.
- Crawling (tab)
- Index
- Type: Custom Checkbox Editor
- Default Value: true
- Alias: robotsIndex
- Follow
- Type: Custom Checkbox Editor
- Default Value: true
- Alias: robotsFollow
- Index

Now that every page has these new properties, let’s add some template code to output the meta data tag. Update the HomePage.cshtml as below:
@inherits Umbraco.Web.Mvc.UmbracoTemplatePage<ContentModels.HomePage>
@using ContentModels = Umbraco.Web.PublishedContentModels;
@{
    Layout = null;
    var robotsValue = string.Format("{0}, {1}", Model.Content.RobotsIndex ? "index" : "noindex", Model.Content.RobotsFollow ? "follow" : "nofollow");
}
<!DOCTYPE html>
<html>
<head>
    <meta name="robots" content="@robotsValue" />
</head>
<body>
    <h1>@Model.Content.Name</h1>
</body>
</html>
Now we can change the robots meta tag by changing the Umbraco property on the homepage. If you don’t see the metatag value being outputted correctly, try publishing your homepage.
We need the same functionality for all pages though, not just the homepage. Instead of copying over the code to every template, let’s create a “_Layout.cshtml” and “_ViewStart.cshtml” template to reuse the functionality across all page templates. Add the following files to your Umbraco templates:
_Layout.cshtml
@inherits Umbraco.Web.Mvc.UmbracoTemplatePage<ContentModels.IBasePage>
@using ContentModels = Umbraco.Web.PublishedContentModels;
@{
    var robotsValue = string.Format("{0}, {1}", Model.Content.RobotsIndex ? "index" : "noindex", Model.Content.RobotsFollow ? "follow" : "nofollow");
}
<!DOCTYPE html>
<html>
<head>
    <meta name="robots" content="@robotsValue" />
</head>
<body>
    @RenderBody()
</body>
</html>
_ViewStart.cshtml
@{
    Layout = "~/Views/_Layout.cshtml";
}
For this change to take effect, we also need to remove the “Layout = null;” references in our page-templates. For example, our homepage should look something like this:
@inherits Umbraco.Web.Mvc.UmbracoTemplatePage<ContentModels.HomePage>
@using ContentModels = Umbraco.Web.PublishedContentModels;
<h1>@Model.Content.Name</h1>
Now that all page templates are using the new layout, our robots meta tag is functional everywhere!
Further reading #
Here’s some helpful links when implementing robots.txt and robots meta tags for the first time:
- http://www.robotstxt.org/
- https://moz.com/learn/seo/robotstxt
- https://support.google.com/webmasters/answer/6062608?hl=en
- Google Robots.txt Validator: https://www.google.com/webmasters/tools/robots-testing-tool?pli=1
Source code: You can find the robots code on GitHub
Also, don’t forget to check out the other posts in this series:
- Crawling through Umbraco with Sitemaps
- Crawling through Umbraco with Robots (this post)
Cheerz!
(like, subscribe, and hit that notification bell 🙃)

