


Create a chatbot in the console with Azure OpenAI and C#

ChatGPT went viral shortly after it was launched by OpenAI. Within just a couple of weeks, ChatGPT went from something only technical computer people knew about, to quickly being adopted by kids and teenagers to help them "cheat" on schoolwork. Not much later, even my non-technical friends started experimenting with ChatGPT and Bing chat, without me ever mentioning it to them.
Since then, OpenAI has opened up an API for ChatGPT, but in addition to that, Azure has been working with OpenAI to offer its own version of OpenAI's models through Azure, adding on the security, integration, and management features you expect from the Azure cloud platform.
The interesting thing about Azure OpenAI Service, is that the same models are used as OpenAI, but they are deployed inside of your Azure subscription, so they are completely isolated from OpenAI and from other Azure OpenAI Services. You don't have to worry about accidentally sharing data with others.
While Azure has released the Azure OpenAI Service as "Generally Available", to actually get access to the service, you need to fill out this form and be approved by Microsoft. (C'mon Microsoft, any service where you have to be manually approved is not GA, but I digress.)
In this tutorial, you'll learn how to create an Azure OpenAI Service and consume the API using the OpenAI .NET client library to create a chatbot inside the console.
Prerequisites #
You'll need the following things to follow along:
- .NET 7 SDK (earlier and newer versions may work too)
- A code editor or IDE (I recommend JetBrains Rider, Visual Studio, or VS Code with the C# plugin)
- An Azure Subscription and access to Azure OpenAI Service (request access here)
You can find the source code for this tutorial on this GitHub repository. Feel free to submit GitHub issues if you encounter any problems or have questions.
Create an Azure OpenAI Service #
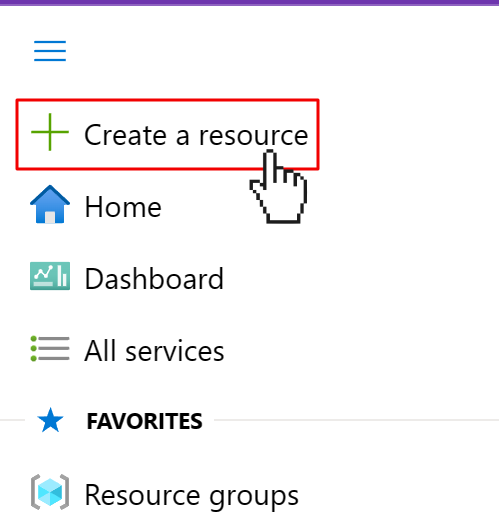
To create an Azure OpenAI Service, first open a browser and navigate to the Azure Portal. Open the navigation on the left and click on Create a resource.
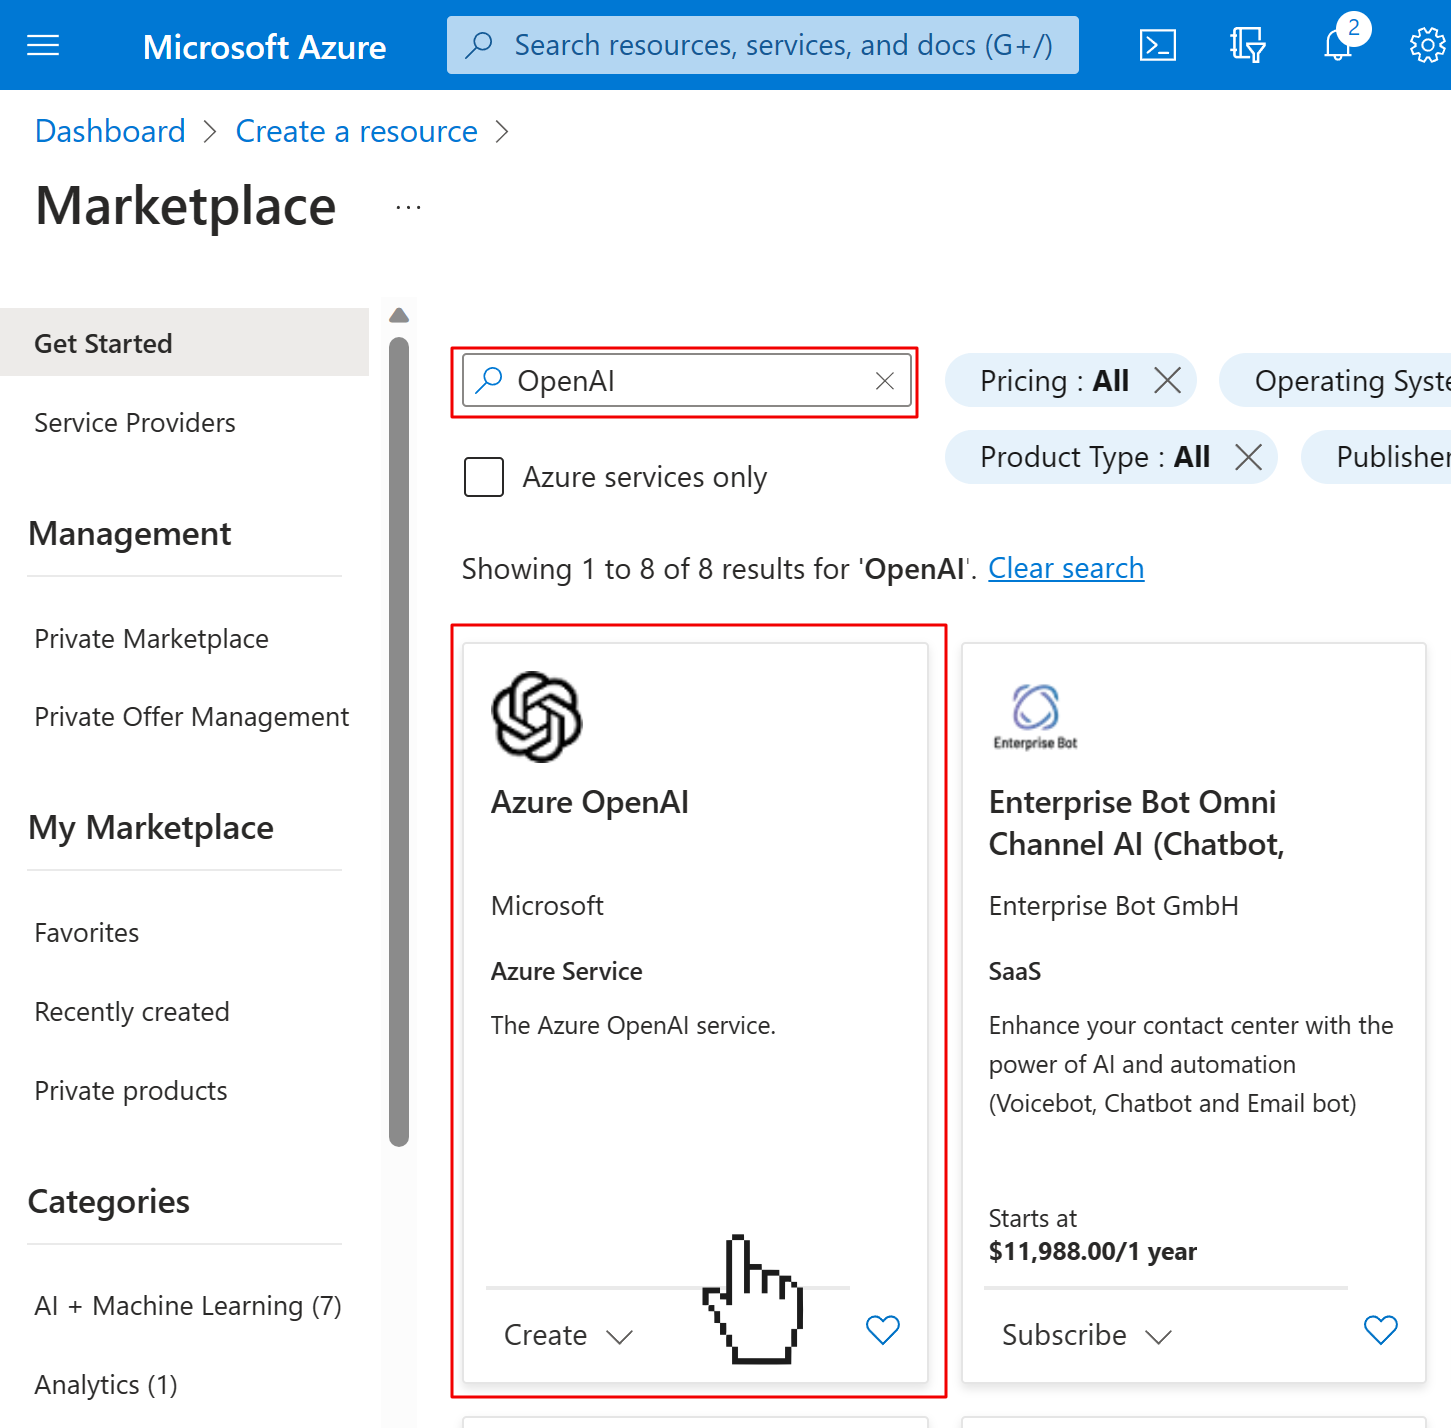
This will open the Azure Marketplace. Use the search box to search for "OpenAI" and click on the Azure OpenAI product.
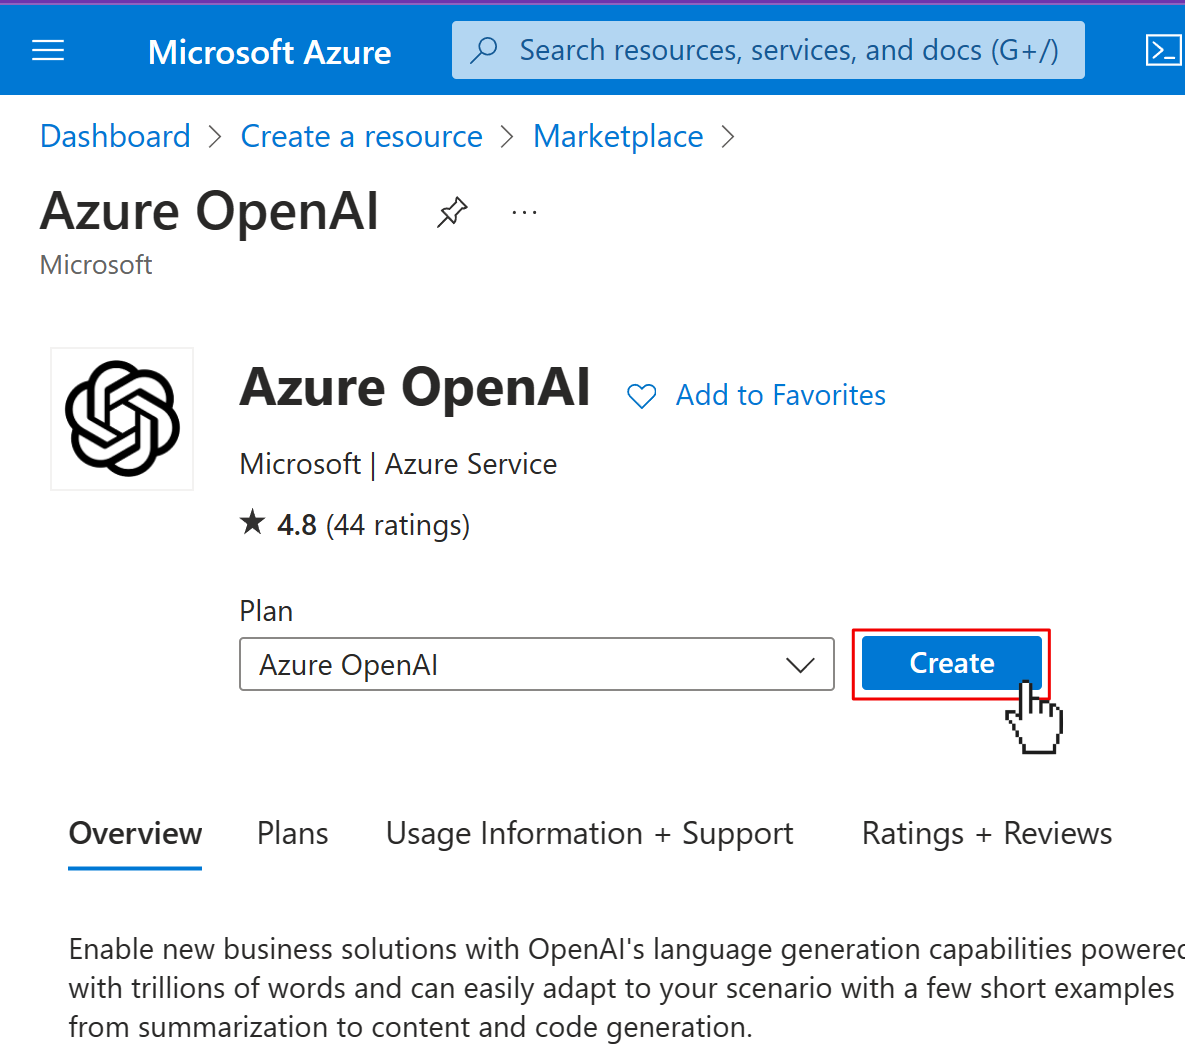
On the product page for Azure OpenAI, click on the Create button.
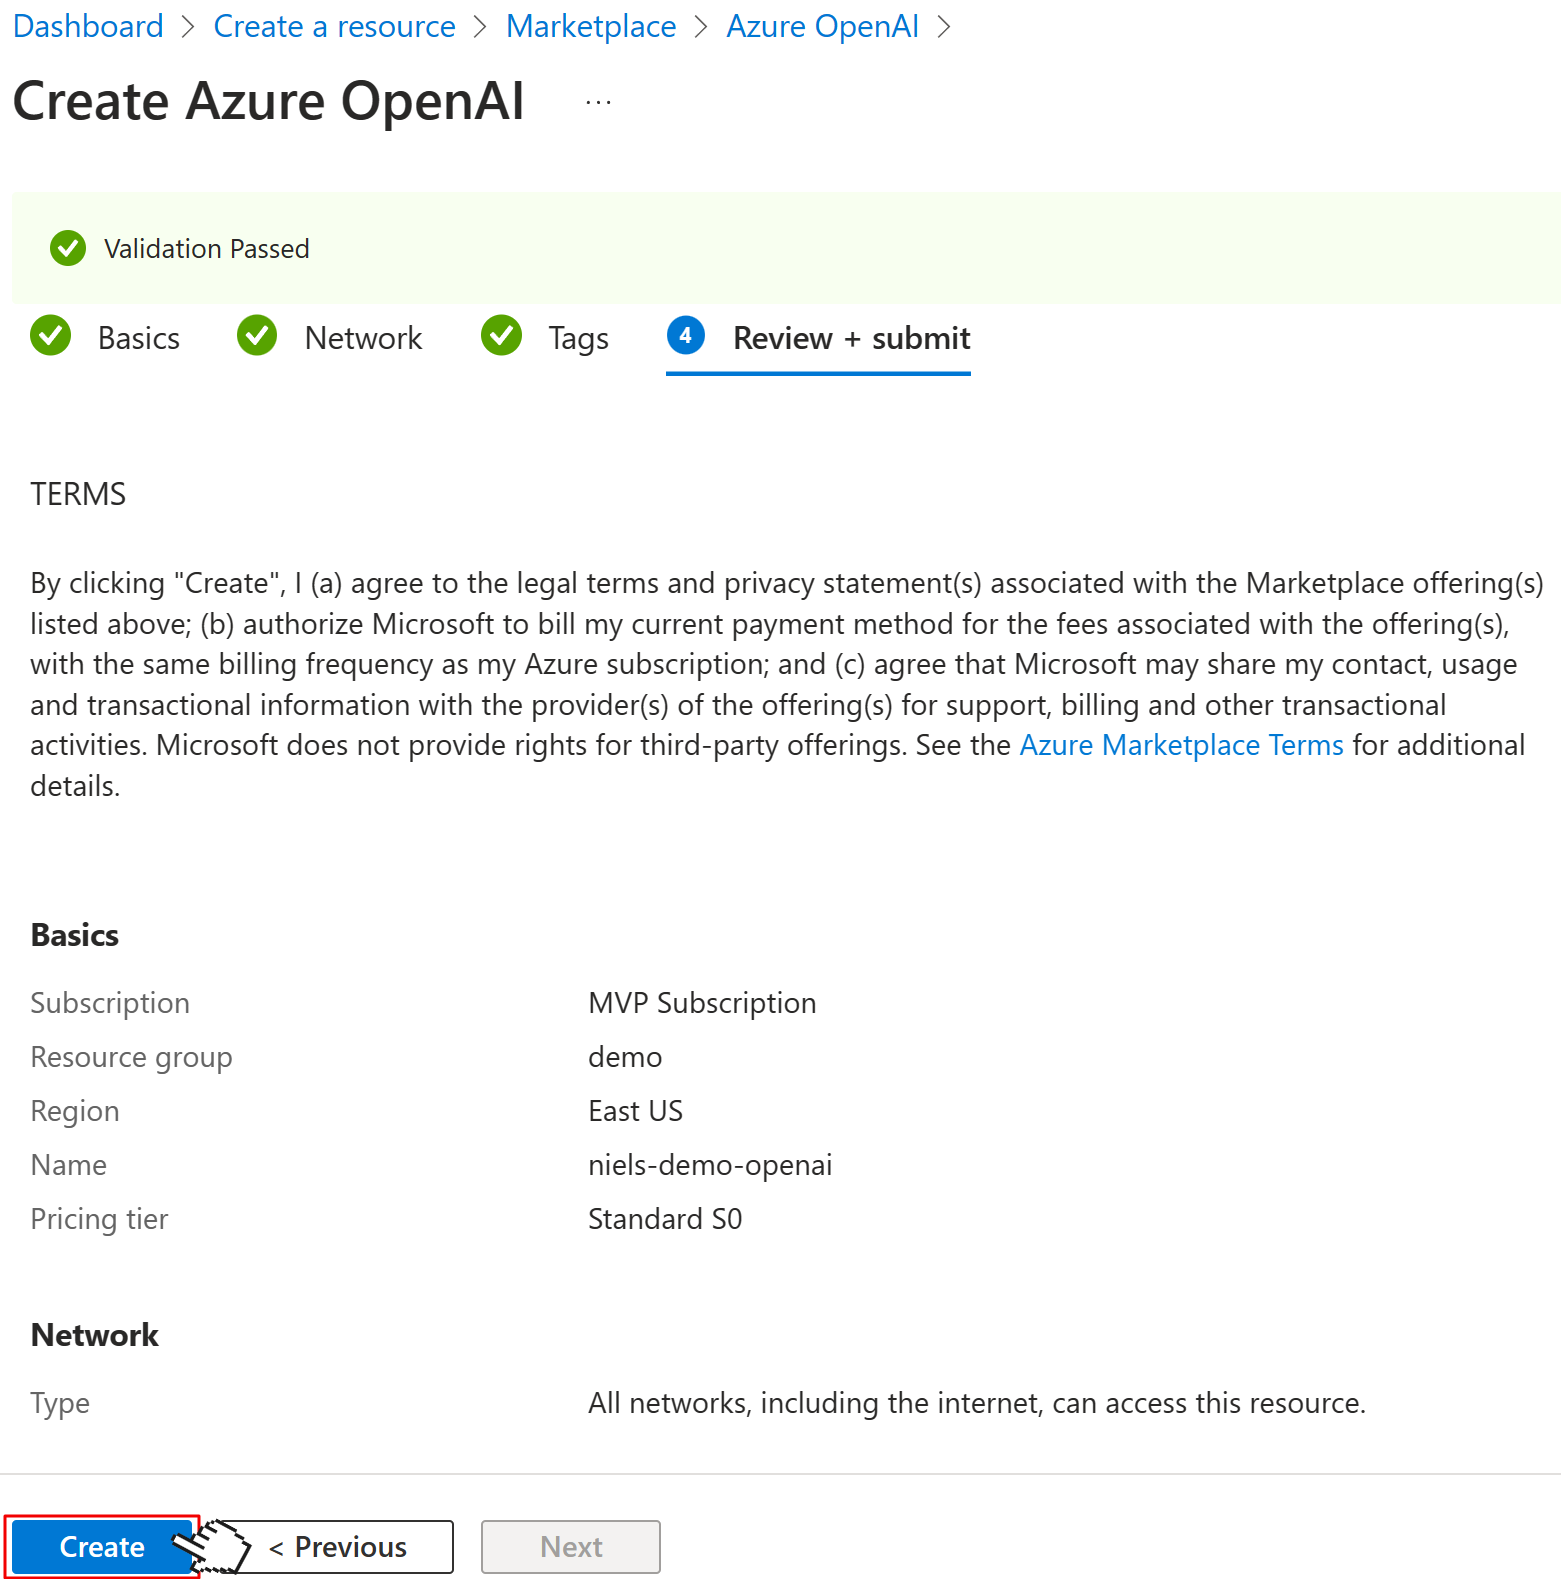
Select the resource group you want to use, or create a new one, give your OpenAI instance a globally unique name, and select any pricing tier (there's only one at the time of writing this). Then click Next.

Leave the defaults on the Network and Tags page. Click Next until you reach the Review + submit page. Here you'll see an overview of what you're about to create. Click the Create button.
Now, Azure will provision your Azure OpenAI instance which will take some time. It took about 10 minutes for me, so go make some coffee, or even better, some delicious tea. 😉
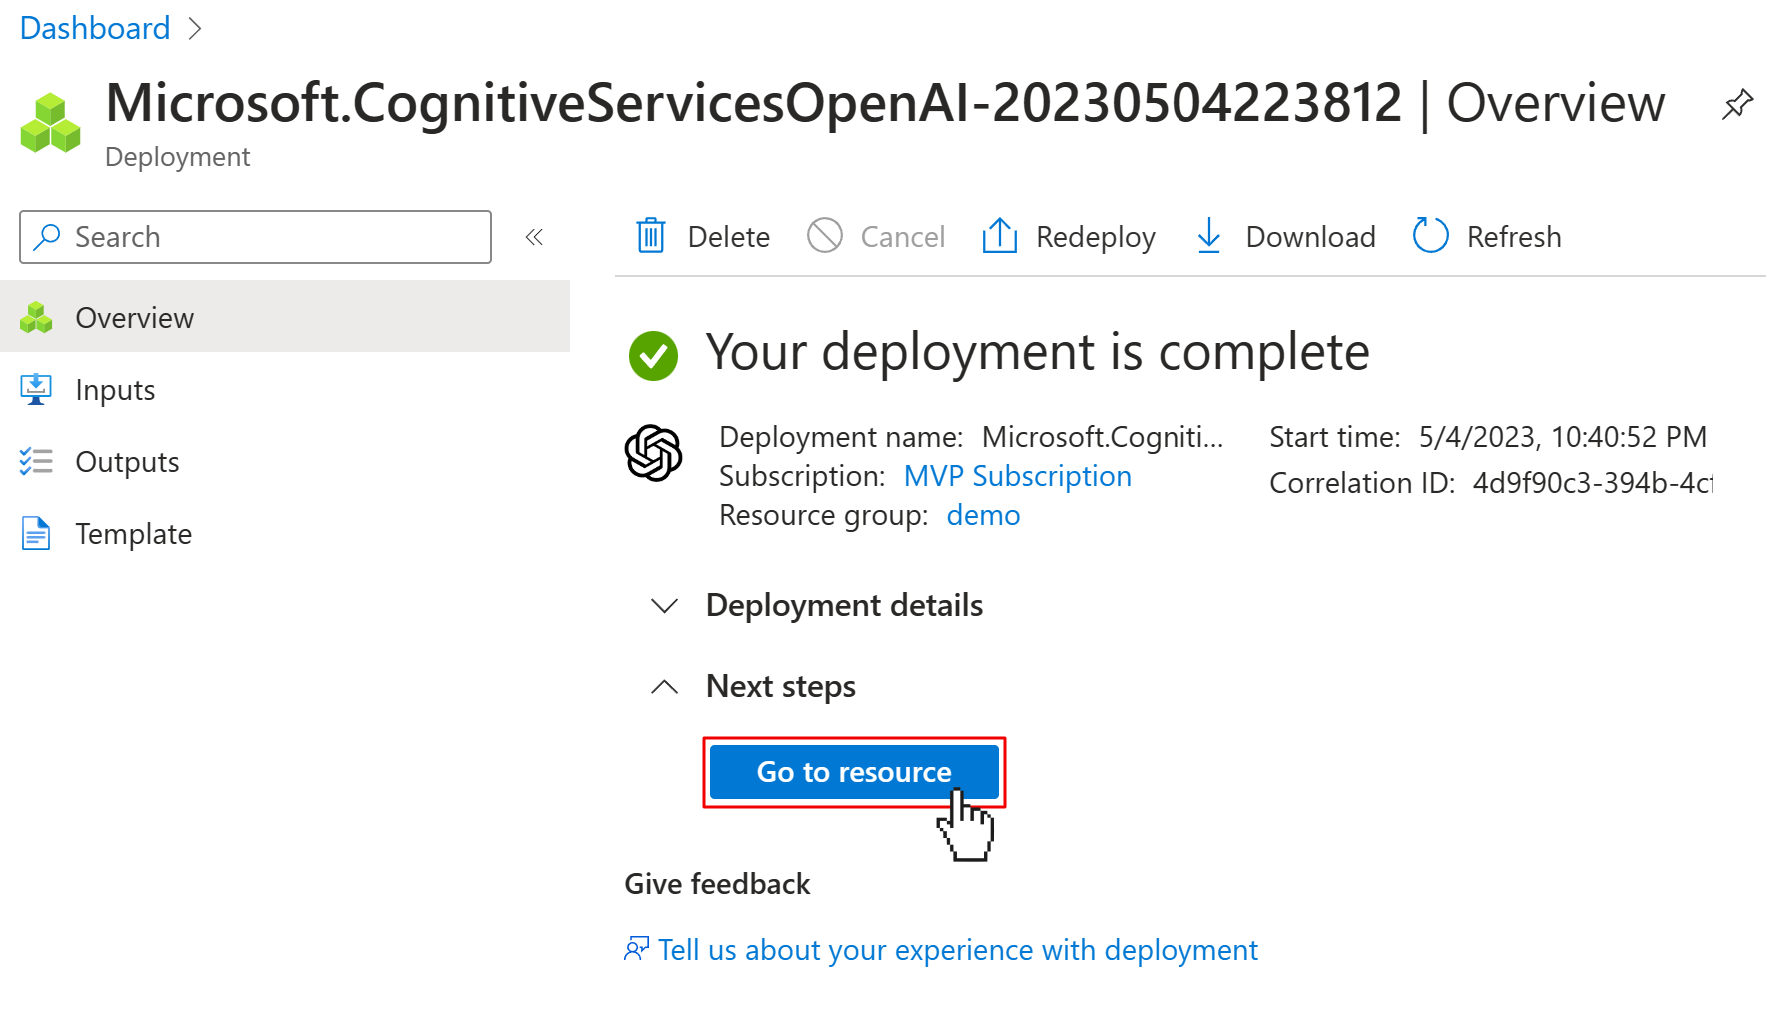
Once Azure says, "Your deployment is complete", click on the Go to resource button. Then in your OpenAI instance, click on the Model deployments tab in the left navigation, and then click the Create button up top.
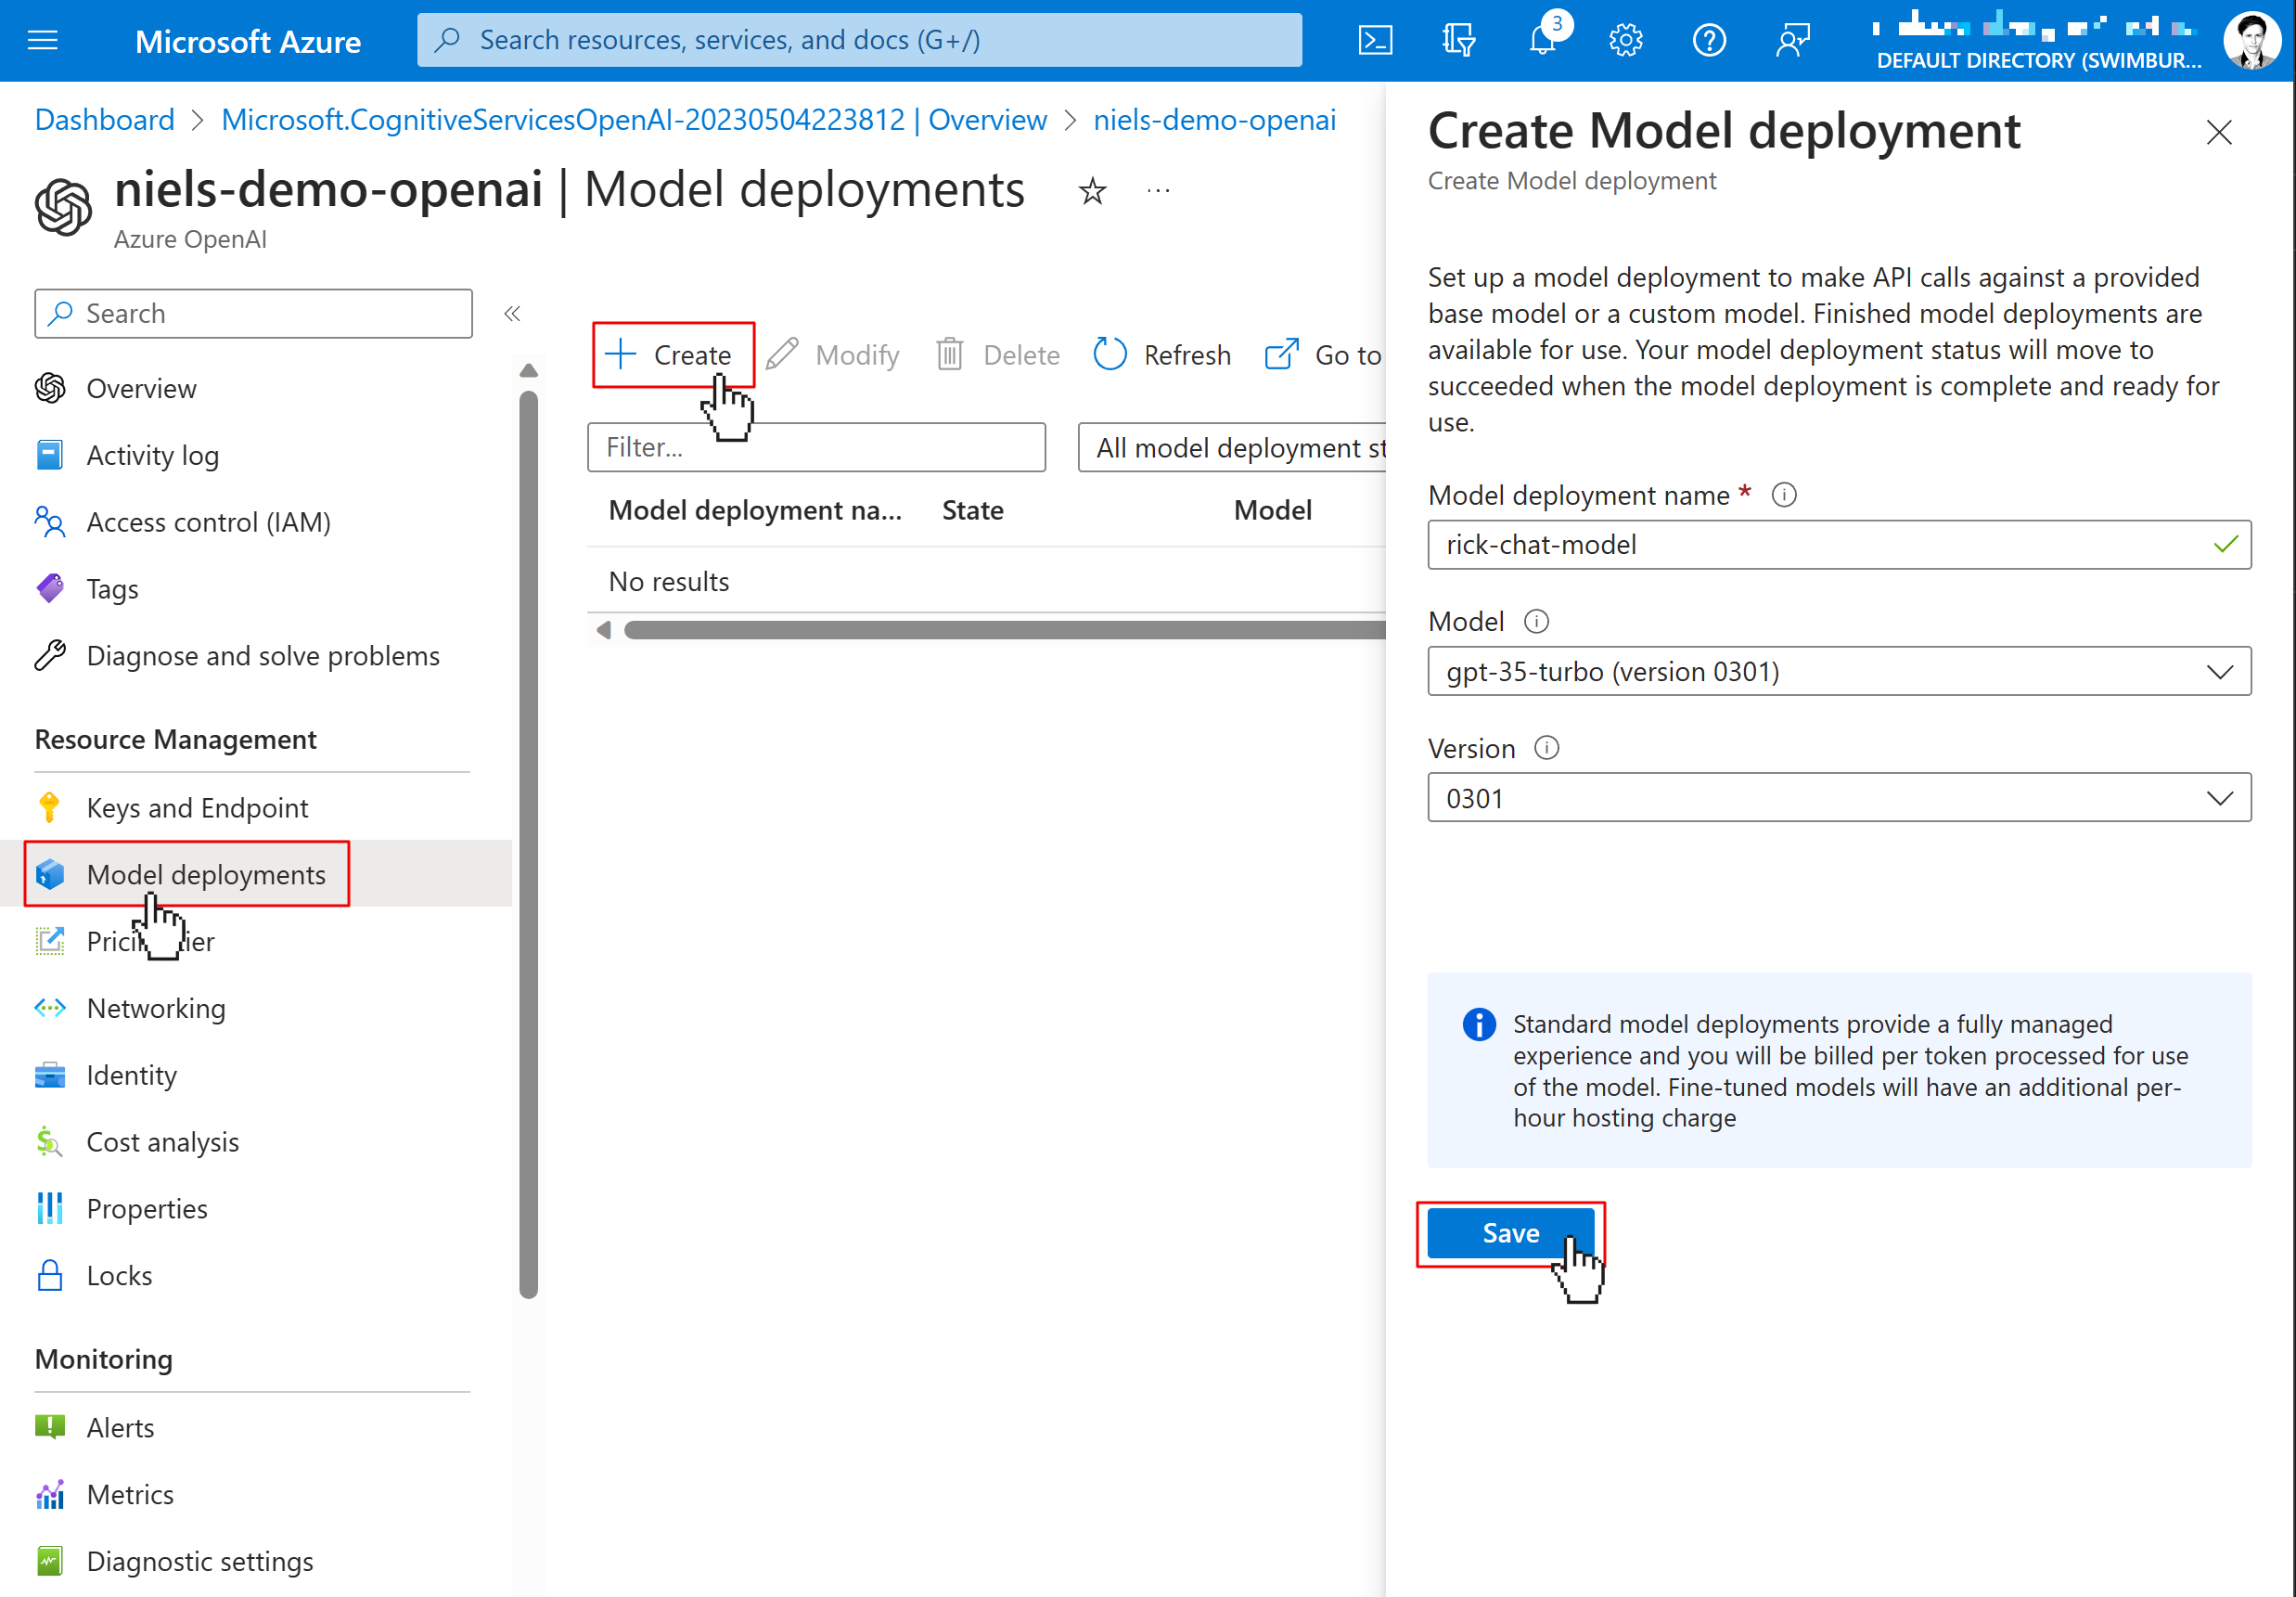
Give your model any name, select gpt-35-turbo (version 0301) as the Model, select 0301 as the name, and click Save.
Gpt-35-turbo is the model that OpenAI trained specifically for ChatGPT, however, ChatGPT also offers a newer model GPT4 which is not yet available in Azure OpenAI.
You can't customize your model inside the Azure portal itself, but you there's a link "Go to Azure OpenAI Studio" which takes you to the Cognitive Services portal where you can use the playground to experiment with the different models, and you can customize the model by providing extra training data. Keep in mind, this is just the start of this new service, and there's a lot more to come ;)
Remember the name of your Model deployment, as you'll need this later in your .NET application.
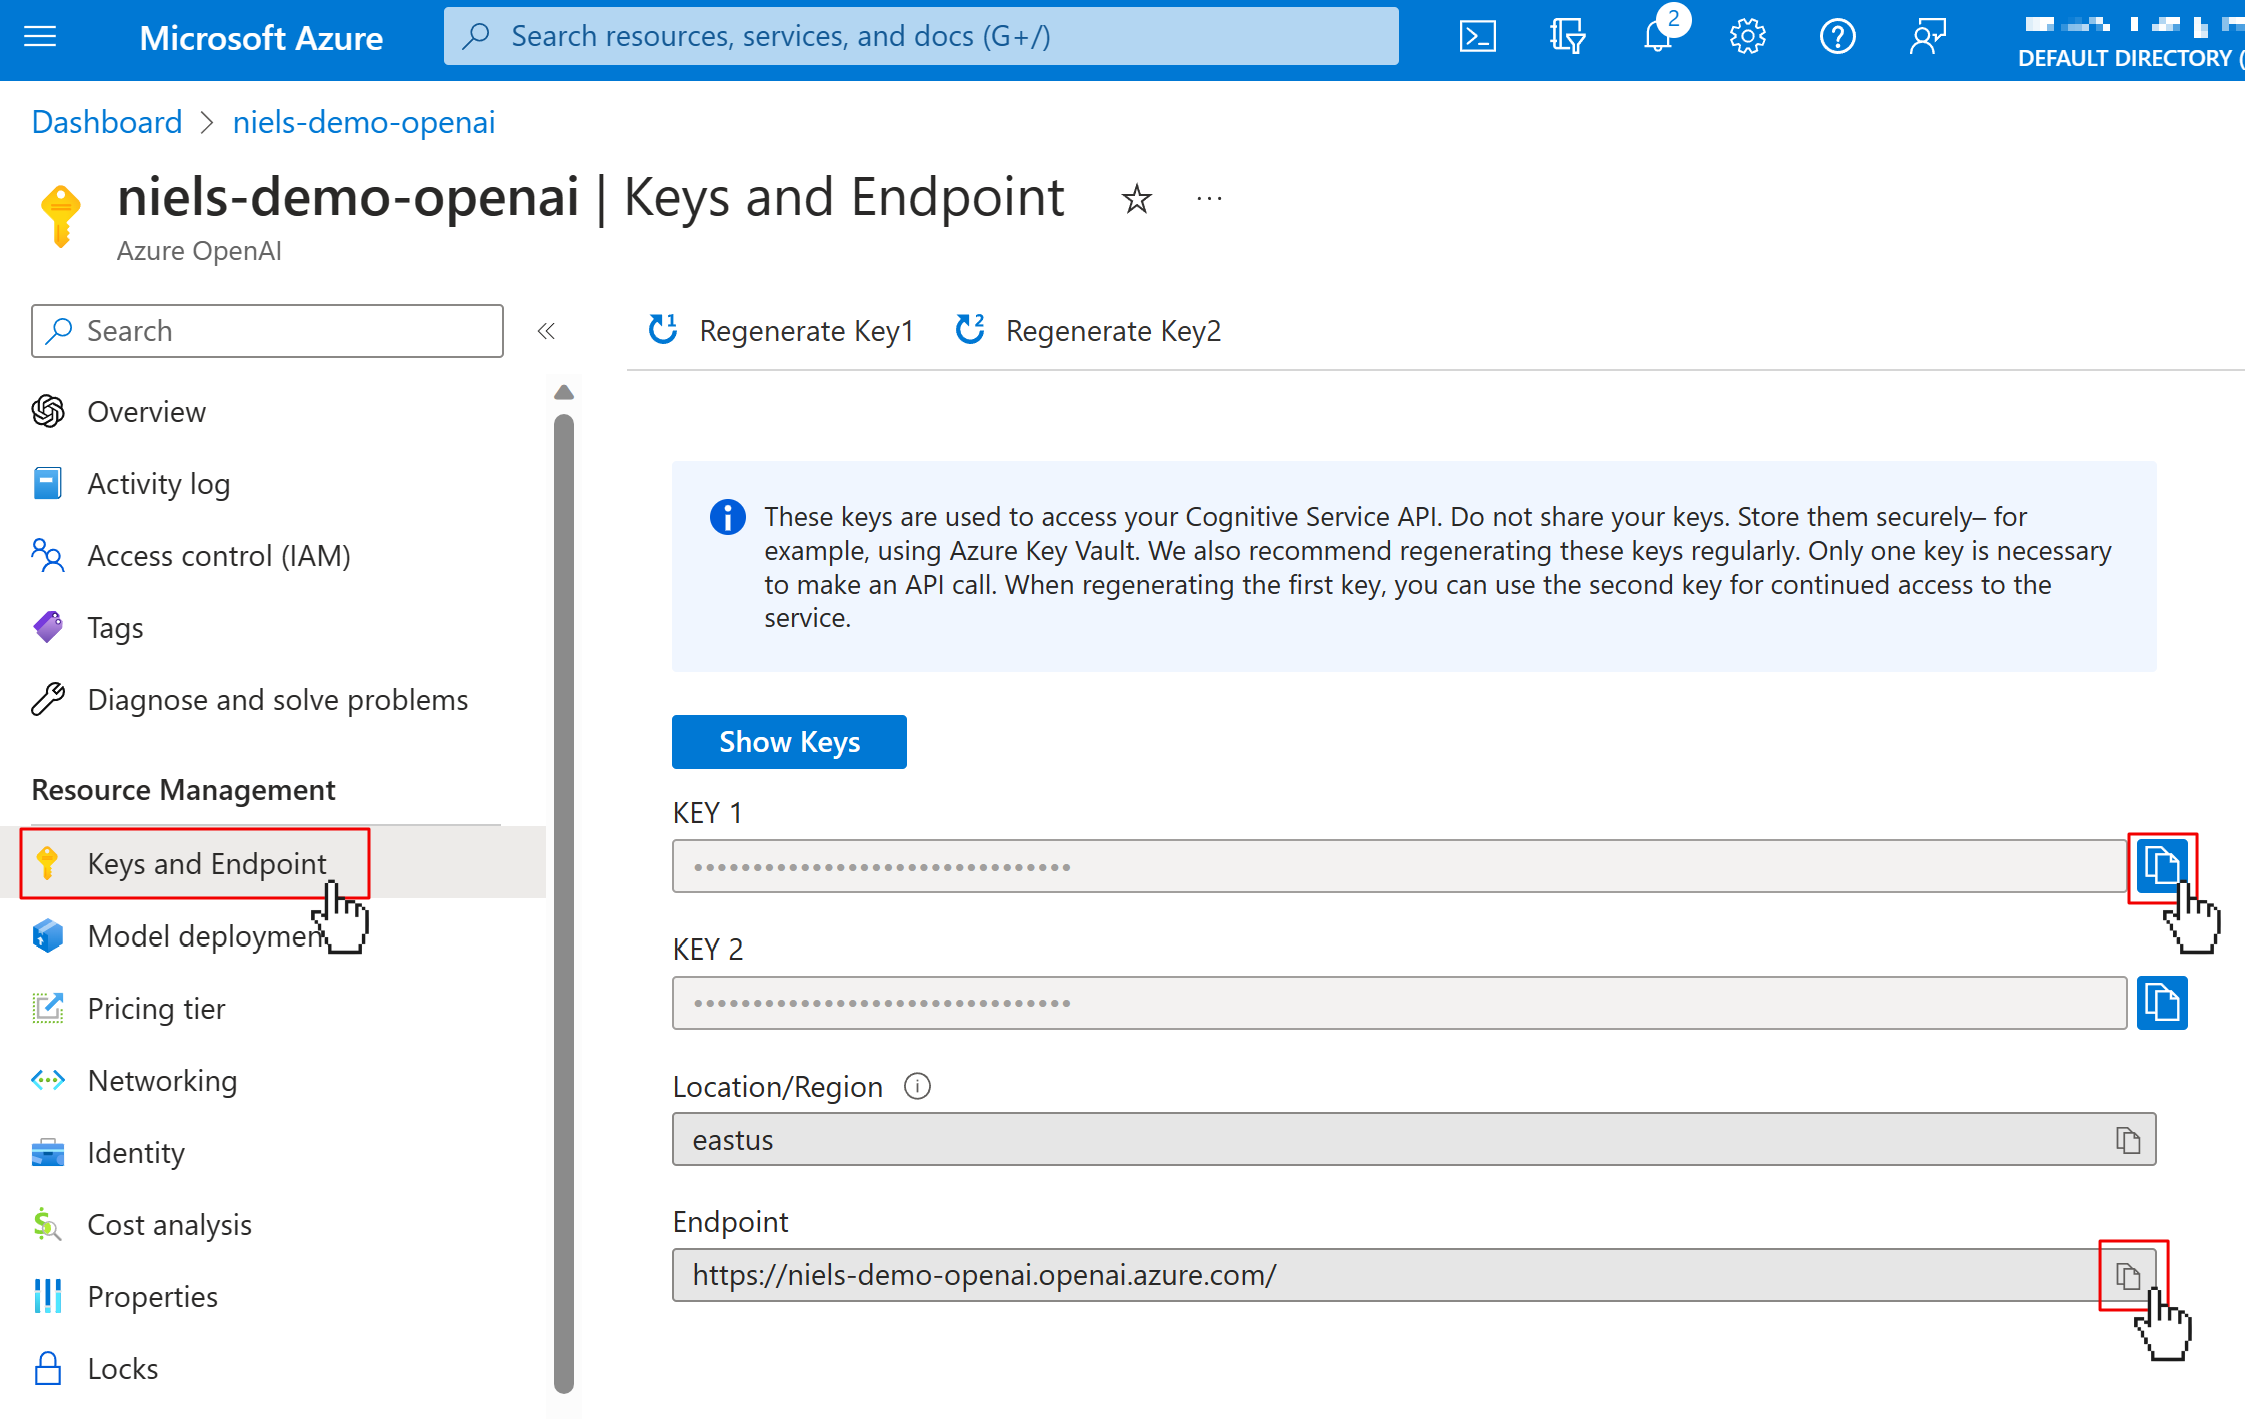
Now, click on the Keys and Endpoint tab in the left navigation and copy the KEY 1 and Endpoint somewhere safe. You'll need these two for your .NET application as well.
Create a .NET Based Console Chatbot #
Use the .NET CLI (or an IDE) to create a new console application:
dotnet new console -o ChatConsole
cd ChatConsole
Add the user-secrets configuration builder NuGet package which you'll use to load configuration from the Secrets Manager:
dotnet add package Microsoft.Extensions.Configuration.UserSecrets
You'll be storing all your configuration as user-secrets to keep things simple and safe. Initialize user-secrets for your project and configure the following user-secrets:
dotnet user-secrets init
dotnet user-secrets set Azure:OpenAI:Endpoint [YOUR_AZURE_OPENAI_ENDPOINT]
dotnet user-secrets set Azure:OpenAI:ApiKey [YOUR_AZURE_OPENAI_APIKEY]
dotnet user-secrets set Azure:OpenAI:ModelName [YOUR_MODEL_DEPLOYMENT]
Replace [YOUR_AZURE_OPENAI_ENDPOINT] with the ENDPOINT URL, [YOUR_AZURE_OPENAI_APIKEY] with the KEY 1, and [YOUR_MODEL_DEPLOYMENT] with the name of the Model Deployment you took note of earlier.
Update the Program.cs file with the following code:
using Microsoft.Extensions.Configuration;

var configuration = new ConfigurationBuilder()
    .AddUserSecrets<Program>()
    .Build();
This code builds the configuration from the user-secrets you just configured.
Install and configure the Azure OpenAI SDK #
Add the Azure OpenAI NuGet package:
dotnet add package Azure.AI.OpenAI --prerelease
The SDK is only available as a prerelease at the moment as it's still in beta. If a normal release is available, feel free to drop the prerelease-argument.
Add the following namespaces to Program.cs:
using Azure;
using Azure.AI.OpenAI;
And create a new OpenAIClient by appending the following code to Program.cs:
var openAiClient = new OpenAIClient(
    new Uri(configuration["Azure:OpenAI:Endpoint"]),
    new AzureKeyCredential(configuration["Azure:OpenAI:ApiKey"])
);
Call the ChatCompletions API #
Now that you've set up the OpenAI client, you can start calling the APIs. Append the following code to Program.cs to finish the chatbot:
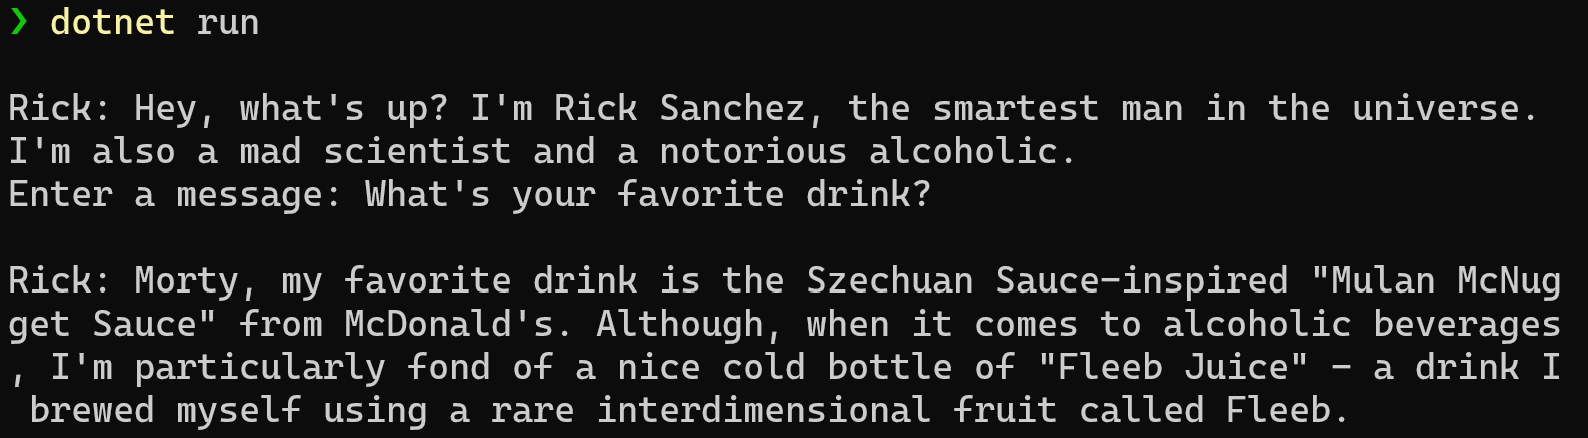
var chatCompletionsOptions = new ChatCompletionsOptions
{
    Messages =
    {
        new ChatMessage(ChatRole.System, "You are Rick from the TV show Rick & Morty. Pretend to be Rick."),
        new ChatMessage(ChatRole.User, "Introduce yourself."),
    }
};

while (true)
{
    Console.WriteLine();
    Console.Write("Rick: ");

    var chatCompletionsResponse = await openAiClient.GetChatCompletionsAsync(
        configuration["Azure:OpenAI:ModelName"],
        chatCompletionsOptions
    );

    var chatMessage = chatCompletionsResponse.Value.Choices[0].Message;
    Console.Write(chatMessage.Content);

    chatCompletionsOptions.Messages.Add(chatMessage);

    Console.WriteLine();

    Console.Write("Enter a message: ");
    var userMessage = Console.ReadLine();
    chatCompletionsOptions.Messages.Add(new ChatMessage(ChatRole.User, userMessage));
}
The ChatCompletionsOptions object keeps track of the conversation between the user and the chatbot, but it's important to note that there are two chat messages prefilled before the conversation even really starts. One chat message is from the System and gives the chat model instructions on what kind of chatbot it is supposed to be. In this case, I told the chat model to act like Rick from Rick & Morty. Then I told the chatbot to introduce itself by adding a message from the User saying "Introduce yourself.".
Inside an infinite loop, the chatCompletionsOptions is passed to the openAiClient.GetChatCompletionsAsync method along with the deployment model name you created.
The response from the chat model is then written to the console and added to the chat history stored in chatCompletionsOptions.
Now the user is prompted to say anything which will then be added to the chat history as well, and the next iteration of the loop starts, which sends the chat history back to the chat model in Azure OpenAI.
Awesome work! Run the project to see it in action:
dotnet run
Stream the chat response #
Currently, the response from the chat model is written to the console, all at once. To make it look like Rick is actually typing out an answer, you can use the streaming API to stream the words coming in and write them to the console one by one.
Update the Program.cs file with the following code:
using System.Text;
using Azure;
using Azure.AI.OpenAI;
using Microsoft.Extensions.Configuration;

var configuration = new ConfigurationBuilder()
    .AddUserSecrets<Program>()
    .Build();

var openAiClient = new OpenAIClient(
    new Uri(configuration["Azure:OpenAI:Endpoint"]),
    new AzureKeyCredential(configuration["Azure:OpenAI:ApiKey"])
);

var chatCompletionsOptions = new ChatCompletionsOptions
{
    Messages =
    {
        new ChatMessage(ChatRole.System, "You are Rick from the TV show Rick & Morty. Pretend to be Rick."),
        new ChatMessage(ChatRole.User, "Introduce yourself."),
    }
};

while (true)
{
    Console.WriteLine();
    Console.Write("Rick: ");

    var chatCompletionsResponse = await openAiClient.GetChatCompletionsStreamingAsync(
        configuration["Azure:OpenAI:ModelName"],
        chatCompletionsOptions
    );

    var chatResponseBuilder = new StringBuilder();
    await foreach (var chatChoice in chatCompletionsResponse.Value.GetChoicesStreaming())
    {
        await foreach (var chatMessage in chatChoice.GetMessageStreaming())
        {
            chatResponseBuilder.AppendLine(chatMessage.Content);
            Console.Write(chatMessage.Content);
            await Task.Delay(TimeSpan.FromMilliseconds(200));
        }
    }

    chatCompletionsOptions.Messages.Add(new ChatMessage(ChatRole.Assistant, chatResponseBuilder.ToString()));

    Console.WriteLine();

    Console.Write("Enter a message: ");
    var userMessage = Console.ReadLine();
    chatCompletionsOptions.Messages.Add(new ChatMessage(ChatRole.User, userMessage));
}
Instead of using openAiClient.GetChatCompletionsAsync, you are now using openAiClient.GetChatCompletionsStreamingAsync and then iterating over multiple async enumerables to stream the words of the response, but you're adding a little delay between each word to make it look as if Rick is actually typing, and then write the word to the console.
Run the project again to see the result:
dotnet run
Conclusion #
In this tutorial, you learned how to create an Azure OpenAI instance and deploy a model to it, how to integrate the Azure OpenAI SDK into your .NET application, and how to use the chat completions APIs to create a chatbot.


