


Send Email and SMS from Google Forms using Zapier, SendGrid, and Twilio

This blog post was written for Twilio and originally published at the Twilio blog.
Forms are one of the fundamental building blocks of the web. Almost all websites use forms to get feedback from users and to gather leads. Many of these forms integrate directly with a Customer Relationship Management (CRM) system, while others forward the form data directly to an email inbox.
If you're building a form using a web framework, you can quickly integrate SendGrid's Email API or one of the SendGrid libraries to forward the data to an email inbox. However, sometimes there's no time to build a fully fledged form yourself, or the form's purpose is for a single short-lived campaign. In that case, you could use an off-the-shelf form product like Google Forms to get the job done quickly with minimal investment. You don't even have to sacrifice the form integrations, because with Zapier's workflow automation, you can integrate Google Forms with tons of products including SendGrid to send emails and Twilio Messaging to send SMS.
In this tutorial, you'll learn how to forward form submission data via email and send a notification via SMS using Google Forms, Zapier, and Twilio. This is a very common scenario on the web, but with these tools you don't even need to write any code to make it happen!

Zapier workflow automation with Google Forms, SendGrid, and Twilio SMS
If you're looking to build a form for users to signup for your newsletter, you can use SendGrid’s Signup Forms to build and manage your email contact list for newsletters.
Prerequisites #
You will need these things to follow along:
- A free or paid SendGrid account. Sign up here to send up to 100 emails per day completely free of charge.
- A free or paid Twilio account (If you register here, you'll receive $10 in Twilio credit when you upgrade to a paid account!)
- A free Zapier account, or even better, a paid or Zapier trial account (more on that later)
- A Google account
Create a Google Form #
You can skip this step if you already set up a Google Form. If not, head over to forms.new which will automatically create a blank new form in Google Forms for you. Give your new form a name and use the interface to build your form out until you're happy with the result.
For example, here's a form that will contact me, so I added a Name, Email Address, and Question field to the form.

Click on the Responses tab, click the 3 dotted icon to open the overflow menu, and click Select response destination.
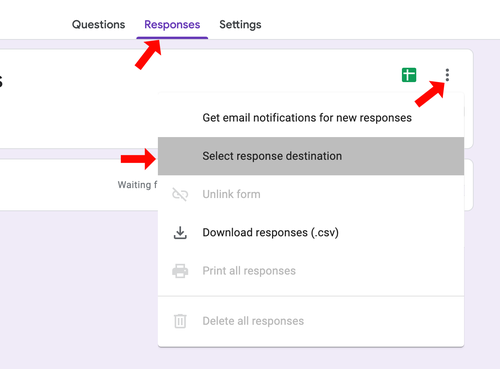
A modal will appear where you can decide which Google Sheet (spreadsheet) will be used to store the form submissions in. Select the Create a new spreadsheet option and, if desired, change the name of the spreadsheet and then click Create.

This spreadsheet will be used to store responses in rows whenever the form gets filled out and submitted.
Later, you will configure Zapier to watch this spreadsheet and run your automation workflow whenever a new row appears on the spreadsheet.
Configure your SendGrid account to send emails #
In SendGrid, you'll need to configure two things before you can send emails: First, you’ll need to set up Sender Authentication. This will verify that you own the email address or domain that you will send emails from. Second, you’ll need to create a SendGrid API Key with permission to send emails.
Sender Authentication #
To quickly get started, you will use Single Sender Verification for this tutorial. This verifies that you own the email address that the application will send emails from. Single Sender Verification is great for testing purposes, but it is not recommended for production.
Twilio recommends Domain Authentication for production environments. An authenticated domain proves to email providers that you own the domain, and removes the "via sendgrid.net" text that inbox providers would otherwise append to your from address.
To set up Single Sender Verification, click the Settings tab in the left menu. Once the settings tab opens, click Sender Authentication.

Then, click Get Started under the Single Sender Verification section.

This opens a form in the right-side panel. Fill out the form with your information and email address.

Click Create after filling out the form. Another panel will appear on the right, asking you to confirm your email address in your email inbox.
Go to your personal email inbox, open the email from SendGrid, and click Verify Single Sender.

Your email address has been verified. You can now use it to send emails!
Create a SendGrid API key to send emails #
Back on the SendGrid website, click API Keys under the Settings tab, then click Create API Key in the top right-hand corner. This opens another form in the right-side panel.
Give your API Key a useful name. You can assign different permissions to the API Key. For optimal security, you should only give the minimum amount of permissions that you need.
Next, click Restricted Access.

Scroll down to the Mail Send accordion item and click on it to reveal the permissions underneath. Drag the slider to the right for the Mail Send permission.

Scroll to the bottom of the form and click Create & View. The API key will now be displayed on your screen.
You will not be able to retrieve the API key again once you leave this screen, so make sure you copy the API Key somewhere safe.

With the sender verified and the API Key created, you’ll now be able to send emails from Zapier's workflow automation.
Get Your Twilio Configuration #
To send text messages from Zapier, you'll first need to buy a Twilio Phone Number. If you're using a trial account, the cost for the phone number will be applied to the complimentary trial credit. If you don't already have a phone number, go and buy a phone number via the Twilio Console.
Next, you'll need some configuration elements from Twilio to send text messages from Zapier. Back in the Twilio Console, take note of your Twilio Account SID and Auth Token located at the bottom left of the page.

After all these steps you should have:
- The name of the spreadsheet that hosts your Google Form data
- The email address of your Verified Sender on SendGrid.
- The API Key from SendGrid to send emails
- The Account SID and Auth Token from Twilio to send SMS
Fantastic! Time to create the automation with Zapier.
Create workflow automation with Zapier #
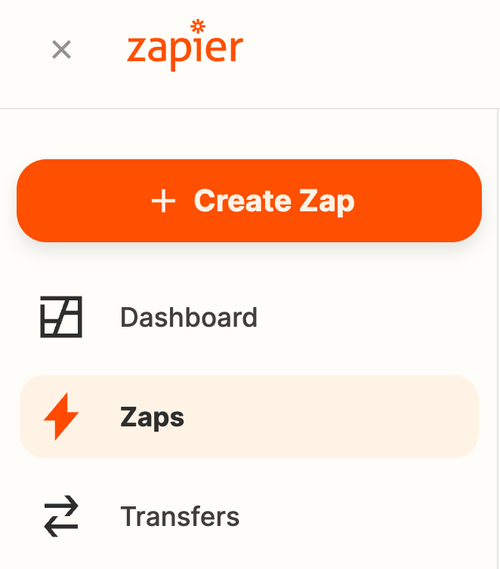
Head over to the Zapier dashboard and click on the Create Zap button on the top left.
In Zapier's words: "A Zap is an automated workflow that connects your apps and services together". After creating the Zap, change the name of the Zap to something meaningful. This can be done by clicking on the pen icon next to Untitled Zap in the top left corner of the page.
Configure the Google Forms Trigger to receive the form submission #
Every Zap needs to have a Trigger; a trigger is an event that will start the workflow. In the App Event search bar, enter "Google Forms" and then click on the "Google Forms" entry.

In the Event dropdown, select the "New Response in Spreadsheet" option, and click Continue.
Click on Sign in, authenticate with Google, and share the necessary permissions with Zapier. Once authenticated, click Continue.
Now, click on the Spreadsheet dropdown and select the spreadsheet that you created earlier for your Google Form.

A single spreadsheet can contain multiple worksheets, so Zapier will also prompt you to select the Worksheet of which there is only one in this case. Select the Worksheet and then click Continue.
You may be asked to test the trigger; if so, click Skip test since testing will be done at the end of the tutorial.
Configure the SendGrid Action to send an email #
After the Trigger, there's already an empty action added to your Zap. Click on the action and search for the SendGrid app. For the Event dropdown, select "Send Email", and then click Continue.

Now you have to help Zapier authenticate to your SendGrid account. Click on the Sign In button and a window will pop up asking you for the "Mail API Key", enter the SendGrid API Key you took note of earlier and click "Yes, Continue".

Now that Zapier has your SendGrid API Key, click Continue and configure the action.
As you can see in the screenshot below, I configured the fields as follows:
- To: The email address of the person that will review the form submission. You can use your own email address for this.
- From: The Verified Sender email address that you configured earlier in SendGrid.
- From Name : A name that uniquely identifies the form. This is added using the "Insert Data …" popover that lets you use the data from a trigger or a previous action. In this case, the data is pulled from the Google Form trigger.
- Reply To: This is optional, but if your form is like mine and has an input for the user's email address, this field can be used to reply directly to the form submitter through the email instead of replying to the From email address.
- Subject: The title that will be shown on the subject line of the email.
- HTML: The HTML will be the content of your email. You can also use the Text field if you don't want to use HTML.
Here's the HTML I used for my email:
If you have a similar form as mine, you'll have to replace the [FORM SUBMISSION …] placeholders with the data from the Google Forms trigger.

Click Continue. The last step is to Test action which you can skip by clicking Skip test since you will be coming back at the end to it to test it out.
Configure the Twilio Action to send an SMS #
The next action you will create is to send an SMS notification when the form has been submitted.
This will require you to add a second action to your Zap, which is only possible for paid Zapier plans. If you don't have a paid Zapier plan or trial, you can only create Zaps with a single action. However, as a workaround, you could create a second Zap with the same Google Forms trigger and the Twilio action for sending SMS.
Click on the plus-icon below the SendGrid action you just created. Look for "Twilio" in the App Event search box and click on the Twilio option.

Next, select "Send SMS" in the Event dropdown, and click Continue.

Click on Sign in to share the Twilio credentials with Zapier. Enter the Twilio Account SID and Auth Token you took note of earlier and click "Yes, Continue".

Back in your Zap, click Continue.
Select your Twilio Phone Number from the "From Number" dropdown. Next, enter your phone number into the "To Number" field, and enter some text into the Message field.

Click Continue, then Skip test and finally Publish Zap. You’ll be asked to confirm to turn on your Zap; click Publish & Turn On.
Testing your Zap #
While creating your Zap, you may have noticed that you can test the trigger and actions from Zapier's interface. Go to your trigger and under the "Test trigger" section, click on the "Test trigger" button.

If someone already submitted the form before, Zapier will grab the form submission data and use it to test your Zap. Be mindful tho, this data may be a real submission, not just your own test data. Now head over to each of your actions and test them out as well.
To do an end-to-end test, go to your Google Form and submit it and wait until you get your email and text message.
Next steps #
You just created one of the most commonly requested form flows without writing any code; well apart from some HTML that is. However, there are many more triggers and actions you could build automations with, and if you want to build and explore more communication applications, check out our no-code application builder, Twilio Studio. For example, learn how to build an Interactive Voice Response (IVR) application with Twilio Studio so you can take phone calls to help out customers without having a call representative.


