Use YARP to host client and API server on a single origin to avoid CORS

Applications are often split up into a client and a server. The client renders the UI and communicates to the server through an API. But when the client and server are split up into separate projects and hosted at different origins (origin == scheme + host + port), it can be a hassle for the client to communicate with the server.
On the web specifically, communicating between different origins can be painful. By default, clients are not allowed to make ajax requests to a different origin. The server has to use Cross-Origin Resource Sharing (CORS) headers to allow cross-origin ajax requests.
Another way to resolve CORS challenges is to circumvent it entirely by having the client and server hosted on the same origin. If your technology stack allows for it, you can merge the client and server into a single project and host them on a single origin. If that's not possible, you can use a reverse proxy to consolidate the client origin and the server origin under the proxy's origin.
The diagram above visualizes how the HTTP requests from a web browser are sent to the reverse proxy. If the requested path starts with '/API/', the proxy forwards the request to the API server. Otherwise, the request is sent to the Client Web Server which serves the frontend of your application.
You can pick any option for your frontend client, backend server, and reverse proxy server. It does not matter because they all understand the same language: HTTP. In this walkthrough, you'll learn how to communicate between a Blazor WebAssembly (WASM) client and an ASP.NET Web API without CORS. The client and server will be hosted on a single origin by putting Microsoft's new reverse proxy: YARP (which stands for "YARP: A Reverse Proxy")
But why YARP instead of Apache or Nginx? YARP is built on top of ASP.NET Core which gives you some benefits:
- You can configure YARP with any supported external configuration like JSON, environment variables, and many more.
- You can also use .NET code to configure and extend your reverse proxy.
- You can store this piece of infrastructure in source control like any other ASP.NET Core project.
- You can increase consistency between your local environment and server environments.
- It's cross-platform, you can develop locally on your OS of choice but deploy it to your server OS of choice. For example, you can develop on Windows but use Linux machines for production.
Prerequisites #
To follow along you need the following tech:
- .NET 6 (older versions work too with slight adjustments) (installation instructions)
- OS which supports the above tech such as Windows, Mac, or Linux
You can find all the source code for the end result on GitHub.
Create the Blazor WASM client #
Before creating the client, create a folder where all projects will reside using the following commands:
mkdir YarpClientServerSingleOrigin
cd YarpClientServerSingleOrigin
Create a solution file using the dotnet command line interface (CLI):
dotnet new sln
Create the Blazor WASM client:
dotnet new blazorwasm -n Client -o Client
-n: specifies the name of the project
-o: specifies the location where the project will be created
Using the command above, you created a Blazor WASM project named 'Client' which is also used as the default namespace. This project is created in a subfolder also named 'Client'.
Add the client project to the solution file:
dotnet sln add Client
When you take a look at the FetchData component at Client\Pages\FetchData.razor, you can see the client is requesting data about the weather from a static JSON file:
forecasts = await Http.GetFromJsonAsync<WeatherForecast[]>("sample-data/weather.json");
Update this line of code to fetch the data from api/WeatherForecast instead:
forecasts = await Http.GetFromJsonAsync<WeatherForecast[]>("api/WeatherForecast");
This API endpoint does not exist yet, but you will create this soon.
In .NET 6, new web projects will use a random port number. To make sure you're using the same port as this tutorial, update the Client/Properties/launchSettings.json to match the content below:
{
  "profiles": {
    "Client": {
      "commandName": "Project",
      "dotnetRunMessages": true,
      "launchBrowser": true,
      "inspectUri": "{wsProtocol}://{url.hostname}:{url.port}/_framework/debug/ws-proxy?browser={browserInspectUri}",
      "applicationUrl": "https://localhost:5000",
      "environmentVariables": {
        "ASPNETCORE_ENVIRONMENT": "Development"
      }
    }
  }
}
With this change, the web application will run on https://localhost:5000 when using dotnet run.
Create the ASP.NET Core Web API server #
Create the Web API project using the dotnet CLI:
dotnet new webapi -n Server -o Server
Using the command above, you created a Web API project named 'Server' which is also used as the default namespace. This project is created in a subfolder also named 'Server'.
Add the server project to the solution file:
dotnet sln add Server
To make sure you're using the same port as this tutorial, update the Server/Properties/launchSettings.json to match the content below:
{
  "profiles": {
    "Proxy": {
      "commandName": "Project",
      "dotnetRunMessages": true,
      "launchBrowser": true,
      "applicationUrl": "https://localhost:5001",
      "environmentVariables": {
        "ASPNETCORE_ENVIRONMENT": "Development"
      }
    }
  }
}
With this change, the web application will run on https://localhost:5001 when using dotnet run.
There is a single controller that comes out of the box with the WebAPI template: WeatherForecastController.cs.
This controller generates random weather forecasts and luckily for you matches the data model used in the Blazor WASM client. The WeatherForecast API can be requested at '/WeatherForecast', but the client will request it at '/api/WeatherForecast'. The reverse proxy you will create next will suffix the API with '/api'.
Create the YARP proxy #
Unlike some other reverse proxies, you cannot simply install it on your server and configure it. Instead, you have to create an empty ASP.NET Core Web project, add the YARP NuGet package, and configure YARP using configuration or code. Then you need to build, publish, and install it onto your server like any other ASP.NET Core application. This walkthrough will go through building and running this locally for development only.
Create an empty ASP.NET Core Web project using the dotnet CLI:
dotnet new web -n Proxy -o Proxy
Using the command above, you created an empty web project named 'Proxy' which is also used as the default namespace. This project is created in a subfolder also named 'Proxy'. In this case, Proxy is short for Reverse Proxy and not Forward Proxy.
Add the proxy project to the solution file:
dotnet sln add Proxy
To make sure you're using the same ports as this tutorial, update the Proxy/Properties/launchSettings.json to match the content below:
{
  "$schema": "https://json.schemastore.org/launchsettings.json",
  "profiles": {
    "Server": {
      "commandName": "Project",
      "dotnetRunMessages": true,
      "launchBrowser": true,
      "launchUrl": "swagger",
      "applicationUrl": "https://localhost:5002",
      "environmentVariables": {
        "ASPNETCORE_ENVIRONMENT": "Development"
      }
    }
  }
}
With this change, the proxy will run on https://localhost:5002 when using dotnet run.
Add the NuGet package for YARP to the proxy project:
dotnet add package Yarp.ReverseProxy
The package 'Yarp.ReverseProxy' is at version '1.0.0' at the time of writing this. If any of the upcoming functionality does not work as expected with newer versions of YARP, make sure to check out YARP's documentation.
Update the 'Program.cs' file to enable YARP's functionality:
var builder = WebApplication.CreateBuilder(args);
builder.Services.AddReverseProxy()
    .LoadFromConfig(builder.Configuration.GetSection("ReverseProxy"));
var app = builder.Build();
app.MapReverseProxy();
app.Run();
YARP also has documentation on how to add YARP to the older .NET templates.
You can use any external configuration like 'appsettings.json' or environment variables to configure YARP. You can also configure the reverse proxy dynamically using code.
Update the 'Proxy\appsettings.Development.json' file:
{
  "Logging": {
    "LogLevel": {
      "Default": "Information",
      "Microsoft.AspNetCore": "Warning"
    }
  },
  "ReverseProxy": {
    "Clusters": {
      "Client": {
        "Destinations": {
          "Client1": {
            "Address": "https://localhost:5000"
          }
        }
      },
      "Server": {
        "Destinations": {
          "Server1": {
            "Address": "https://localhost:5001"
          }
        }
      }
    },
    "Routes": {
      "ServerRoute": {
        "ClusterId": "Server",
        "Match": {
          "Path": "/api/{**catch-all}"
        },
        "Transforms": [
          {
            "PathRemovePrefix": "/api"
          }
        ]
      },
      "ClientRoute": {
        "ClusterId": "Client",
        "Match": {
          "Path": "{**catch-all}"
        }
      }
    }
  }
}
The above JSON configures YARP as follows:
- 2 clusters are defined
- Client cluster only has one destination named "Client1" which points to the local development URL for the Blazor WASM client.
- Server cluster only has one destination named "Server1" which points to the local development URL for the Web API server.
- A cluster named "Client"
- A cluster named "Server"
- 3 routes are defined
- A route named "ServerRoute" forwards HTTP requests to the "Server" cluster any time the requested path starts with '/api/'. Before the HTTP request is forwarded to the Web API, the '/api' prefix is removed by the "PathRemovePrefix" transform.
- A route name "ClientRoute" forwards HTTP requests to the "Client" cluster for all remaining requests.
In this case, there is only one destination per cluster, but YARP can handle multiple destinations and the reverse proxy will load balance the HTTP requests.
Testing the result #
You need to open three different terminals. One for every project. Run the following commands:
- Terminal 1:
dotnet run --project Client - Terminal 2:
dotnet run --project Server - Terminal 3:
dotnet run --project Proxy
Open the browser and navigate to the Proxy which should be accessible at 'https://localhost:5002'.
The Blazor client should be showing up. Click on the "Fetch Data" navigation link.
The weather forecast data should populate just as you expect it from an out-of-the-box Blazor WASM project. But every time you reload, the data should be different because it is being generated by the Web API project.
You can write a script to bring up and down all three projects instead of manually running them in three different terminals. OR you could use Microsoft's experimental project Tye to tie everything together.
Install Tye as a .NET global tool:
dotnet tool install --global Microsoft.Tye --version 0.10.0-alpha.21420.1
You can find the most recent version of Tye at Nuget.
Initialize tye using this command:
tye init
This will create a configuration YAML file 'tye.yaml'. Update the YAML file to match the content below:
name: yarpclientserversingleorigin
services:
- name: client
  project: Client/Client.csproj
  bindings:
  - port: 5000
    protocol: https
- name: server
  project: Server/Server.csproj
  bindings:
  - port: 5001
    protocol: https
- name: proxy
  project: Proxy/Proxy.csproj
  bindings:
  - port: 5002
    protocol: https
Tye will automatically use random ports for projects if you do not specify them. The Proxy project expects the client and server project to be run on ports 5000 and 5001. Hence you need to explicitly configure which port and protocol these projects use in the YAML file.
Run this command to bring up all projects at once with tye:
tye run
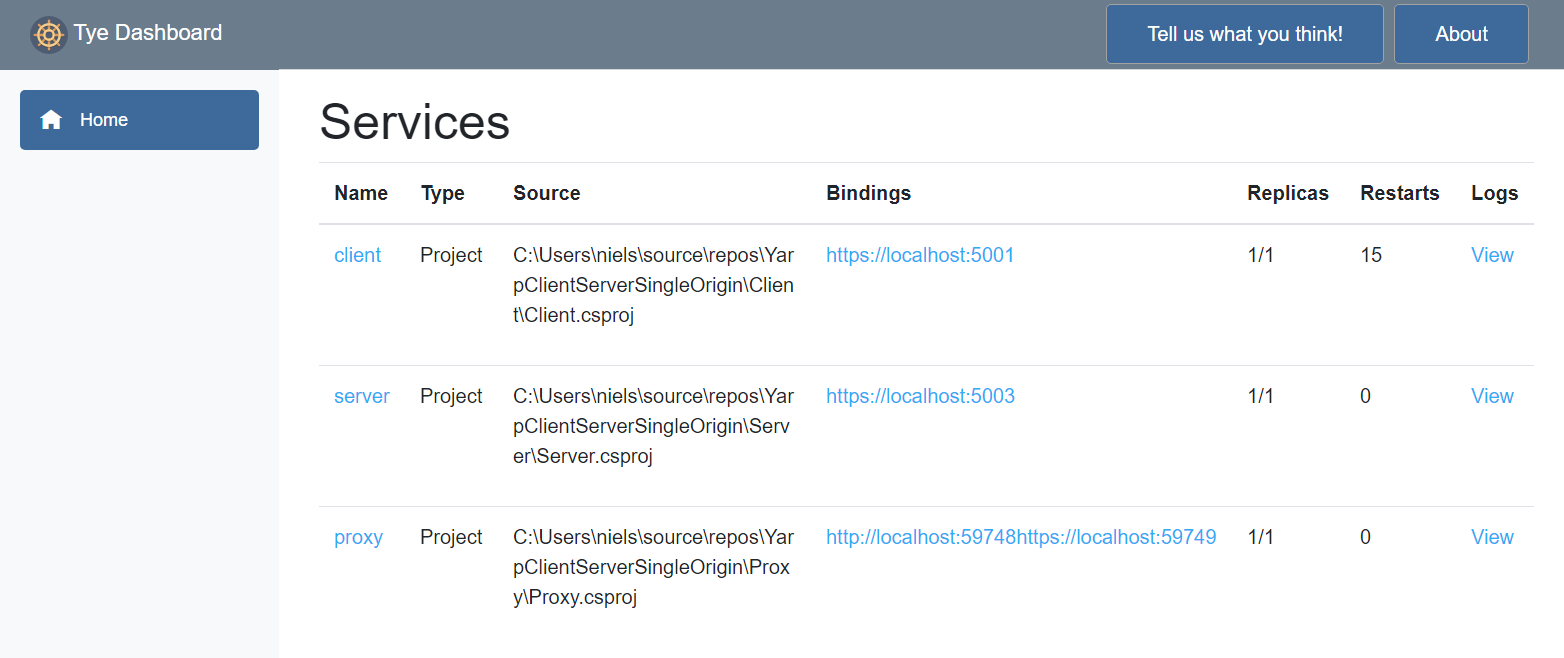
You can find the proxy URL in the output, or you can navigate to tye's dashboard at localhost:8000.

In addition to finding the URL for each service, you can also watch the log streams of each service.
Summary #
API's need to provide CORS headers to explicitly allow ajax requests from web clients hosted on a different origin. Reverse proxies can merge the API origin and client origin onto a single origin. Using Microsoft's new reverse proxy "YARP", you configured the proxy to forward requests to '/api' to the Web API, and all other requests to the Blazor WASM client.
Using project Tye, you tied all projects together so you can easily run all projects at once instead of starting them in 3 different terminals.
You can learn more about YARP at YARP's Documentation and you can learn more about project Tye on its GitHub repository.


