


Capture emails during development using smtp4dev and UI Test with Selenium

If you develop websites for a living, you probably have created a couple of forms that send out emails. You may have created dozens of them by now and your personal inbox is filled with spam from yourself and your peers testing. So much so that you've created automated Outlook rules to read & archive them automatically.
Maybe it's just me and I'm projecting, but if you find yourself in a similar situation, check out this tool called smtp4dev. Here's how smtp4dev describes itself on the readme:
A dummy SMTP server for Windows, Linux, Mac OS-X (and maybe elsewhere where .NET Core is available). Lets you test your application without spamming your real customers and without needing to set up a complicated real email server with a special configuration. Messages received in smtp4dev can be viewed and inspected.
Smpt4dev used to be a Windows GUI tool similar to Papercut—another excellent dev mail tool—, but now is a cross-platform service that you can host locally and remotely. Smtp4dev supports SMTP, basic IMAP, and offers a web interface to view the captured emails.
You can also configure relay options so that emails to specific email addresses are relayed to a real SMTP server so that the emails are actually being sent out.
Let's install smtp4dev and try it out.
Install smtp4dev as a .NET tool #
To install smtp4dev, you need to have the .NET Core SDK 3.1 or up on your machine. When the SDK is installed, run the following command:
dotnet tool install -g Rnwood.Smtp4dev
This will install smtp4dev as a global .NET tool which will make it available from the command line as smtp4dev.
Consult the installation instructions if you want to run smtp4dev as a docker container, as a Windows service, or run it inside IIS.
Now that smpt4dev is installed, execute the following command to run the tool:
smtp4dev --urls=https://localhost:5002
- port 5002 exposes the webserver
- port 25 exposes the SMTP server
- port 143 exposes the IMAP server
If you omit the --urls argument, the webserver will use 'http://localhost:5000' and 'https://localhost:5001'.
I recommend specifying a different URL to host smtp4dev to avoid port collision with other ASP.NET Core applications using the same two default hosting URLs.
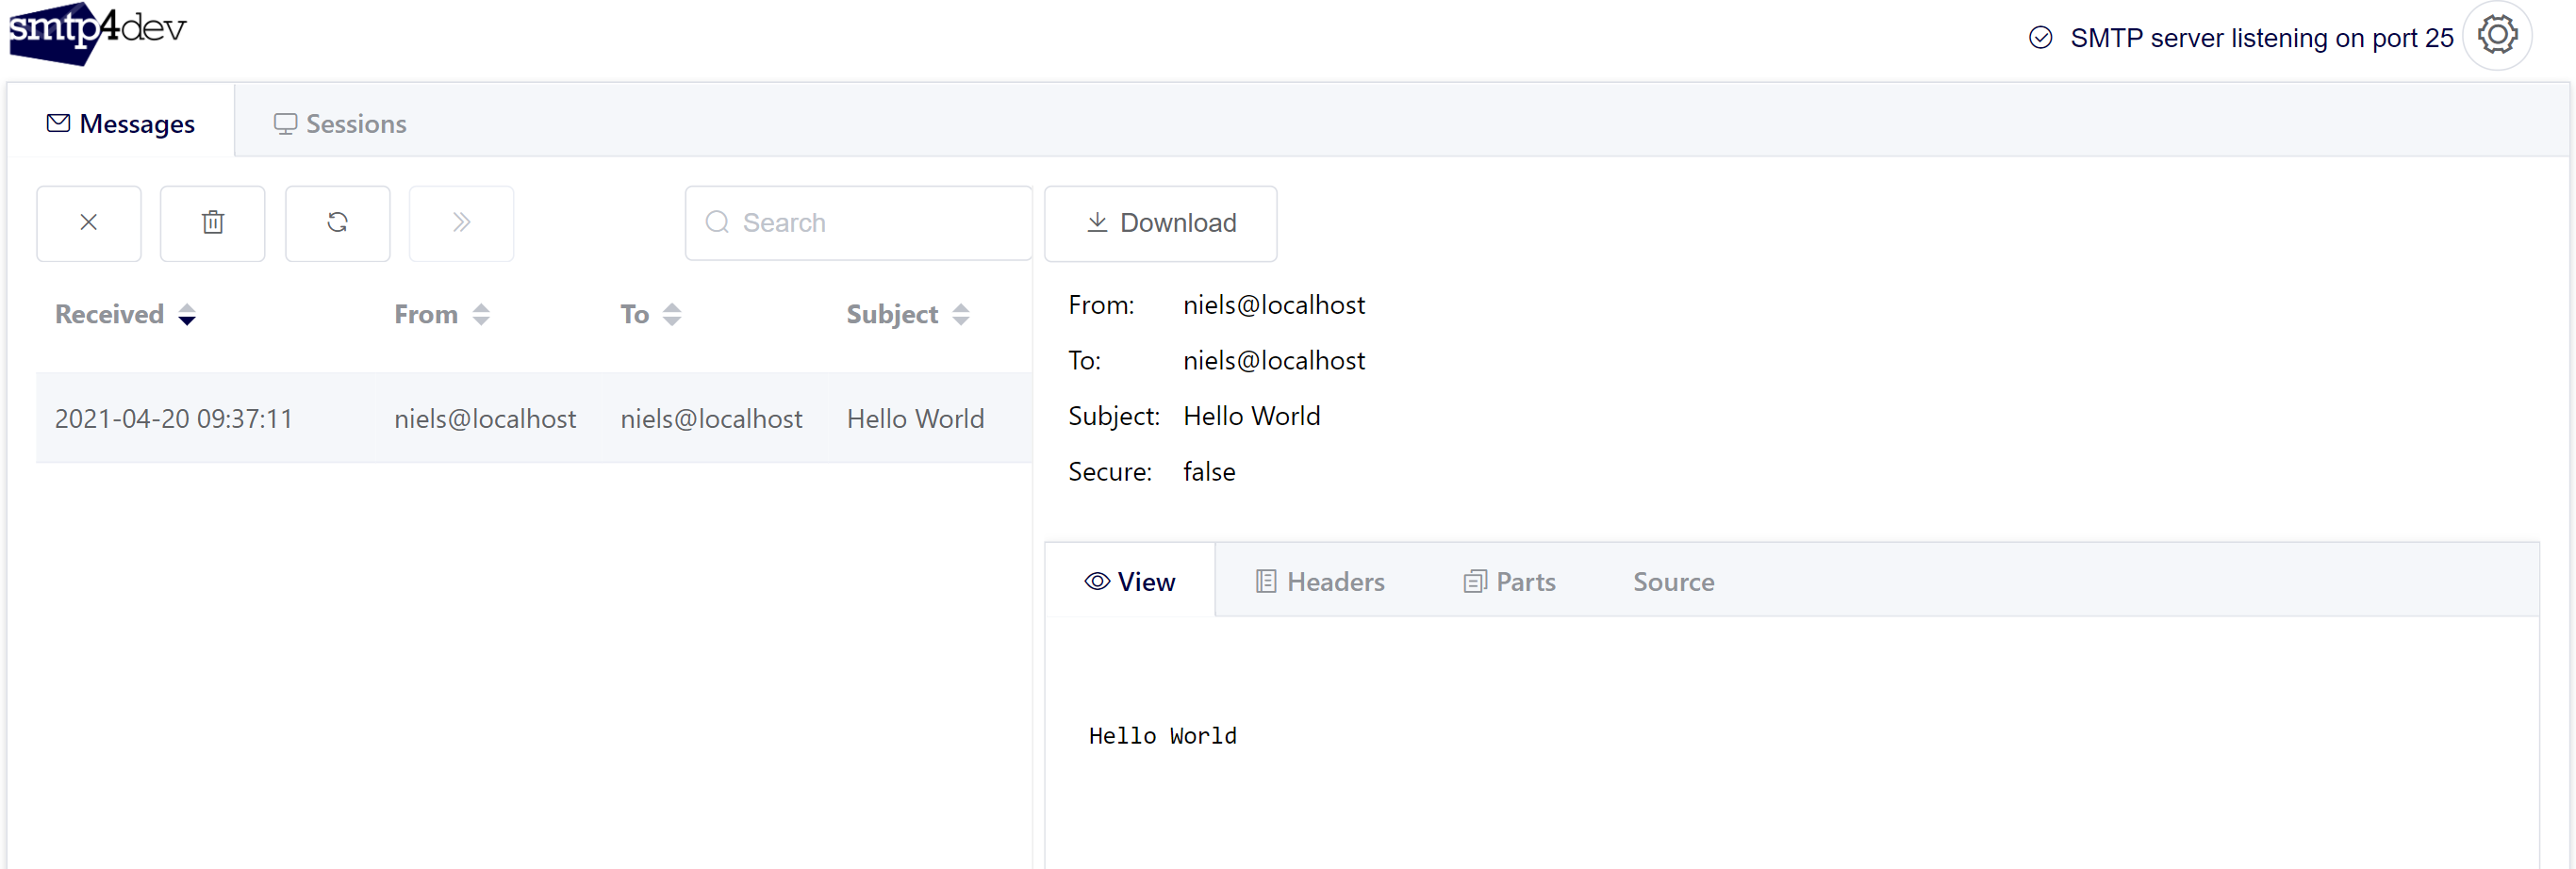
To quickly verify the SMTP functionality, open a PowerShell and run this command:
Send-MailMessage -SmtpServer localhost -Subject "Hello World" -Body "Hello World" -From "niels@localhost" -To "niels@localhost"
This command will use the smtp4dev SMTP server hosted at localhost:25 to send an email. When you browse to the smtp4dev dashboard at https://localhost:5002, you will find the email:
Send emails from a form in ASP.NET Core MVC #
Sending an email from PowerShell is useful for verifying your SMTP server, but you likely want to send emails from your application.
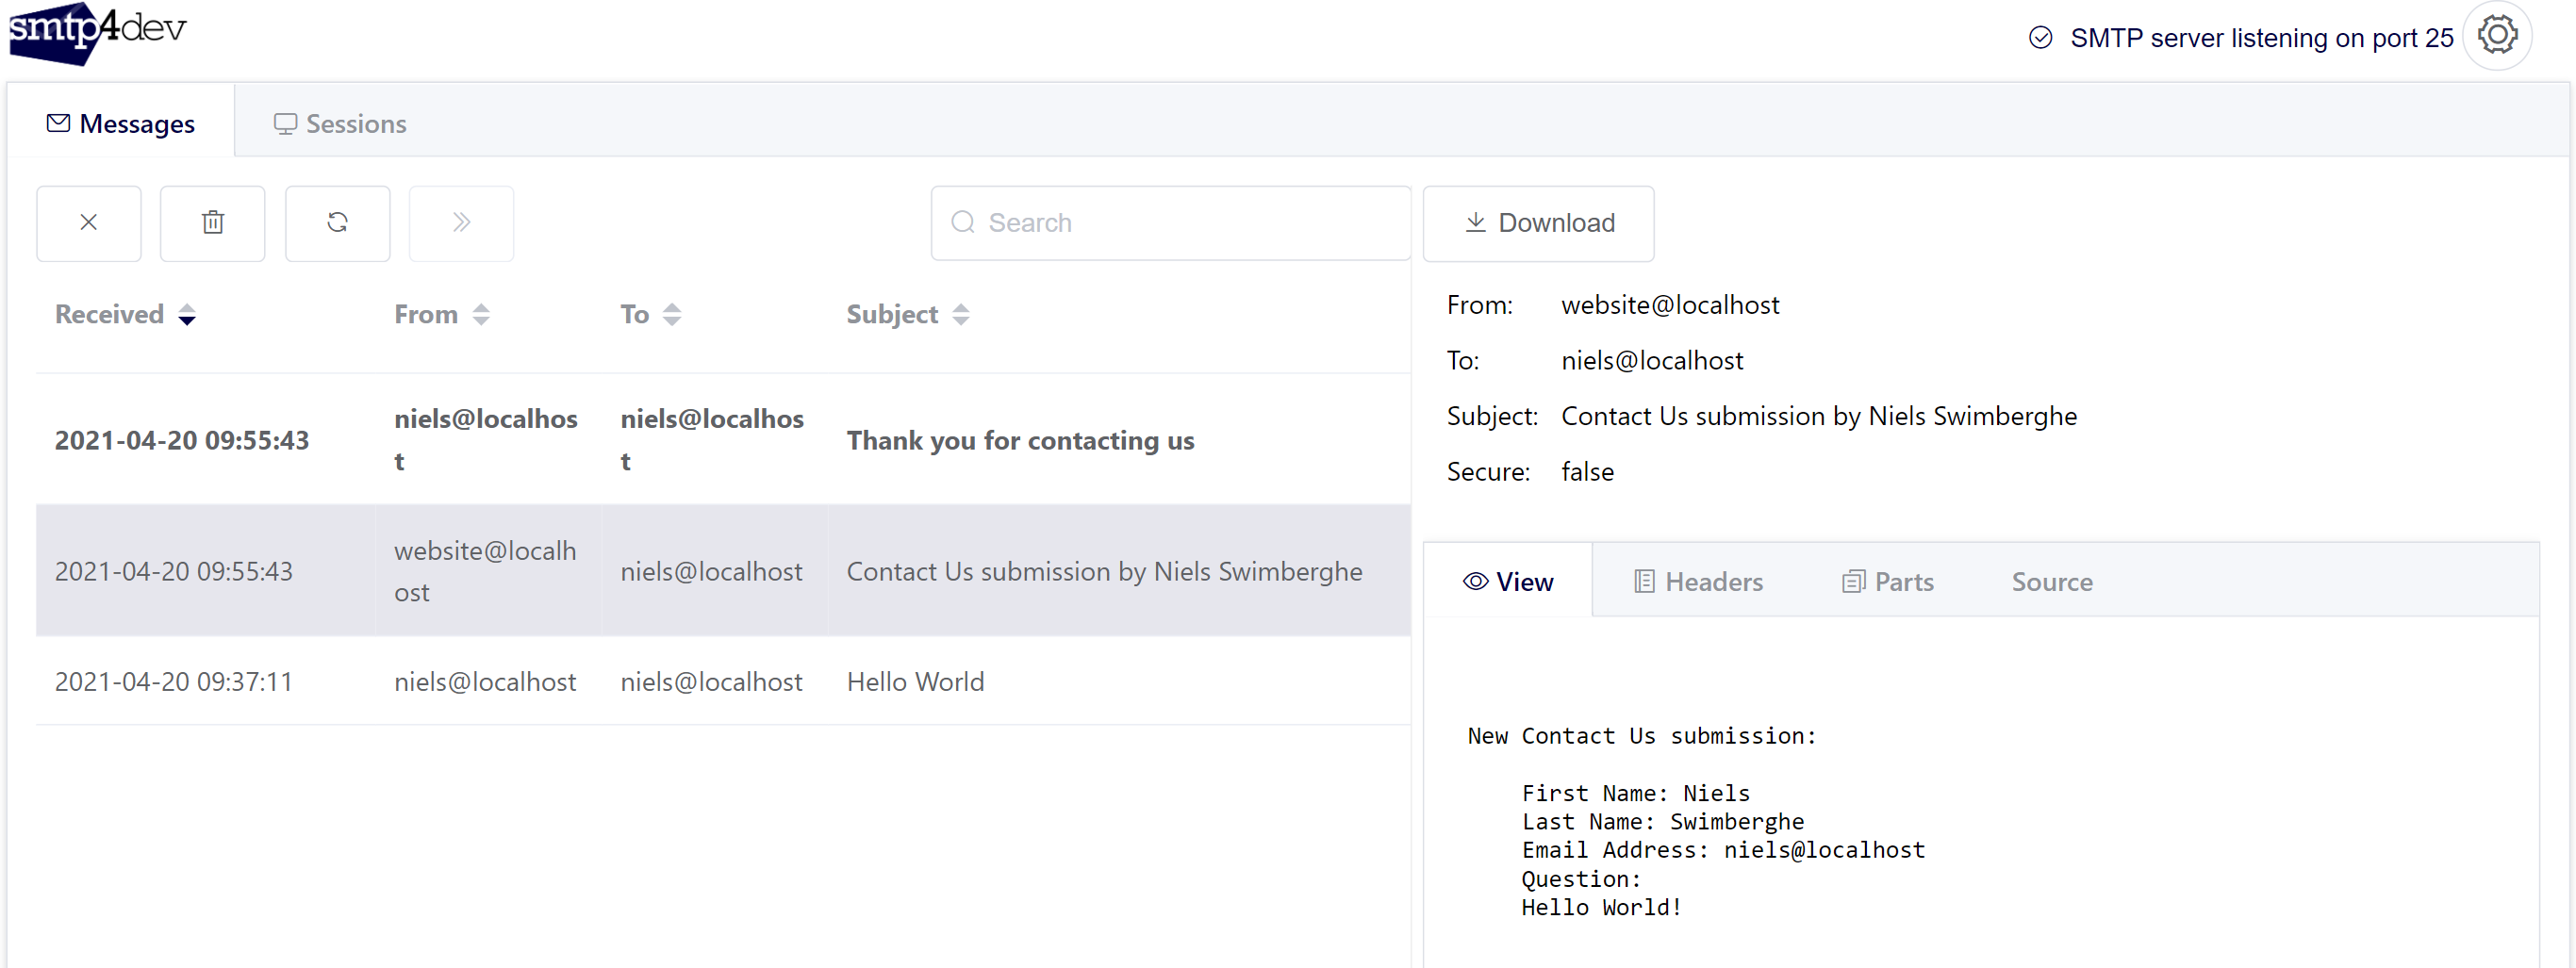
Here's a sample ASP.NET Core MVC application that accepts a form submission and sends two emails, one to the submitter of the form and one to the owner of the website.
The emails are sent using the SmtpClient which comes with the .NET SDK. This is what the controller looks like for the form:
using System.Diagnostics;
using System.Net.Mail;
using Microsoft.AspNetCore.Mvc;
using Smpt4devSample.WebApp.Models;

namespace Smpt4devSample.WebApp.Controllers
{
    public class HomeController : Controller
    {
        public IActionResult Index() => View();

        [HttpPost]
        public IActionResult Index(ContactFormViewModel contactFormViewModel)
        {
            if(!ModelState.IsValid)
            {
                return View();
            }

            using var smtpClient = new SmtpClient()
            {
                Host = "localhost",
                Port = 25
            };
            var submitterFullName = $"{contactFormViewModel.FirstName} {contactFormViewModel.LastName}";

            // send email to website owner
            smtpClient.Send("website@localhost", "niels@localhost", $"Contact Us submission by {submitterFullName}",
$@"New Contact Us submission:

    First Name: {contactFormViewModel.FirstName}
    Last Name: {contactFormViewModel.LastName}
    Email Address: {contactFormViewModel.EmailAddress}
    Question:
    {contactFormViewModel.Question}"
            );

            // send email to submitter
            smtpClient.Send("niels@localhost", contactFormViewModel.EmailAddress, "Thank you for contacting us",
                $"Thank you {submitterFullName} for reaching out to us.\nWe have received your inquiry and will respond to you in 24 hours."
            );

            return RedirectToAction(nameof(ThankYou));
        }

        public IActionResult ThankYou() => View();
    }
}
The controller does the following:
- Serve the form using the
Index()action - Accept the form submission using the
Index(ContactFormViewModel)action. This action does the following- validate form state
- create a SmtpClient that connects to localhost:25
- send an email to the site owner with all values provided by the form submitter
- send an email to the email address provided by the form submitter
- redirect to the
ThankYou()action.
(Always a good idea to have a dedicated thank you page for optimal analytics tracking 👍)
These are the emails you get when submitting the form:
UI Test the form using Selenium #
Up until now, the form and email functionality have been verified manually, but if this functionality is important to your website, you should automate this with an end-to-end (E2E) test.
Here's how you can test the above form using Selenium and MSTest:
using System;
using System.Linq;
using System.Threading.Tasks;
using MailKit;
using MailKit.Net.Imap;
using Microsoft.VisualStudio.TestTools.UnitTesting;
using OpenQA.Selenium.Chrome;

namespace Smpt4devSample.UiTests
{
    [TestClass]
    public class ContactUsFormTests
    {
        [ClassInitialize]
        public static async Task SetupTests(TestContext testContext)
        {
            var chromeDriverInstaller = new ChromeDriverInstaller();
            await chromeDriverInstaller.Install();
        }

        [TestMethod]
        public void TestContactUsForm()
        {
            // output should look like 9014dbca920e40dfa7c760a4a4808759@localhost
            var emailAddress = $"{Guid.NewGuid().ToString("N")}@localhost";

            var chromeOptions = new ChromeOptions();
            chromeOptions.AddArguments("headless");
            using (var driver = new ChromeDriver(chromeOptions))
            {
                driver.Navigate().GoToUrl("https://localhost:5001");
                driver.FindElementById("firstName").SendKeys("Jon");
                driver.FindElementById("lastName").SendKeys("Doe");

                driver.FindElementById("emailAddress").SendKeys(emailAddress);

                driver.FindElementById("question").SendKeys("Hello World!");

                driver.FindElementsByCssSelector("form button").First().Click();

                Assert.AreEqual("https://localhost:5001/Home/ThankYou", driver.Url);
                Assert.IsTrue(driver.PageSource.Contains("Thank you for contacting us"));
            }

            // more to come
        }
    }
}
The code does the following:
- Before running the test, the correct ChromeDriver is installed into the bin folder automatically using the ChromeDriverInstaller from a previous blog post: "Download the right ChromeDriver version & keep it up to date on Windows/Linux/macOS using C# .NET"
- The test itself does the following:
- Generate a unique email address by using a GUID and concatenating it with "@localhost". By using a unique email address for this test session, you avoid false negatives from previous test runs.
- Create a headless ChromeDriver instance.
The ChromeDriver class is provided by theSelenium.WebDriverpackage. You can install the package using this command:dotnet add package Selenium.WebDriver - Navigate to the form located at https://localhost:5001
- Fill out the form with dummy data
- Submit the form by clicking the submit button
- Verify you are redirected to the thank you page
- Verify the content of the thank you page
This is a great start, but unfortunately, this is often where the test automation ends and the manual verification starts. In many instances, developers and QA engineers will manually verify whether the email was sent out and received, but you can automate this part too.
Verify emails using IMAP #
If you're not using smtp4dev or you're trying to verify the email functionality in production, you can use different protocols for downloading email like POP or IMAP. Alternatively, if your email service offers an HTTP API like Outlook and Gmail, you can also use that for email verification.
Smtp4dev has IMAP support—tho only basic functionality—which you can use to verify the emails. The test sample continues to verify the email functionality by fetching the emails using IMAP:
// more to come

using (var client = new ImapClient())
{
    client.Connect("localhost", 143);
    client.Authenticate(userName: "", password: "");

    // The Inbox folder is always available on all IMAP servers...
    var inbox = client.Inbox;
    inbox.Open(FolderAccess.ReadOnly);

    var emailToSiteOwner = inbox.GetMessage(inbox.Count - 1);
    var emailToSubmitter = inbox.GetMessage(inbox.Count - 2);
    MimeKit.MimeMessage tempMessage = null;

    // swap emails if necessary
    if(
        !emailToSiteOwner.Subject.Contains("Contact Us submission by") &&
        emailToSubmitter.Subject.Contains("Contact Us submission by")
    )
    {
        tempMessage = emailToSiteOwner;
        emailToSiteOwner = emailToSubmitter;
        emailToSubmitter = tempMessage;
    }

    Assert.AreEqual("Contact Us submission by Jon Doe", emailToSiteOwner.Subject);
    Assert.IsTrue(emailToSiteOwner.TextBody.Contains("First Name: Jon"));
    Assert.IsTrue(emailToSiteOwner.TextBody.Contains("Last Name: Doe"));
    Assert.IsTrue(emailToSiteOwner.TextBody.Contains($"Email Address: {emailAddress}"));
    Assert.IsTrue(emailToSiteOwner.TextBody.Contains("Hello World!"));

    Assert.AreEqual("Thank you for contacting us", emailToSubmitter.Subject);
    Assert.IsTrue(emailToSubmitter.TextBody.Contains("Thank you Jon Doe for reaching out to us."));

    client.Disconnect(true);
}
The code does the following:
- Create an ImapClient instance. This class is provided by another open-source project called Mailkit.
You can install mailkit into your test project using this command:dotnet add package MailKit - Connect and authenticate to smtp4dev using IMAP
- Get the inbox and open it using read-only mode
- Store the last two messages into
emailToSiteOwnerandemailToSubmitterand swap them if necessary - Verify the contents of the emails match the data from the form submission
- disconnect and dispose of the ImapClient
IMAP also has support for advanced querying of emails, but unfortunately, that is not supported by smtp4dev.
The above sample code works fine for local testing, but for a production server where there are many more emails, you should use the IMAP querying functionality to find and verify your emails.
Additional resources #
Check out these links to learn more about the topics in this post:
- smtp4dev GitHub
- SmtpClient documentation by Microsoft
- The sample code for this post on GitHub
- Query IMAP sample from MailKit
- How to UI test using Selenium and .NET Core on Windows, Ubuntu, and MacOS
- Download the right ChromeDriver version & keep it up to date on Windows/Linux/macOS using PowerShell
- Download the right ChromeDriver version & keep it up to date on Windows/Linux/macOS using C# .NET

