


How to create a Discord Bot using the .NET worker template and host it on Azure Container Instances

Discord is a communication platform originally built for the gaming audience, but it has also become popular with other groups. Many developer communities have also moved from Slack to Discord. With Discord, you can create servers to build your community. On your server, you can chat, make voice calls, video calls, stream, and more.
There are multiple ways you can extend Discord as a developer. In this tutorial, you'll learn how to create a bot for Discord.
Discord Bots #
A bot in Discord can be added to both voice and text channels where it can listen and respond to users' input. To real users, a bot looks just like a normal participant that can be online and offline, although explicitly marked as a bot. Permission management on channels also works the same for users and bots.
To build your own bot, you need to connect to Discords WebSocket APIs. This can be a simple command-line application running on a Raspberry PI, but you'll use an Azure Container Instance to host your .NET project. In your .NET project, you'll use the DSharpPlus library to more easily interact with the Discord API.
Prerequisites #
For this tutorial, you will need the following:
- Operating System supported by Docker & .NET (Core)
- Docker
- .NET 5 SDK (earlier versions should work too)
- Azure subscription
- Azure CLI
- A Discord Account
This tutorial is built using Ubuntu and the bash shell. The tutorial should work with other operating systems and shells, but you may need to make slight adjustments.
You can find the source code for the Discord bot on this GitHub repository.
Create a Discord bot application in the Discord Developer Portal #
Before you can start developing a bot for Discord, you need to create a Discord application in the developer portal.
Navigate to discord.com/developer and click on the "New Application" button.
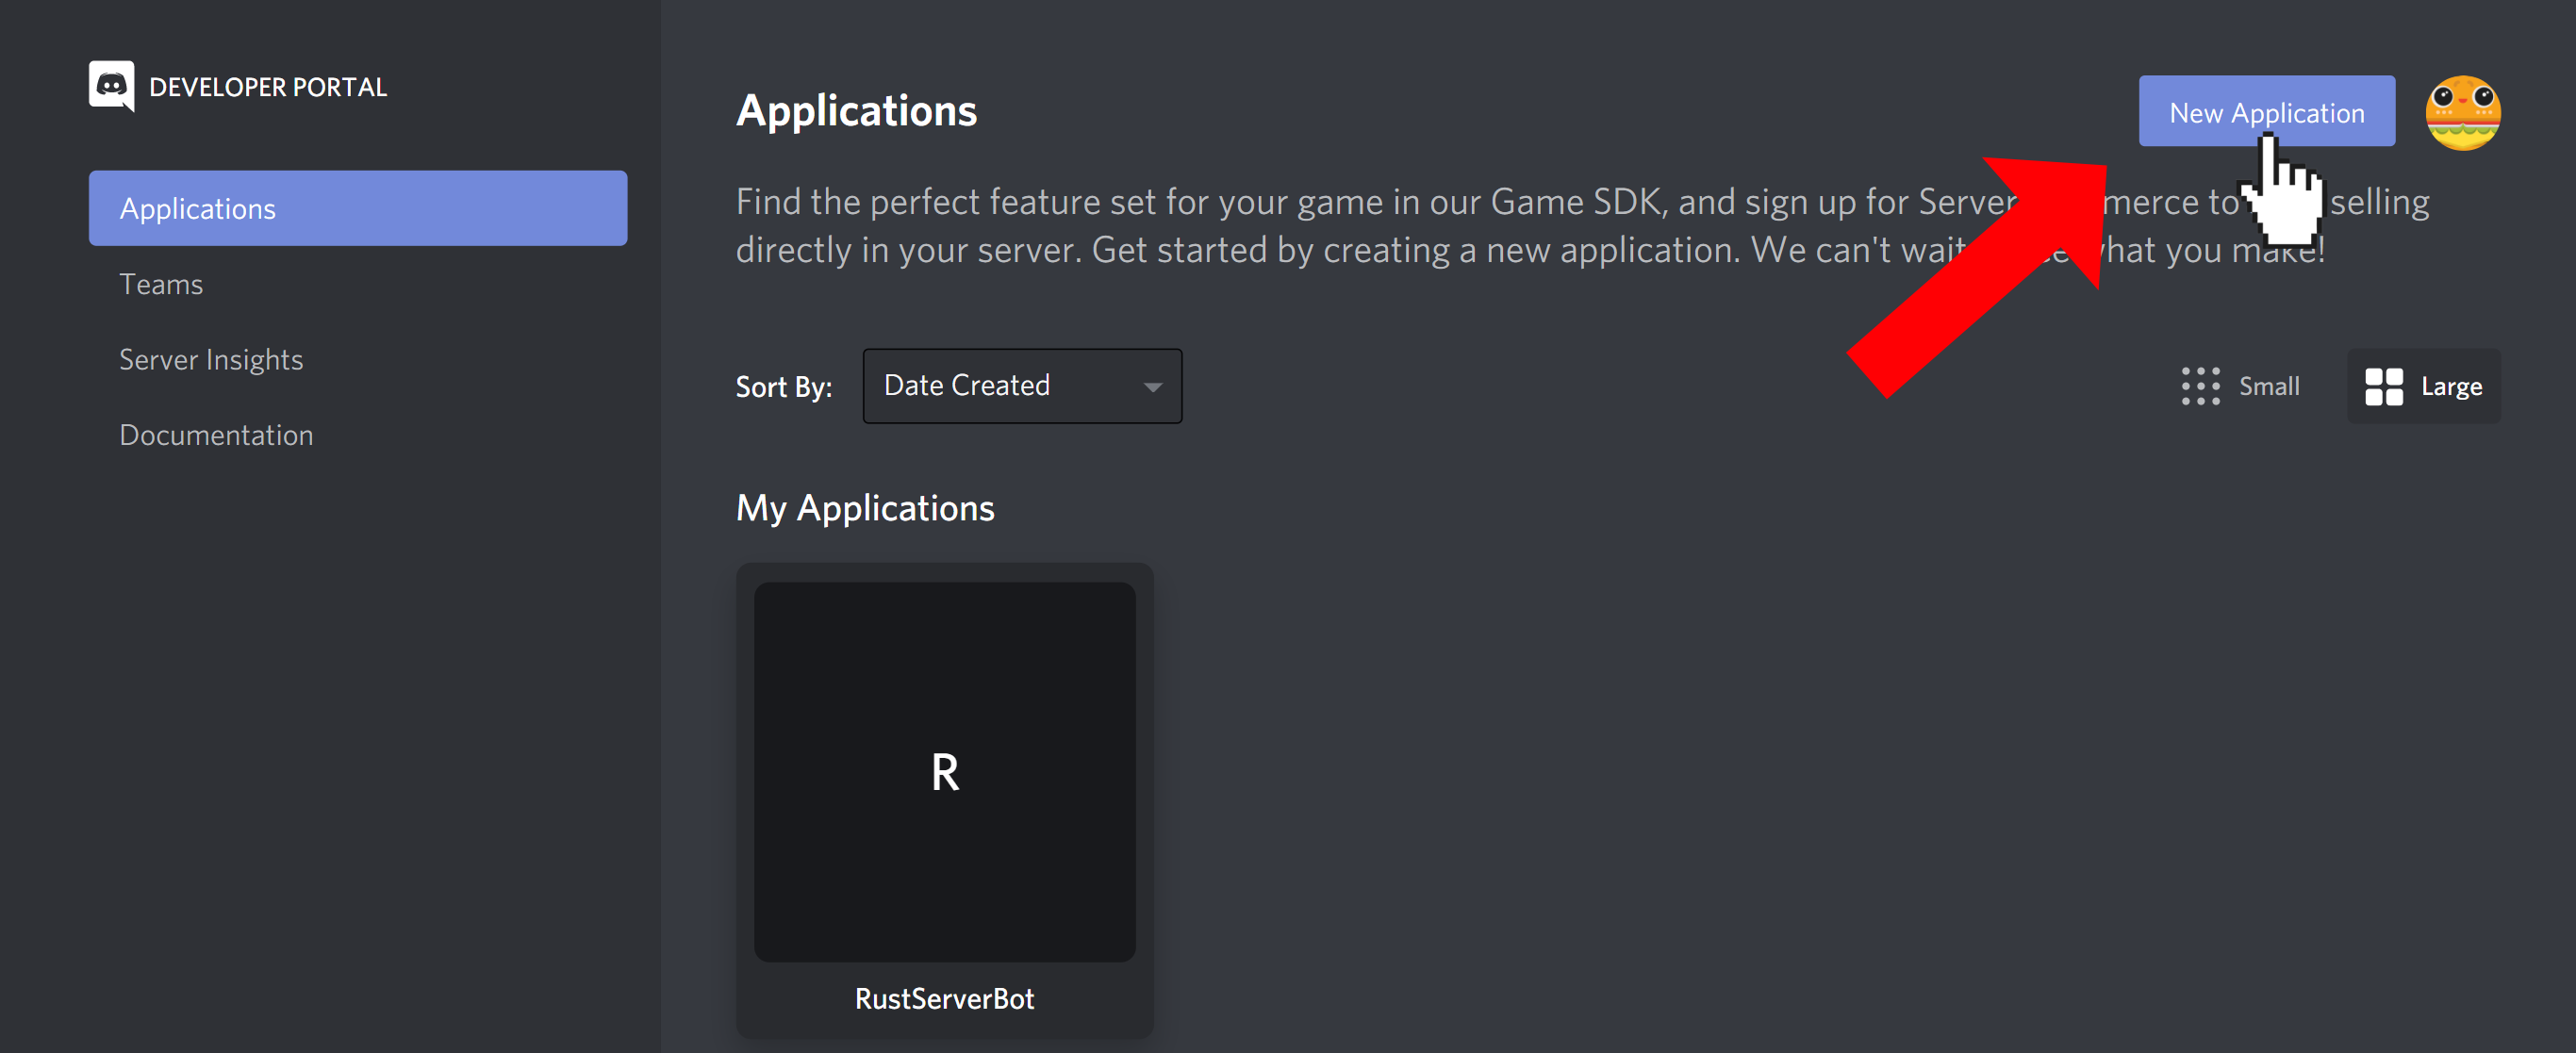
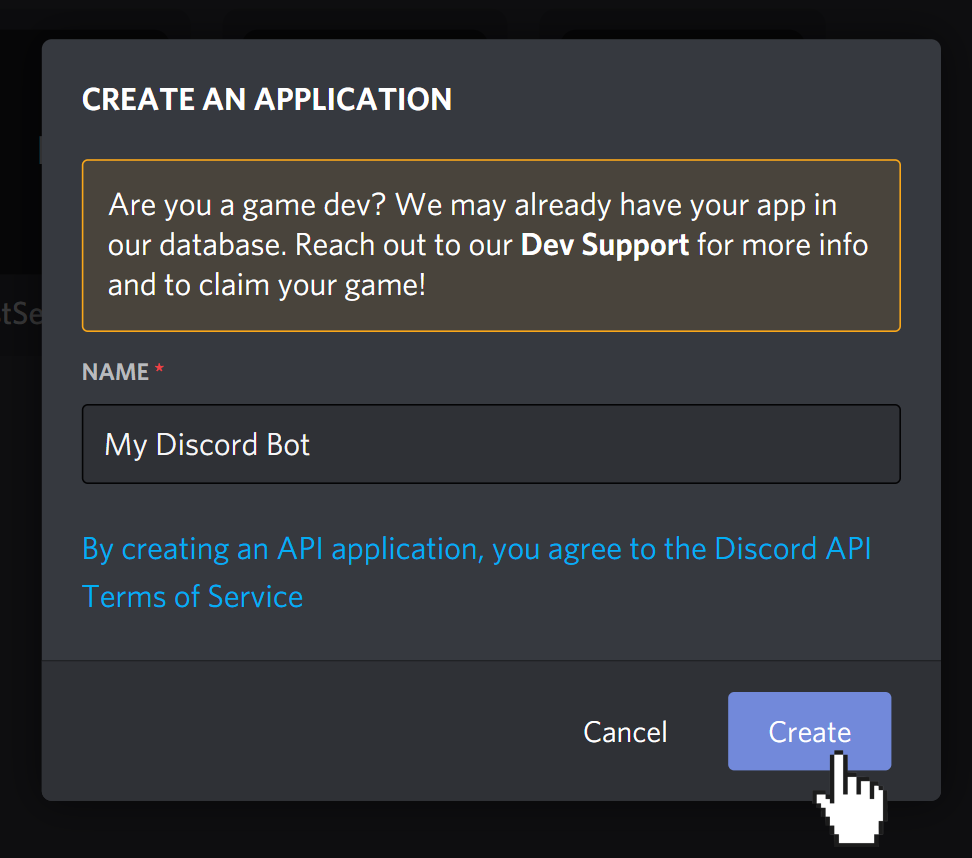
Enter a name for your application (the name of your bot) and click the "Create" button.
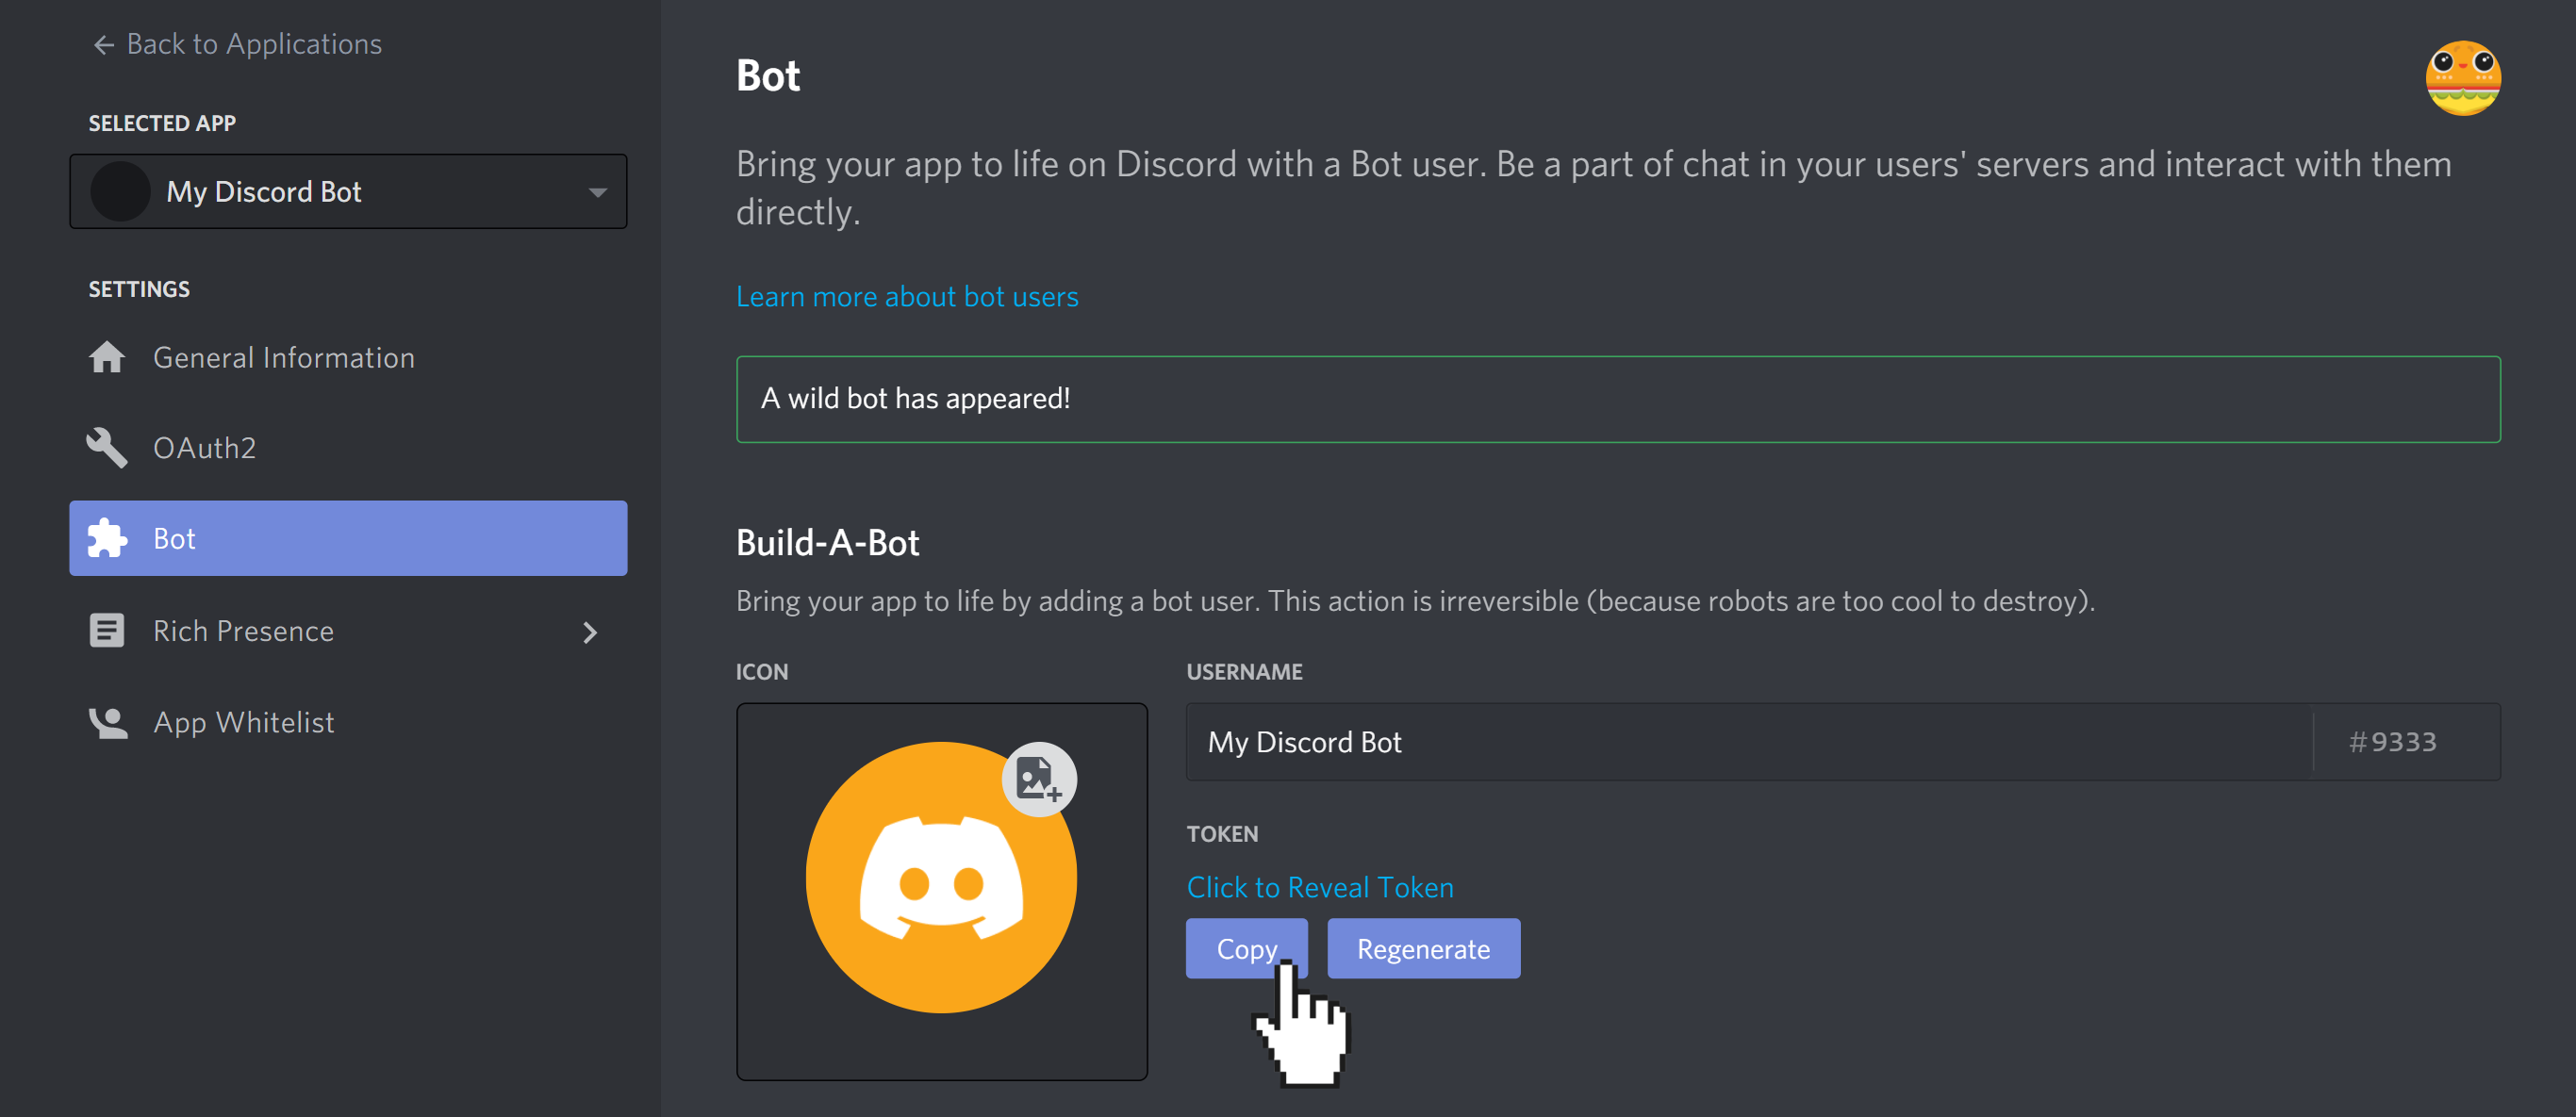
After the application is created, you are taken to the settings for the application.
Navigate to the "Bot" tab using the side navigation on the left, and click on the "Add Bot" button.

When prompted, confirm to add a bot to this app using the "Yes, do it!" button.
Now that the bot functionality has been added, you can copy the Discord bot token.
Click on the "Copy" button and keep it somewhere for later.
August 31, 2022 Discord Update: Reading Message Content is now a Privileged Intent. For this tutorial to work, you'll need to go into your Discord Application > Bot and find the "MESSAGE CONTENT INTENT" toggle, enable it and click "Save Changes". Once your bot reaches 100 or more servers, this will require verification and approval. Instead of using Message Content, Discord recommends using the Interactions API to bring new features like Slash Commands, Buttons, and Select Menus that don't require access to message content.
Navigate to the "OAuth2" tab and select the following checkboxes:
- Under "Scopes" check "bot"
- Under "Bot permissions" check "Send Messages"
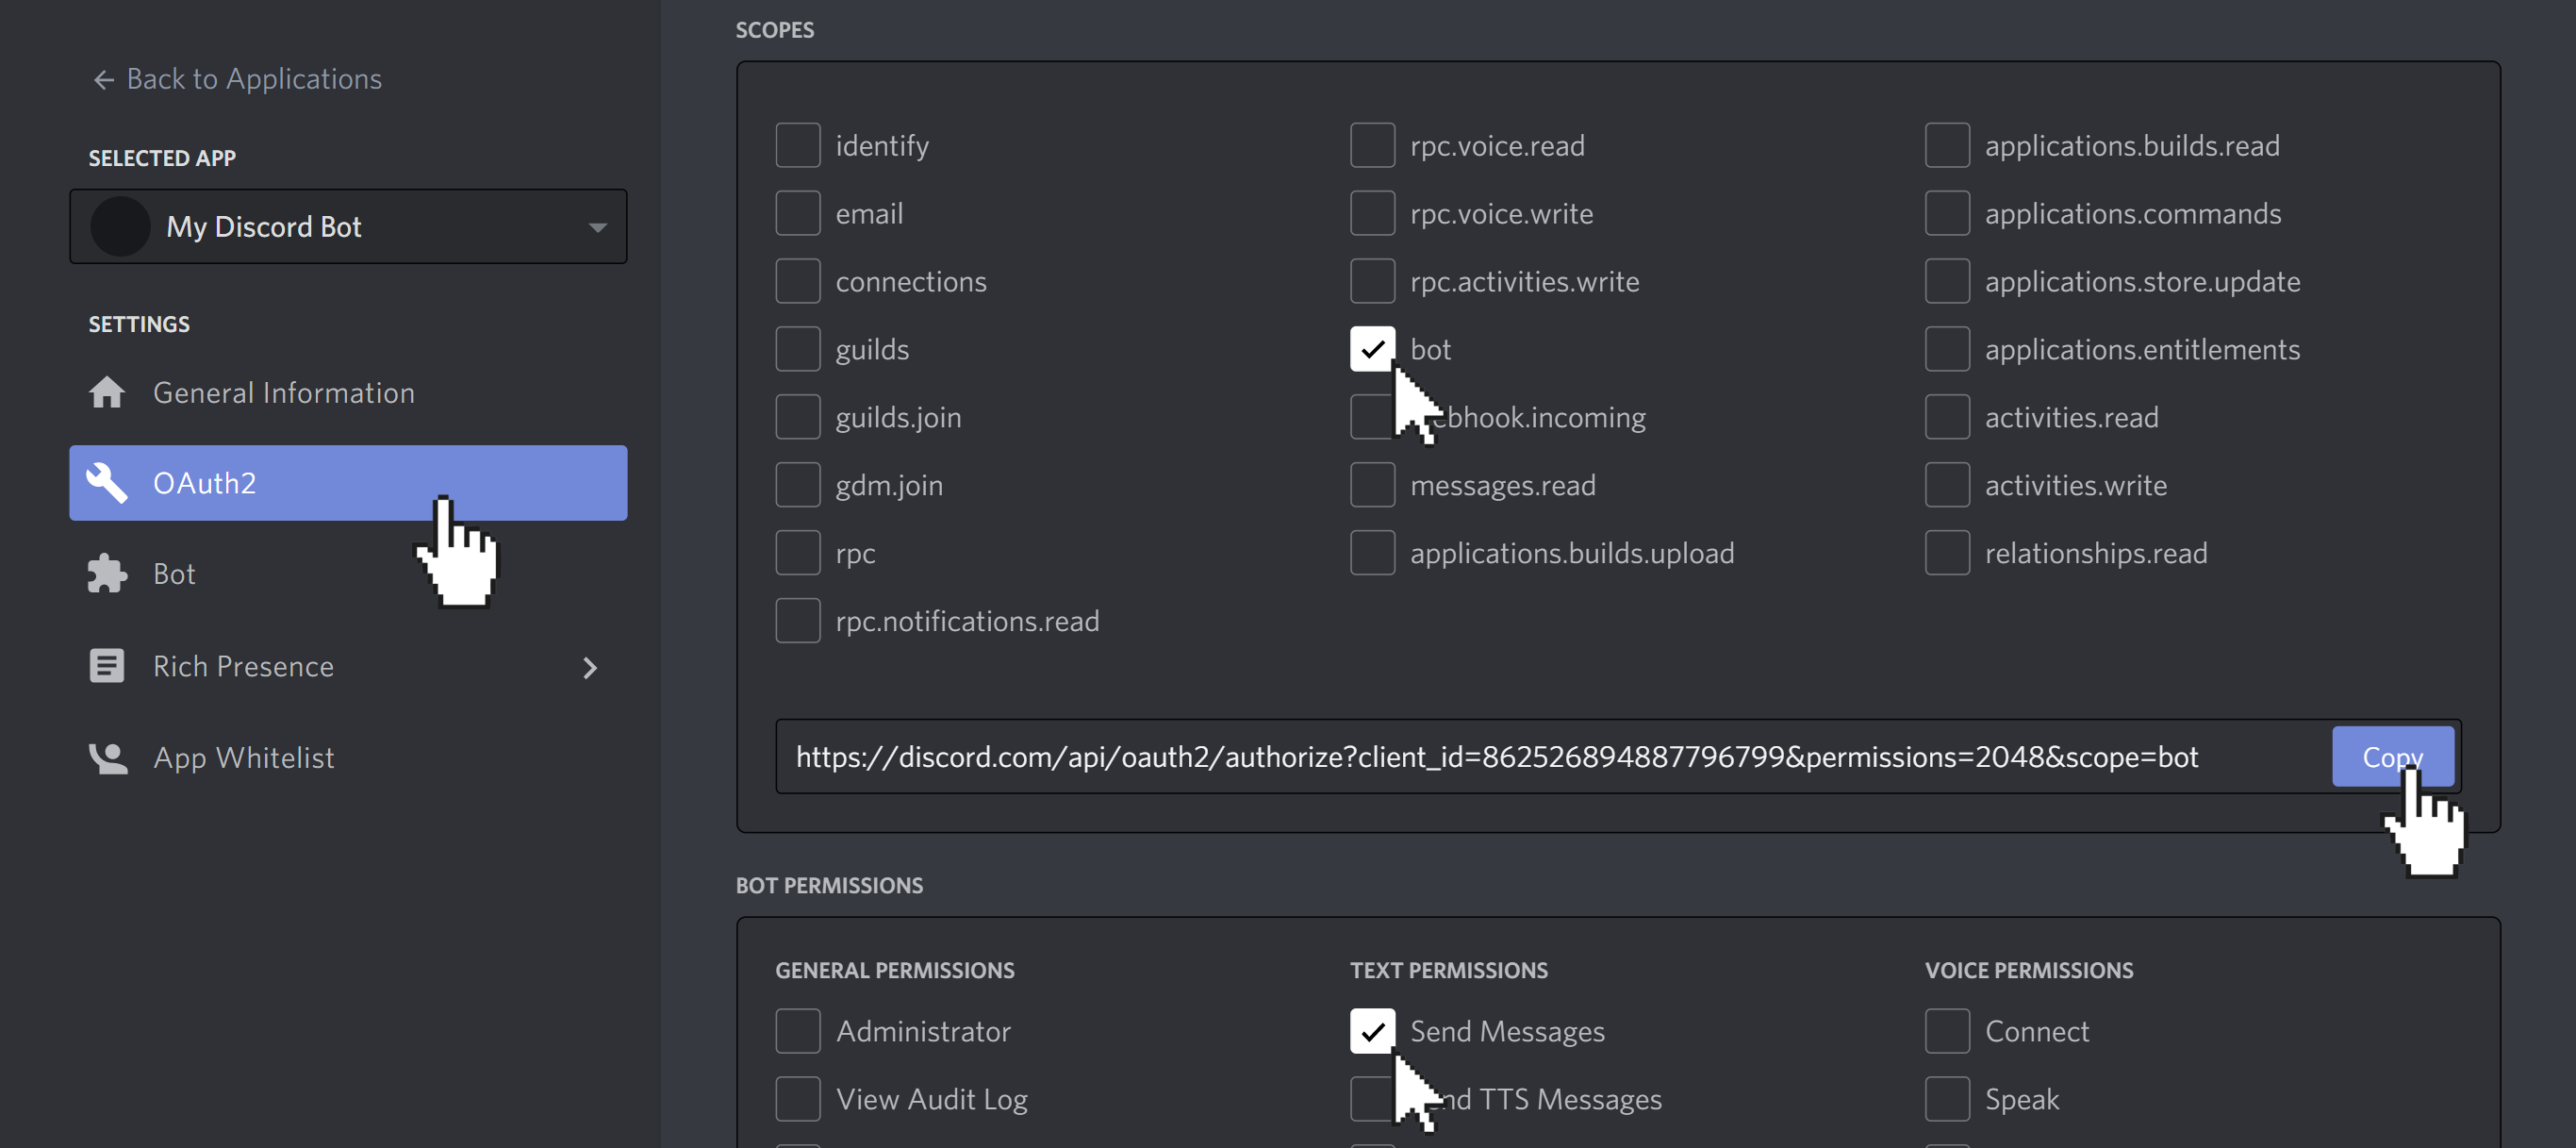
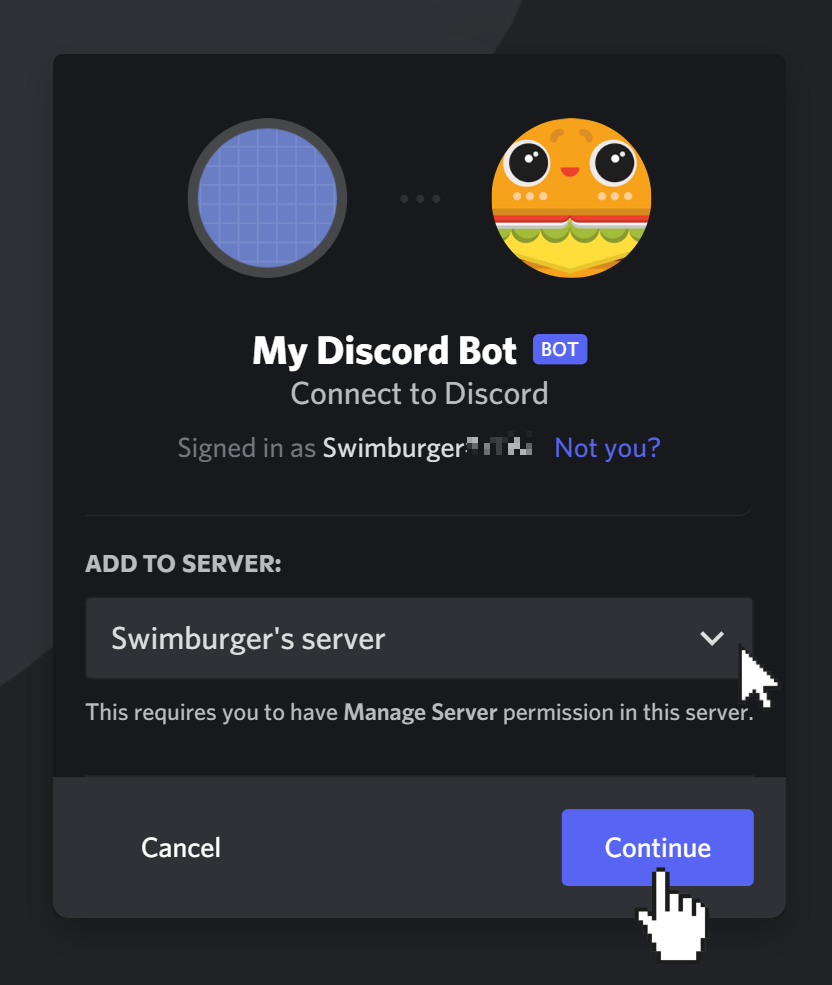
Copy the URL and paste it into your browser. Using this URL, you can add your Discord bot to servers.
Select your server in the dropdown and click "Continue". If you don't have a server, here's a helpful guide on how to create a Discord Server.
Leave the "Send Messages" checkbox checked and click on the "Authorize" button.
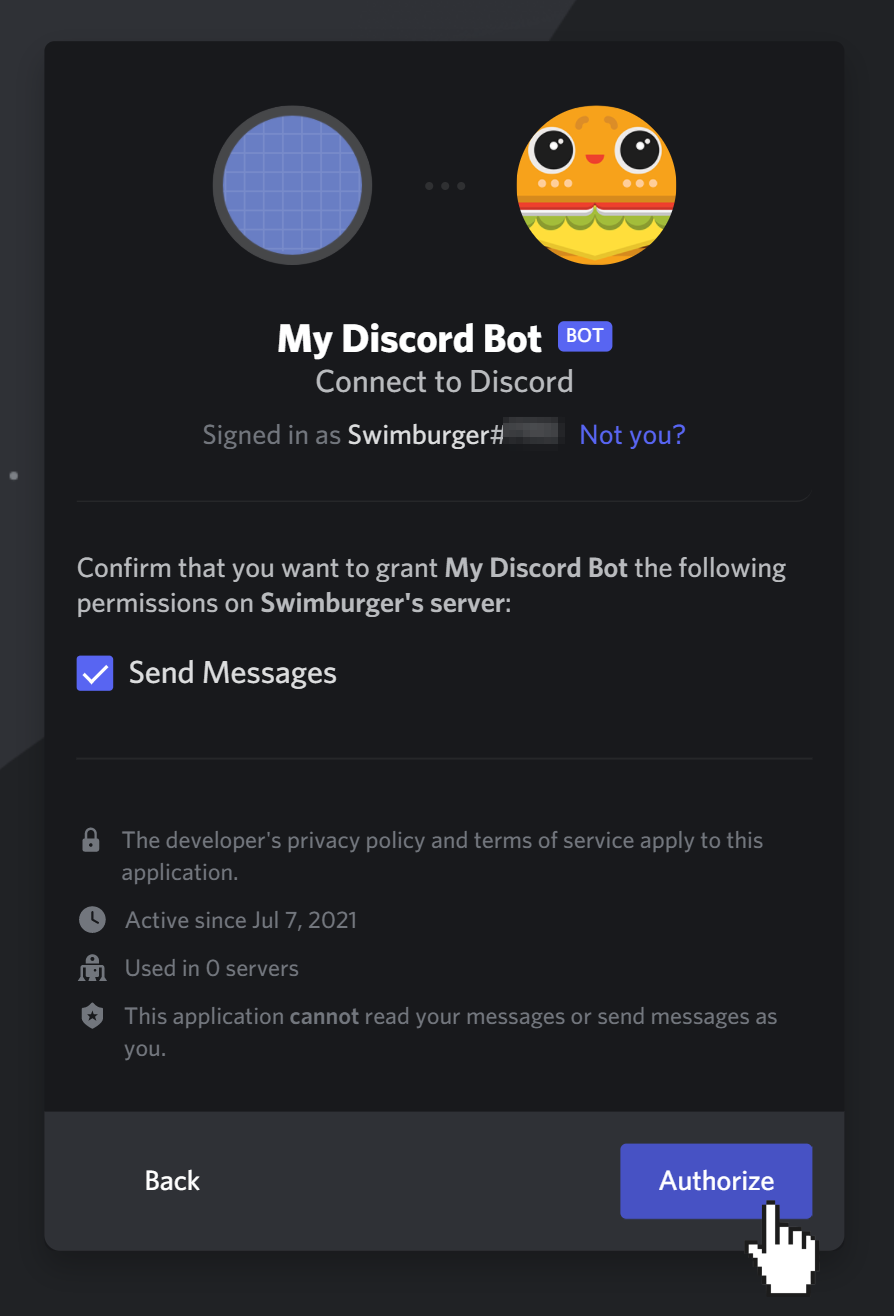
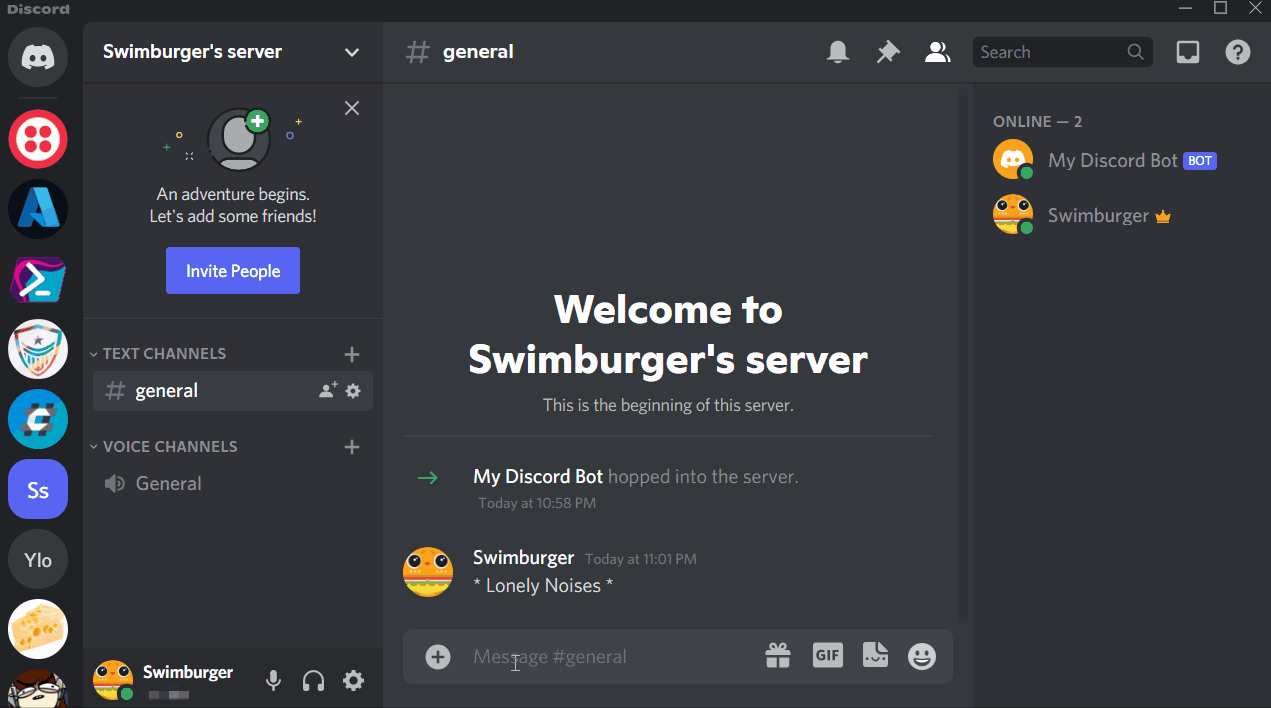
The bot has now joined your Discord server!

But the bot is offline and doesn't interact with you 😟
Unlike other communication platforms featuring bots that rely on REST APIs and webhooks, Discord bots use a real-time connection for the duration they are online, usually 24/7.
Let's set up that real-time connection between a .NET console application and Discord.
Develop a Discord bot using .NET #
Run the following commands to create a .NET worker project and change the current directory into the project:
dotnet new worker -n DiscordBot
cd DiscordBot
The worker template is similar to the console template but comes with code for developing long-running background services. This template is ideal for the Discord bot since the bot has to be running non-stop.
The worker template also comes with useful defaults & features which you may be used to from ASP.NET Core applications. For example, later in the tutorial, you'll take advantage of the dependency injection which will inject the logger & configuration.
Luckily, there's this amazing open-source project called DSharpPlus which is doing the hard work of implementing the Discord functionality and providing an easy-to-use .NET API.
Run the following command to add the DSharpPlus library to the project:
dotnet add package DSharpPlus
Update the Worker.cs file with the content below:
using System;
using System.Collections.Generic;
using System.Linq;
using System.Threading;
using System.Threading.Tasks;
using DSharpPlus;
using DSharpPlus.EventArgs;
using Microsoft.Extensions.Configuration;
using Microsoft.Extensions.Hosting;
using Microsoft.Extensions.Logging;

namespace DiscordBot
{
    public class Worker : BackgroundService
    {
        private ILogger<Worker> logger;
        private IConfiguration configuration;
        private DiscordClient discordClient;

        public Worker(ILogger<Worker> logger, IConfiguration configuration)
        {
            this.logger = logger;
            this.configuration = configuration;
        }

        public override async Task StartAsync(CancellationToken cancellationToken)
        {
            logger.LogInformation("Starting discord bot");

            string discordBotToken = configuration["DiscordBotToken"];
            discordClient = new DiscordClient(new DiscordConfiguration()
            {
                Token = discordBotToken,
                TokenType = TokenType.Bot,
                Intents = DiscordIntents.AllUnprivileged
            });

            discordClient.MessageCreated += OnMessageCreated;
            await discordClient.ConnectAsync();
        }

        protected override Task ExecuteAsync(CancellationToken stoppingToken) =>  Task.CompletedTask;

        public override async Task StopAsync(CancellationToken cancellationToken)
        {
            discordClient.MessageCreated -= OnMessageCreated;
            await discordClient.DisconnectAsync();
            discordClient.Dispose();
            logger.LogInformation("Discord bot stopped");
        }

        private async Task OnMessageCreated(DiscordClient client, MessageCreateEventArgs e)
        {
            if (e.Message.Content.StartsWith("ping", StringComparison.OrdinalIgnoreCase))
            {
                logger.LogInformation("pinged, responding with pong!");
                await e.Message.RespondAsync("pong!");
            }
        }
    }
}
Let's summarize what the code above does:
- The built-in dependency injection injects an ILogger and an IConfiguration object into the constructor of the Worker class. You can log information using the logger and retrieve external configuration from the configuration object.
The worker template has multiple configuration sources preconfigured such as JSON files, environment variables, user secrets, command-line arguments, and more.
Both constructor parameters are stored in private fields so the other parts of the class can use them. - The Worker class inherits from the BackgroundService abstract class. You have to implement the ExecuteAsync method, but you can also override other methods like StartAsync and StopAsync.
For this application, you'll want to initialize the bidirectional connection with Discord in StartAsync and disconnect from it in StopAsync.- StartAsync:
- To connect to Discord, the DiscordClient requires the token you copied earlier. Instead of hardcoding the token, the token is pulled from the configuration object using configuration["DiscordBotToken"].
You'll configure the "DiscordBotToken" configuration later. - The Discord client is created with the discordBotToken.
- You can add an event handler to the MessageCreated event to wire some code whenever a message is sent to the server.
When a message is sent, the OnMessageCreated method will be invoked. - lastly, the discord client establishes the bidirectional connection using discordClient.ConnectAsync()
- To connect to Discord, the DiscordClient requires the token you copied earlier. Instead of hardcoding the token, the token is pulled from the configuration object using configuration["DiscordBotToken"].
- ExecuteAsync: This is usually where you perform your work, but in this case, you don't need to do anything. To comply with the abstract interface, you do have to implement the method.
You can simply return Task.CompletedTask. - StopAsync: When the application is being shut down, the StopAsync method will be called. Here you should clean up whatever resources you setup during StartAsync:
- Remove the event handler
- Disconnect from Discord
- Dispose of the Discord client
- StartAsync:
- OnMessageCreated is called whenever a message is sent to the Discord server. When the message starts with "ping", the bot will respond with "pong!"
Since the worker template comes with my external configuration sources pre-configured, you can configure the "DiscordBotToken" in many different ways.
For local development, the easiest way to do so would be to use the user-secrets commands in the .NET CLI.
Use the following commands to initialize user-secrets and set the DiscordBotToken user-secret:
dotnet user-secrets init
dotnet user-secrets set DiscordBotToken [YOUR_DISCORD_BOT_TOKEN]
Now that the code and configuration are finished, run the application using the .NET CLI:
dotnet run
Now that your bot is running, switch to your Discord application and send "ping" into the chat of your server.
You'll notice that your bot will immediately respond with 'pong!' 👏
Hosting the Discord bot on Azure Container Instances #
There are a lot of options to host your Discord bot. Anywhere that runs .NET Core can run your bot. You could run it on your computer, but then your bot will be offline when you turn off your computer.
You could run it on something like a Raspberry Pi and just keep the process running forever. Alternatively, you could host it in a cloud, like Microsoft Azure. In Azure, you also have multiple options:
- You could create an Azure Virtual Machine and run your application there.
- You can use Azure App Service and run it inside of a continuous webjob as blogged here.
- You could containerize your application and run it inside of an Azure Container Instance.
In this tutorial, you'll learn how to containerize your .NET worker application and host it in an Azure Container Instance.
Containerize the Discord bot using Docker #
A huge benefit of containerizing your application is that you can deploy your container not just to Azure Container Instances, but any place with container support.
This makes your application very portable across clouds and vendors.
To containerize your .NET application, create a new file called "Dockerfile" and add the following content:
FROM mcr.microsoft.com/dotnet/runtime:5.0 AS base
WORKDIR /app

# Creates a non-root user with an explicit UID and adds permission to access the /app folder
# For more info, please refer to https://aka.ms/vscode-docker-dotnet-configure-containers
RUN adduser -u 5678 --disabled-password --gecos "" appuser && chown -R appuser /app
USER appuser

FROM mcr.microsoft.com/dotnet/sdk:5.0 AS build
WORKDIR /src
COPY ["DiscordBot.csproj", "./"]
RUN dotnet restore "DiscordBot.csproj"
COPY . .
WORKDIR "/src/."
RUN dotnet build "DiscordBot.csproj" -c Release -o /app/build

FROM build AS publish
RUN dotnet publish "DiscordBot.csproj" -c Release -o /app/publish

FROM base AS final
WORKDIR /app
COPY --from=publish /app/publish .
ENTRYPOINT ["dotnet", "DiscordBot.dll"]
The Dockerfile will tell Docker how to build your container image and how to run your container.
In summary, the Dockerifle does the following:
- Using Microsoft's .NET SDK docker image,
- Copy over only the "DiscordBot.csproj" file which contains the NuGet package references
- run dotnet restore to restore the NuGet packages in "DiscordBot.csproj"
- Copy over all the other files from your machine into Docker
- run dotnet build in release mode and put the output at '/app/build'
- run dotnet publish in release mode and put the output at '/app/publish'
- Using a separate docker Image which only contains the .NET runtime, but not the SDK
- Copy over the files form '/app/publish' from the previous stage into the current stage
- Tell docker to run dotnet DiscordBot.dll when the container starts
Run the following docker command to build the container:
docker build -t discord-bot-image:latest .
This command will build the container image following all the instructions in the Dockerfile and tag the image with 'discord-bot-image' as the name and 'latest' as the tag.
Now that your docker image is built, you can run it with the following command:
docker run -it discord-bot-image:latest

# Output:
#   info: DiscordBot.Worker[0]
#         Starting discord bot
#   [2021-07-09 03:06:03 +00:00] [101 /Startup     ] [Info ] DSharpPlus, version 4.0.1
#   Unhandled exception. System.Exception: Authentication failed. Check your token and try again.
#    ---> DSharpPlus.Exceptions.UnauthorizedException: Unauthorized: 401
#      at DSharpPlus.Net.DiscordApiClient.GetGatewayInfoAsync()
#      at DSharpPlus.BaseDiscordClient.GetGatewayInfoAsync(String token)
#      at DSharpPlus.DiscordClient.InternalUpdateGatewayAsync()
#      at DSharpPlus.DiscordClient.InternalConnectAsync()
#      at DSharpPlus.DiscordClient.ConnectAsync(DiscordActivity activity, Nullable`1 status, Nullable`1 idlesince)
#      --- End of inner exception stack trace ---
#      at DSharpPlus.DiscordClient.ConnectAsync(DiscordActivity activity, Nullable`1 status, Nullable`1 idlesince)
#      at DiscordBot.Worker.StartAsync(CancellationToken cancellationToken) in /src/Worker.cs:line 38
#      at Microsoft.Extensions.Hosting.Internal.Host.StartAsync(CancellationToken cancellationToken)
#      at Microsoft.Extensions.Hosting.HostingAbstractionsHostExtensions.RunAsync(IHost host, CancellationToken token)
#      at Microsoft.Extensions.Hosting.HostingAbstractionsHostExtensions.RunAsync(IHost host, CancellationToken token)
#      at Microsoft.Extensions.Hosting.HostingAbstractionsHostExtensions.Run(IHost host)
#      at DiscordBot.Program.Main(String[] args) in /src/Program.cs:line 14
The container ran, but there's an exception occurring. The exception occurs because the 'DiscordBotToken' is not configured in any of the configuration sources used by the worker template.
You configured the token using 'user-secrets', but that isn't accessible to the docker container. As an alternative to 'user-secrets', you can pass in the configuration using an environment variable.
Run the following command with the -e argument:
docker run -it discord-bot-image:latest -e DiscordBotToken=[YOUR_DISCORD_BOT_TOKEN]

# Output:
#   info: DiscordBot.Worker[0]
#         Starting discord bot
#   [2021-07-09 03:13:37 +00:00] [101 /Startup     ] [Info ] DSharpPlus, version 4.0.1
#   info: Microsoft.Hosting.Lifetime[0]
#         Application started. Press Ctrl+C to shut down.
#   info: Microsoft.Hosting.Lifetime[0]
#         Hosting environment: Production
#   info: Microsoft.Hosting.Lifetime[0]
#         Content root path: /app
#   info: DiscordBot.Worker[0]
#         pinged, responding with pong!
Push your Docker image to Azure Container Registry #
Before you can create an Azure Container Instance, you'll need to push the Docker image to a Docker registry.
You can use any Docker registry, but for this tutorial, you'll create an Azure Container Registry (ACR) and push the image to your ACR.
Make sure you have the Azure CLI installed and are logged in. Then, create a new resource group called "DiscordBotRg":
az group create --location eastus --resource-group DiscordBotRg
Create a new Azure Container Registry:
az acr create --name DiscordBotAcr --resource-group DiscordBotRg \
              --sku Basic \
              --location eastus
Log into your new ACR:
az acr login --name DiscordBotAcr
Push the docker image you created previously by tagging it with the registry URL and then pushing it with the native docker command:
docker tag discord-bot-image:latest discordbotacr.azurecr.io/discord-bot-image:latest
docker push discordbotacr.azurecr.io/discord-bot-image:latest
Alternatively, you can use the Azure Container Registry build command to build the docker image locally and push it put to ACR:
az acr build -r DiscordBotAcr -t discord-bot-image:latest .
Your Discord bot container image is now in Azure Container Registry and you can move on to creating an Azure Container Instance!
Deploy your Discord bot to Azure Container Instances #
With your Docker image up in your registry, you should be able to create an Azure Container Instance, but by default, the container instance service won't have permission to access the registry.
As a result, the container instance won't be able to pull your container image. There are multiple ways to give access to the registry.
In this tutorial, you'll create a service principal in Azure and give it permission to pull from your registry.
Run the following bash script:
# Obtain the full registry ID for subsequent command args
ACR_REGISTRY_ID=$(az acr show --name DiscordBotAcr --query id --output tsv)

SP_PASSWD=$(az ad sp create-for-rbac --name acr-service-principal --scopes $ACR_REGISTRY_ID --role acrpull --query password --output tsv)
SP_APP_ID=$(az ad sp list --display-name acr-service-principal --query [0].appId -o tsv)
The script will
- create a service principal
- give the service principal the 'acrpull' role on your Azure Container Registry
- store the password of the service principal in SP_PASSWD
- store the service principal app id in SP_APP_ID
You can use SP_APP_ID as the username and SP_PASSWD as the password to log into your registry.
Now you have the credentials required to let your upcoming Azure Container Instance pull from your registry.
Run the following command to create the Azure Container Instance:
az container create --resource-group DiscordBotRg \
                    --name discord-bot-container \
                    --image discordbotacr.azurecr.io/discord-bot-image:latest \
                    --registry-username $SP_APP_ID \
                    --registry-password $SP_PASSWD \
                    --secure-environment-variables DiscordBotToken=[YOUR_DISCORD_BOT_TOKEN] \
                    --location eastus
Make sure you replace [YOUR_DISCORD_BOT_TOKEN] with your token. This will be stored in a secure environment variable which you won't be able to see in the Azure UI or APIs.
And you're done! That was a lot of steps to get to the end result, but now that everything is configured, you won't need to do much.
If you want to update the container instance with new code, push a new version of your container image to the ACR and restart the container instance.
Summary #
In this tutorial you
- created a Discord application in the Discord Developer Portal
- created a Discord bot using the DSharpPlus library and the .NET worker template
- containerized the .NET application using Docker
- created a private docker registry with Azure Container Registry
- pushed your Docker image to your private registry
- created a service principal with access to pull from your registry
- and finally created an Azure Container Instance to run your Discord bot in a docker container
Instead of running your Docker container on Azure Container Instance, you could also host it on any other platform that supports Docker containers, whether it's under your desk or up in the cloud.
A lot of technologies were glossed over in this tutorial, so here are some resources to learn more about them:
- Documentation for the DSharpPlus library
- An overview of the .NET Worker service by the Microsoft Docs team.
- Introduction to .NET and Docker by the Microsoft Docs team.
- Deploy a Worker Service to Azure by David Pine on Microsoft Docs.
This tutorial by David is the source of inspiration for the tutorial you just went through. Thank you, David! - An overview of different ways you can authenticate to Azure Container Registry by the Microsoft Docs team.


