


How to run ASP.NET Core Web Application as a service on Linux without reverse proxy, no NGINX or Apache


This article has been updated for .NET 6 and RHEL 8 on 03/20/2022.
This article walks us through running a ASP.NET Core web application on Red Hat Enterprise Linux (RHEL) 8 using systemd. Here's what we'll cover:
- Running ASP.NET Core using systemd
- Adding Systemd integration package
- Making ASP.NET Core accessible externally (Kestrel only, no reverse proxy)
- Serving ASP.NET Core over port 80 & 443 (Kestrel only, no reverse proxy)
Your website will use HTTPS over 443, however, this tutorial will use the out-of-the-box development certificates, and not walk you through installing your own certificates for secure HTTPS communication.
The end goal is to serve ASP.NET Core directly via the built-in Kestrel webserver over port 80/443.
No reverse proxy, no NGINX and no Apache. Reverse proxies provide a lot of fantastic functionality, however, if you don't need those features, you can serve ASP.NET application directly via the built-in Kestrel server.
To learn how to run .NET services (non-web stuff) on Linux, check out how to run .NET Console app as a service using Systemd on Linux.
Prerequisites: #
- Red Hat Enterprise Linux (or a compatible Unix based OS)
- .NET 6 installed (Get started instructions from Red Hat)
- Sudo privileges
This walkthrough should work for most .NET supported Linux distributions, not just RHEL, albeit with small modifications. This tutorial should also work for older versions of .NET too.
Run ASP.NET Core using Systemd #
Let's start by creating a new ASP.NET Core application using the web-template:
We'll be using this application throughout the walkthrough. Let's verify that the web application works:
In the output you can find an HTTPS and an HTTP URL, take note of the HTTP URL for the next command. Open a separate shell (leave the other shell running) and use the curl HTTP-client to send an HTTP request to the application using the HTTP URL:
If the application works, go back to the first shell and stop the application by pressing ctrl + c.
Now, publish the project somewhere logical such as /srv/AspNetSite:
The published result contains an executable called AspNetSite which will run the application. Let's verify we can also run the published application:
To run services on Linux, Systemd uses 'service unit configuration' files to describe how to run services. Let's create the file AspNetSite.service inside our project so we can store it in source control along with our code. Add the following content to AspNetSite.service:
Make sure to update the 'User' to your username. Refer to the comments for an explanation of the specified options. For more information on the service unit configuration file, read the freedesktop manual page or the Red Hat documentation.
Systemd expects all configuration files to be put under /etc/systemd/system/. Copy the service configuration file to /etc/systemd/system/AspNetSite.service and tell systemd to reload the configuration files.
Now systemd is aware of the new 'AspNetSite' service. Using `systemctl start AspNetSite` we can start the service.
Using `systemctl status AspNetSite` we can query the status of the service. Let's start the service and check its status:
Due to the Restart=always option, systemd will restart our service in case it crashed. But it will not automatically start the service when the machine reboots. To enable automatic startup, use the following command:
If everything is working correctly, we should be able to curl the application via localhost:5000:
The website is now running as a systemd service. There's a systemd-package provided by Microsoft to improve the integration with systemd. Let's set that up next.
Add Systemd integration package #
Microsoft recently added a package to better integrate with systemd. When the integration is installed, the application will notify systemd when it's ready and when it's stopping. Additionally, systemd will understand the different log levels that the application logs.
Using the dotnet CLI, add the 'Microsoft.Extensions.Hosting.Systemd' (nuget) package:
Next, we'll need to add one line to the Program.cs, builder.Host.UseSystemd():
For demonstration purposes of the logging integration, update the Program.cs file with the following code:
Lastly, we need to update the file AspNetSite.service to specify 'type=Notify':
Let's deploy all our changes. We'll need to publish the .NET app and stop/reload/start the systemd service:
The application logs are being captured by systemd. We can query the logs using 'journalctl', here are some examples:
The unit-flag (-u) allows us to filter by 'SyslogIdentifier' which we specified in 'AspNetSite.service'.
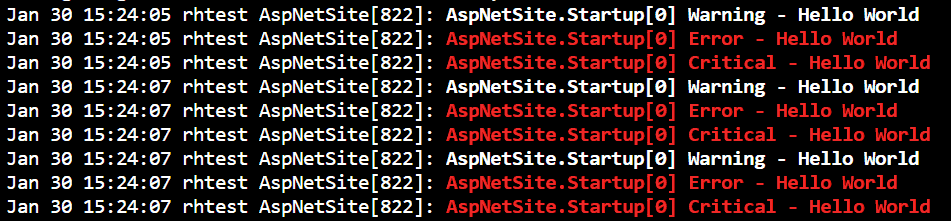
We can verify that the .NET Core logging integrates correctly by using the priority-flag (-p) on 'journalctl'. This will filter the output according the log levels below:
| LogLevel | Syslog level | systemd name |
| Trace/Debug | 7 | debug |
| Information | 6 | info |
| Warning | 4 | warning |
| Error | 3 | err |
| Critical | 2 | crit |
For example, the following command will only print output with log level 4 and below meaning warning, error, and critical:
Let's first make a couple of HTTP request to the application using curl and then run the 'journalctl' query:
The 'journalctl' command should now return the different log statements we wrote 3 times.
The 'UseSystemd' function will not do anything when run outside of a systemd service. The implementation checks if the OS is a Unix system and whether the parent process is systemd.
If not, the systemd integration is skipped.
We now have our systemd-integration ready, but the application is still not accessible outside of the machine. Let's make the application accessible externally.
Make ASP.NET Core accessible externally #
As demonstrated below, the application is only accessible via localhost on the machine and not via the machine's IP-address.
Out of the box, the application is configured to listen to http://localhost:5000 & https://localhost:5001. This works great for development, but we want to expose our application to other machines in the network or even to the internet. To serve our application outside of the localhost, we'll need to figure out the IP address that you want to serve your app on, and then tell ASP.NET Core to bind to the IP address and a port.
On RHEL, you can use the command `ip addr show` to list the IP addresses on your machine, while on other OS's, the command you'll need may be `ifconfig` or something else. Find the IP address that you'll send HTTP requests to from outside the machine, and take note of it. In my case, the IP address attached to my network interface in Azure is 10.0.0.4. I'll use this IP address throughout this article, however, keep in mind that your IP address may be different.
In ASP.NET Core there are many ways to configure the URL's. We can configure it through code, appsettings.json, environment variables, or command line arguments.
Let's go with environment variables. Add the 'ASPNETCORE_URLS' environment variable to the 'AspNetSite.service' file:
You can also use an asterisk (*) instead of an IP address which will act as a wild card. The application will then listen to localhost and all IP-addresses assigned to the machine, however, this is a security risk, so it's best to explicitly specify the IP address you want to listen to.
Let's copy the updated configuration file and reload/restart the systemd service:
Instead of http://localhost:5000, we can now see http://10.0.0.4:5000. Now that the application is bound to the machine's IP-address, we should be able to curl it via IP from within the machine:
Does this mean the website is accessible from outside the machine now?
Almost, Red Hat comes with a built-in firewall which will block the traffic. Using the 'firewall-cmd' utility, we can update the firewall configuration to allow TCP traffic over port 5000 & 5001:
Now the website will be accessible from other machines within the network.
In case you're running this RHEL machine in the cloud, you will also have to ensure whatever security is provided by the cloud also allow TCP over port 5000 & 5001.
Once that's done, the website should be accessible to the internet. In my case, I had to also allow port 5000 and 5001 as inbound ports in the Network Security Group attached to my network interface on my Azure VM. Then I could browse to my public Azure IP address on port 5000 or 5001 to reach my ASP.NET website.
Serve ASP.NET Core over port 80 & 443 #
By default, Linux machines won't allow processes to use well known ports (ports lower than 1024).
If we try to run the application using port 80 and/or 443, we'll get a permission error:
There are many ways to work around this restriction.
Use a Reverse Proxy #
We can setup a reverse proxy to listen to port 80 & 443 and have it forward traffic to the ASP.NET Core application. This process is well documented by Microsoft:
This is a great option for many reasons, but we're not going to do this since our goal for this walkthrough is to stick to the built-in Kestrel server exclusively.
Grant CAP_NET_BIND_SERVICE capability #
Using the following command, we can give the AspNetSite executable the 'CAP_NET_BIND_SERVICE' capability. This capability will allow the process to bind to well known ports.
Every time the executable is updated the 'CAP_NET_BIND_SERVICE' capability will be lost. We could make this command as part of a deployment script, but the systemd service unit configuration files has an option called 'AmbientCapabilities'.
When configuring this option to 'CAP_NET_BIND_SERVICE', systemd will grant the capability to the service for us. Let's update the 'AspNetSite.service' file to update the ports and add the capability to bind to well known ports.
For the last time, copy the AspNetSite.service file and reload/restart the AspNetSite service.
The web application is now listening to port 80 & 443, but the built-in firewall will still block traffic coming in over those ports. Update the built-in firewall and any other network security to allow traffic over port 80 & 443:
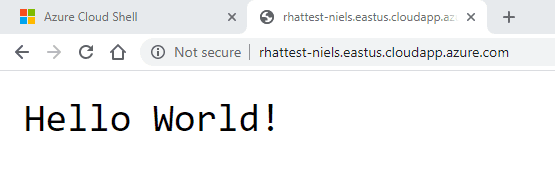
Visiting the website over port 80 using the browser should now return "Hello World!".
Summary #
We now have a public facing ASP.NET Core application served by the built-in Kestrel web server by taking the following steps:
- deploy ASP.NET Core to RHEL under /srv/AspNetSite
- configure systemd to run the application as a service
- add systemd .NET Core integration to the application
- configure the application to listen to all IP's and different ports using environment variables
- update the built-in firewall to allow TCP traffic over 5000, 5001, 80, and 443
- grant 'CAP_NET_BIND_SERVICE' capability to the service to allow the application to bind to well known ports such as 80 & 443

