---
title: "Pre-render Blazor WebAssembly at build time to optimize for search engines"
excerpt: "Using pre-rendering tools like react-snap, you can pre-render Blazor WASM. Additionally, you can integrate these pre-rendering tools inside of your continuous integration and continuous deployment pipelines."
publishDate: "2021-01-03T00:00:00"
createDate: "2020-12-29T05:21:34.1"
updateDate: "2021-01-04T01:21:23.903"
category: "dotnet"
categoryName: ".NET"
tags: [".NET","dotnet",".NET Core","dotnetcore","ASP.NET","aspnet","aspnetcore","ASP.NET Core","Blazor","WASM","Blazor WebAssembly","WebAssembly","GitHub","GitHub Pages","SEO","SMO"]
permalink: "/blog/dotnet/pre-render-blazor-webassembly-at-build-time-to-optimize-for-search-engines"
canonical: "/blog/dotnet/pre-render-blazor-webassembly-at-build-time-to-optimize-for-search-engines"
image: {"src":"/media/xcrnrmzn/blazor-search-long.png","focalPoint":{"left":0.5,"top":0.4993280071679235},"crops":[{"alias":"Banner","width":1120,"height":400,"coordinates":null}]}
imageAlt: "Blazor logo next to title: Pre-render Blazor WebAssembly at build time to optimize for search engines"
imageBackgroundColor: "#fafafa"
thumbnailImage: {"src":"/media/3tmmtvxg/blazor-square.png","focalPoint":{"left":0.5,"top":0.5},"crops":[{"alias":"thumbnail","width":250,"height":250,"coordinates":null}]}
thumbnailImageAlt: "Blazor logo"
metaTitle: "Pre-render Blazor WebAssembly at build time to optimize for search engines"
metaDescription: "Using pre-rendering tools like react-snap, you can pre-render Blazor WASM."
ogTitle: "Pre-render Blazor WebAssembly at build time to optimize for search engines"
ogDescription: "Using pre-rendering tools like react-snap, you can pre-render Blazor WASM. Additionally, you can integrate these pre-rendering tools inside of your continuous integration and continuous deployment pipelines."
ogImage: {"src":"/media/vqehvvas/blazor-search-social.png","focalPoint":{"left":0.5,"top":0.501507697190922},"crops":[{"alias":"OpenGraph","width":1200,"height":630,"coordinates":null}]}
ogImageAlt: "Blazor logo next to title: Pre-render Blazor WebAssembly at build time to optimize for search engines"
relatedPostKeys: ["b01d783c18284f05b29774abcd096471","0d375026e40743fdadc9c3b841802a6a","3fa142faee1a488c91f507627e8059bb"]
noIndex: false
noFollow: false
sitemapExclude: false
source: {"nodeId":1393,"contentKey":"d6de8a5ab9844b34bc70fd22d76fde21","sortOrder":73}
---


The output of a published Blazor WebAssembly application consists of static files exclusively. Hence these applications can be hosted on static site hosts like <a href="https://swimburger.net/blog/dotnet/how-to-deploy-aspnet-blazor-webassembly-to-azure-static-web-apps">Azure Static Web Apps</a>, <a href="https://swimburger.net/blog/dotnet/how-to-deploy-aspnet-blazor-webassembly-to-github-pages">GitHub Pages</a>, <a href="https://swimburger.net/blog/dotnet/how-to-deploy-blazor-webassembly-to-firebase-hosting">Firebase Hosting</a>, and more. <strong>But just like other single page application (SPA) frameworks, Blazor WASM is not properly indexed by search engines. </strong>This makes it very hard to do search engine optimization (SEO).


<p class="panel panel--info">The issues discussed in this article are not exclusive to SPA frameworks, but any web application requiring JavaScript execution to render the content.</p>


## The SEO problems with SPA's {#the-seo-problems-with-spas}


Search engines crawl your website using "<strong>crawlers</strong>" also called "spiders" sometimes. These crawlers are essentially bots visiting every page it can find on your website. The content on those pages are then added to the search index. But what do crawlers see when they visit SPA's?<strong> For Blazor WASM applications, this is what crawlers see</strong>:


<pre style="color:#000000;background:#ffffff;"><span style="color:#7f0055; ">&lt;!DOCTYPE html&gt;</span>&#10;<span style="color:#7f0055; ">&lt;</span><span style="color:#7f0055; font-weight:bold; ">html</span><span style="color:#7f0055; ">&gt;</span>&#10;<span style="color:#7f0055; ">&lt;</span><span style="color:#7f0055; font-weight:bold; ">head</span><span style="color:#7f0055; ">&gt;</span>&#10;&nbsp;&nbsp;&nbsp;&nbsp;<span style="color:#7f0055; ">&lt;</span><span style="color:#7f0055; font-weight:bold; ">meta</span> charset=<span style="color:#2a00ff; ">"utf-8"</span> <span style="color:#7f0055; ">/&gt;</span>&#10;&nbsp;&nbsp;&nbsp;&nbsp;<span style="color:#7f0055; ">&lt;</span><span style="color:#7f0055; font-weight:bold; ">meta</span> name=<span style="color:#2a00ff; ">"viewport"</span> content=<span style="color:#2a00ff; ">"width=device-width, initial-scale=1.0, maximum-scale=1.0, user-scalable=no"</span> <span style="color:#7f0055; ">/&gt;</span>&#10;&nbsp;&nbsp;&nbsp;&nbsp;<span style="color:#7f0055; ">&lt;</span><span style="color:#7f0055; font-weight:bold; ">title</span><span style="color:#7f0055; ">&gt;</span>BlazorWasmPrerender<span style="color:#7f0055; ">&lt;/</span><span style="color:#7f0055; font-weight:bold; ">title</span><span style="color:#7f0055; ">&gt;</span>&#10;&nbsp;&nbsp;&nbsp;&nbsp;<span style="color:#7f0055; ">&lt;</span><span style="color:#7f0055; font-weight:bold; ">base</span> href=<span style="color:#2a00ff; ">"/"</span> <span style="color:#7f0055; ">/&gt;</span>&#10;&nbsp;&nbsp;&nbsp;&nbsp;<span style="color:#7f0055; ">&lt;</span><span style="color:#7f0055; font-weight:bold; ">link</span> href=<span style="color:#2a00ff; ">"css/bootstrap/bootstrap.min.css"</span> rel=<span style="color:#2a00ff; ">"stylesheet"</span> <span style="color:#7f0055; ">/&gt;</span>&#10;&nbsp;&nbsp;&nbsp;&nbsp;<span style="color:#7f0055; ">&lt;</span><span style="color:#7f0055; font-weight:bold; ">link</span> href=<span style="color:#2a00ff; ">"css/app.css"</span> rel=<span style="color:#2a00ff; ">"stylesheet"</span> <span style="color:#7f0055; ">/&gt;</span>&#10;&nbsp;&nbsp;&nbsp;&nbsp;<span style="color:#7f0055; ">&lt;</span><span style="color:#7f0055; font-weight:bold; ">link</span> href=<span style="color:#2a00ff; ">"BlazorWasmPrerender.styles.css"</span> rel=<span style="color:#2a00ff; ">"stylesheet"</span> <span style="color:#7f0055; ">/&gt;</span>&#10;<span style="color:#7f0055; ">&lt;/</span><span style="color:#7f0055; font-weight:bold; ">head</span><span style="color:#7f0055; ">&gt;</span>&#10;<span style="color:#7f0055; ">&lt;</span><span style="color:#7f0055; font-weight:bold; ">body</span><span style="color:#7f0055; ">&gt;</span>&#10;&nbsp;&nbsp;&nbsp;&nbsp;<span style="color:#7f0055; ">&lt;</span><span style="color:#7f0055; font-weight:bold; ">div</span> id=<span style="color:#2a00ff; ">"app"</span><span style="color:#7f0055; ">&gt;</span>Loading...<span style="color:#7f0055; ">&lt;/</span><span style="color:#7f0055; font-weight:bold; ">div</span><span style="color:#7f0055; ">&gt;</span>&#10;&nbsp;&nbsp;&nbsp;&nbsp;<span style="color:#7f0055; ">&lt;</span><span style="color:#7f0055; font-weight:bold; ">div</span> id=<span style="color:#2a00ff; ">"blazor-error-ui"</span><span style="color:#7f0055; ">&gt;</span>&#10;&nbsp;&nbsp;&nbsp;&nbsp;&nbsp;&nbsp;&nbsp;&nbsp;An unhandled error has occurred.&#10;&nbsp;&nbsp;&nbsp;&nbsp;&nbsp;&nbsp;&nbsp;&nbsp;<span style="color:#7f0055; ">&lt;</span><span style="color:#7f0055; font-weight:bold; ">a</span> href=<span style="color:#2a00ff; ">""</span> class=<span style="color:#2a00ff; ">"reload"</span><span style="color:#7f0055; ">&gt;</span>Reload<span style="color:#7f0055; ">&lt;/</span><span style="color:#7f0055; font-weight:bold; ">a</span><span style="color:#7f0055; ">&gt;</span>&#10;&nbsp;&nbsp;&nbsp;&nbsp;&nbsp;&nbsp;&nbsp;&nbsp;<span style="color:#7f0055; ">&lt;</span><span style="color:#7f0055; font-weight:bold; ">a</span> class=<span style="color:#2a00ff; ">"dismiss"</span><span style="color:#7f0055; ">&gt;</span>🗙<span style="color:#7f0055; ">&lt;/</span><span style="color:#7f0055; font-weight:bold; ">a</span><span style="color:#7f0055; ">&gt;</span>&#10;&nbsp;&nbsp;&nbsp;&nbsp;<span style="color:#7f0055; ">&lt;/</span><span style="color:#7f0055; font-weight:bold; ">div</span><span style="color:#7f0055; ">&gt;</span>&#10;&nbsp;&nbsp;&nbsp;&nbsp;<span style="color:#7f0055; ">&lt;</span><span style="color:#7f0055; font-weight:bold; ">script</span> src=<span style="color:#2a00ff; ">"_framework/blazor.webassembly.js"</span><span style="color:#7f0055; ">&gt;</span><span style="color:#7f0055; ">&lt;/</span><span style="color:#7f0055; font-weight:bold; ">script</span><span style="color:#7f0055; ">&gt;</span>&#10;<span style="color:#7f0055; ">&lt;/</span><span style="color:#7f0055; font-weight:bold; ">body</span><span style="color:#7f0055; ">&gt;</span>&#10;<span style="color:#7f0055; ">&lt;/</span><span style="color:#7f0055; font-weight:bold; ">html</span><span style="color:#7f0055; ">&gt;</span>&#10;</pre>


**The only thing the crawlers see are the words "Loading…" or a blank screen.**<br>To optimize for search engines at the margins, you can add some content above and below, or use the title and description meta tags in the head, but that won’t get you far. The reason why it doesn’t see your entire SPA, is because most search engine crawlers do not execute JavaScript.


The exception to this is Google which <em>depending on the geography you are targeting</em> is the primary search engine. Google crawls websites just like other search engines, but for JavaScript applications will go through <a rel="noopener" href="https://developers.google.com/search/docs/guides/javascript-seo-basics" target="_blank">an additional phase of rendering the pages with JavaScript execution</a>. 


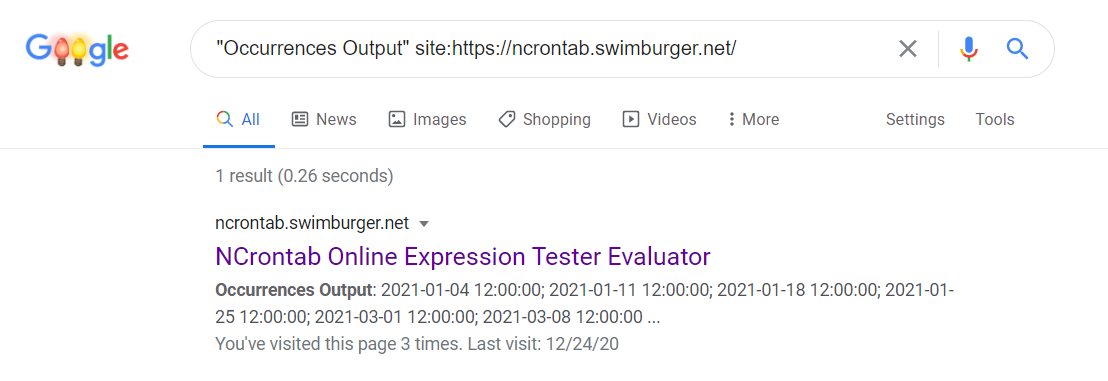
This rendering phase also works for Blazor WASM applications. Below is a Google search query which is returning content generated by Blazor WASM, **proving that Google’s crawlers are able to render and index Blazor WASM applications**:


<picture>
  <img src="https://swimburger.net/cdn-cgi/image/format=auto,quality=90,width=1120/media/s0mlstji/blazor-wasm-in-google-search.png" srcset="https://swimburger.net/cdn-cgi/image/format=auto,quality=90,width=430/media/s0mlstji/blazor-wasm-in-google-search.png 430w, https://swimburger.net/cdn-cgi/image/format=auto,quality=90,width=645/media/s0mlstji/blazor-wasm-in-google-search.png 645w, https://swimburger.net/cdn-cgi/image/format=auto,quality=90,width=718/media/s0mlstji/blazor-wasm-in-google-search.png 718w, https://swimburger.net/cdn-cgi/image/format=auto,quality=90,width=860/media/s0mlstji/blazor-wasm-in-google-search.png 860w, https://swimburger.net/cdn-cgi/image/format=auto,quality=90,width=1077/media/s0mlstji/blazor-wasm-in-google-search.png 1077w" sizes="(max-width: 480px) 430px, (max-width: 768px) 718px, 1120px" width="1120" height="385" alt="Screenshot of a Google Search query returning Blazor WASM content" loading="lazy" decoding="async">
</picture>


Even though Google is able to render and index JavaScript applications, **the gold standard is still server side rendered HTML**. Google takes longer to index JavaScript applications than it does indexing plain HTML. But **most importantly, there are a lot of other search engines out there**. If your content targets an Eastern European audience, Yandex is another search engine that you need to optimize for. In China, Baidu is the most popular search engine and Google Search doesn’t even exist. And of course, there are many smaller players all around the world you should consider optimizing for.


## The SEO solutions for SPA's {#the-seo-solutions-for-spas}


Many SPA frameworks have support for rendering the same application on both client and server. Being able to render both server and client side combines best of both worlds. You have the speed and SEO benefits from server rendered applications and the UX benefits of a SPA. **Since .NET 5, Blazor WebAssembly also has support for pre-rendering on the server.**


Server side pre-rendering is a great solution, but it does require your code to be executed on a server which is not possible if you’re using a static site host. <br>Static site hosting services do not allow server side code execution and only serve static files. This limitation does mean these services are incredibly performant and affordable, often with generous free tiers. Hence why these services are so popular.


So instead of pre-rendering server side at request time, **you can pre-render at build-time**. You can then host the HTML files outputted at build-time on static site hosts, giving you the best performance, best SEO, best UX, and a more affordable hosting.<br>There is no official support for doing this in Blazor WASM, but you can quickly *hack* something together with existing open-source pre-rendering tools.


## Pre-render Blazor WASM at build time {#pre-render-blazor-wasm-at-build-time}

This tutorial will walk you through creating a Blazor WASM project and adding PowerShell/Bash scripts to pre-render the application. Then the functionality will be integrated into GitHub Actions to deploy the result to GitHub Pages.

### Prerequisites {#prerequisites}

You will need the following:

- OS: Windows or Linux distro supported by .NET and NodeJS
- .NET SDK (3.1 and up)
- NodeJS
- git
- GitHub account


**You can find the source code for the sample at <a rel="noopener" href="https://github.com/Swimburger/BlazorWasmPrerender" target="_blank">this GitHub repository</a>.**


### Setup the Blazor WASM project {#setup-the-blazor-wasm-project}

Use the following command to create a folder named *Client* and create a Blazor WASM project inside of that folder:

<pre style="color:#000000;background:#ffffff;">mkdir <span style="color:#2a00ff; ">Client</span>&#10;dotnet <span style="color:#2a00ff; ">new</span> <span style="color:#2a00ff; ">blazorwasm</span> -o <span style="color:#2a00ff; ">Client</span> -n <span style="color:#2a00ff; ">BlazorWasmPrerender</span>&#10;</pre>


### Integrating a pre-render tool {#integrating-a-pre-render-tool}


There are <em>many </em>tools in the open-source community that provide pre-rendering functionality. For this tutorial, you will be using a very popular NodeJS tool called '<a href="https://github.com/stereobooster/react-snap">react-snap</a>'. React-snap can pre-render your application using a headless Chrome browser. Point the tool to your SPA output files and it will render your application and follow any links it can find while saving the results to disk as HTML files. <strong>React-snap supports any SPA framework</strong>, even though the name may give you the impression it's only for react applications.


You can install the tool globally using the following command:

<pre style="color:#000000;background:#ffffff;">npm <span style="color:#2a00ff; ">install</span> -g <span style="color:#2a00ff; ">react-snap</span>&#10;</pre>


React-snap does require some configuration and it has to be stored in a json-file named *package.json*. When you run react-snap, it expects *package.json* to be in the current working directory (CWD). Using the following commands, create a folder named *Prerender* and create an empty *package.json* file in the folder:


**PowerShell:**


<pre style="color:#000000;background:#ffffff;">mkdir <span style="color:#2a00ff; ">Prerender</span>&#10;New-Item <span style="color:#2a00ff; ">Prerender/package.json</span> -ItemType <span style="color:#2a00ff; ">File</span>&#10;</pre>


**Bash**:


<pre style="color:#000000;background:#ffffff;">mkdir Prerender&#10;touch <span style="color:#3f3fbf; ">Prerender/package.json</span>&#10;</pre>


Now publish the Blazor WASM project into a new subfolder of <em>Prerender </em>named <em>output</em>:


<pre style="color:#000000;background:#ffffff;">dotnet <span style="color:#2a00ff; ">publish</span> <span style="color:#2a00ff; ">Client/BlazorWasmPrerender.csproj</span> -c <span style="color:#2a00ff; ">Release</span> -o <span style="color:#2a00ff; ">Prerender/output</span>&#10;</pre>


The publish command, published all the static files to *Prerender/output/wwwroot*.<br>Now you need to add the necessary configuration for react-snap to *Prerender/package.json*:


<pre style="color:#000000;background:#ffffff;">{&#10;&nbsp;&nbsp;&nbsp;&nbsp;<span style="color:#2a00ff; ">"</span><span style="color:#2a00ff; ">reactSnap</span><span style="color:#2a00ff; ">"</span>: {&#10;&nbsp;&nbsp;&nbsp;&nbsp;&nbsp;&nbsp;&nbsp;&nbsp;<span style="color:#2a00ff; ">"</span><span style="color:#2a00ff; ">source</span><span style="color:#2a00ff; ">"</span>: <span style="color:#2a00ff; ">"</span><span style="color:#2a00ff; ">output/wwwroot</span><span style="color:#2a00ff; ">"</span>,&#10;&nbsp;&nbsp;&nbsp;&nbsp;&nbsp;&nbsp;&nbsp;&nbsp;<span style="color:#2a00ff; ">"</span><span style="color:#2a00ff; ">minifyHtml</span><span style="color:#2a00ff; ">"</span>: {&#10;&nbsp;&nbsp;&nbsp;&nbsp;&nbsp;&nbsp;&nbsp;&nbsp;&nbsp;&nbsp;&nbsp;&nbsp;<span style="color:#2a00ff; ">"</span><span style="color:#2a00ff; ">collapseWhitespace</span><span style="color:#2a00ff; ">"</span>: <span style="color:#7f0055; font-weight:bold; ">true</span>,&#10;&nbsp;&nbsp;&nbsp;&nbsp;&nbsp;&nbsp;&nbsp;&nbsp;&nbsp;&nbsp;&nbsp;&nbsp;<span style="color:#2a00ff; ">"</span><span style="color:#2a00ff; ">removeComments</span><span style="color:#2a00ff; ">"</span>: <span style="color:#7f0055; font-weight:bold; ">true</span>&#10;&nbsp;&nbsp;&nbsp;&nbsp;&nbsp;&nbsp;&nbsp;&nbsp;},&#10;&nbsp;&nbsp;&nbsp;&nbsp;&nbsp;&nbsp;&nbsp;&nbsp;<span style="color:#2a00ff; ">"</span><span style="color:#2a00ff; ">puppeteerArgs</span><span style="color:#2a00ff; ">"</span>: [<span style="color:#2a00ff; ">"</span><span style="color:#2a00ff; ">--no-sandbox</span><span style="color:#2a00ff; ">"</span>, <span style="color:#2a00ff; ">"</span><span style="color:#2a00ff; ">--disable-setuid-sandbox</span><span style="color:#2a00ff; ">"</span>]&#10;&nbsp;&nbsp;&nbsp;&nbsp;}&#10;}&#10;</pre>


The most important configuration is the "source" property which tells react-snap where the static web app files are to pre-render. Refer <a rel="noopener" href="https://github.com/stereobooster/react-snap" target="_blank">react-snap’s GitHub readme</a> for more information on the other properties.


With the configuration in place and the Blazor WASM published, you can now run react-snap using the following commands:

<pre style="color:#000000;background:#ffffff;">cd <span style="color:#2a00ff; ">Prerender</span>&#10;npx <span style="color:#2a00ff; ">react-snap</span>&#10;<span style="color:#3f7f59; "># Output:&nbsp;</span>&#10;<span style="color:#3f7f59; "># &nbsp; 💬&nbsp; console.log at /: Streaming compilation failed. Falling back to ArrayBuffer instantiation.&nbsp; JSHandle@error</span>&#10;<span style="color:#3f7f59; "># &nbsp; 💬&nbsp; console.log at /: mono_wasm_runtime_ready fe00e07a-5519-4dfe-b35a-f867dbaf2e28</span>&#10;<span style="color:#3f7f59; "># &nbsp; ✅&nbsp; crawled 1 out of 4 (/)</span>&#10;<span style="color:#3f7f59; "># &nbsp; 💬&nbsp; console.log at /counter: Streaming compilation failed. Falling back to ArrayBuffer instantiation.&nbsp; JSHandle@error️️️💬&nbsp; console.log at /fetchdata: Streaming compilation failed. Falling back to ArrayBuffer instantiation.&nbsp; JSHandle@error</span>&#10;<span style="color:#3f7f59; "># &nbsp; 💬&nbsp; console.log at /404.html: Streaming compilation failed. Falling back to ArrayBuffer instantiation.&nbsp; JSHandle@error</span>&#10;<span style="color:#3f7f59; "># &nbsp; 💬&nbsp; console.log at /counter: mono_wasm_runtime_ready fe00e07a-5519-4dfe-b35a-f867dbaf2e28</span>&#10;<span style="color:#3f7f59; "># &nbsp; 💬&nbsp; console.log at /fetchdata: mono_wasm_runtime_ready fe00e07a-5519-4dfe-b35a-f867dbaf2e28</span>&#10;<span style="color:#3f7f59; "># &nbsp; 💬&nbsp; console.log at /404.html: mono_wasm_runtime_ready fe00e07a-5519-4dfe-b35a-f867dbaf2e28</span>&#10;<span style="color:#3f7f59; "># &nbsp; ✅&nbsp; crawled 2 out of 4 (/counter)</span>&#10;<span style="color:#3f7f59; "># &nbsp; ⚠️&nbsp; warning: 404 page title does not contain "404" string</span>&#10;<span style="color:#3f7f59; "># &nbsp; ✅&nbsp; crawled 3 out of 4 (/404.html)</span>&#10;<span style="color:#3f7f59; "># &nbsp; ✅&nbsp; crawled 4 out of 4 (/fetchdata)</span>&#10;</pre>


You can see which files have been created in the output. Let's see if the pre-rendered project works as expected by running a static http server at *Prerender/output/wwwroot*.<br>To serve the static files locally, you can use a .NET global tool called '<a rel="noopener" href="https://github.com/natemcmaster/dotnet-serve" target="_blank">dotnet-serve</a>' Use the following commands to install the tool and then serve the static files:


<pre style="color:#000000;background:#ffffff;">dotnet <span style="color:#2a00ff; ">tool</span> <span style="color:#2a00ff; ">install</span> <span style="color:#2a00ff; ">--global</span> <span style="color:#2a00ff; ">dotnet-serve</span>&#10;<span style="color:#3f7f59; "># make sure your CWD is Prerender</span>&#10;dotnet <span style="color:#2a00ff; ">serve</span> -o -d <span style="color:#2a00ff; ">output/wwwroot</span>&#10;</pre>

The 'o' argument instructs the tool to open the browser automatically. The 'd' argument tells the tool which directory to serve.

You can verify in the browser that the application has been pre-rendered successfully. You can navigate around and verify the source returns all the HTML content. But the interactivity is broken. When you click on the "Click me" button at the */counter* page it doesn't do anything. When you check the browser console, you can get a glimpse of what is going wrong:

<picture>
  <img src="https://swimburger.net/cdn-cgi/image/format=auto,quality=90,width=1120/media/4ctighl5/pre-rendered-blazor-wasm-console-errors.png" srcset="https://swimburger.net/cdn-cgi/image/format=auto,quality=90,width=430/media/4ctighl5/pre-rendered-blazor-wasm-console-errors.png 430w, https://swimburger.net/cdn-cgi/image/format=auto,quality=90,width=645/media/4ctighl5/pre-rendered-blazor-wasm-console-errors.png 645w, https://swimburger.net/cdn-cgi/image/format=auto,quality=90,width=718/media/4ctighl5/pre-rendered-blazor-wasm-console-errors.png 718w, https://swimburger.net/cdn-cgi/image/format=auto,quality=90,width=860/media/4ctighl5/pre-rendered-blazor-wasm-console-errors.png 860w, https://swimburger.net/cdn-cgi/image/format=auto,quality=90,width=1077/media/4ctighl5/pre-rendered-blazor-wasm-console-errors.png 1077w, https://swimburger.net/cdn-cgi/image/format=auto,quality=90,width=1120/media/4ctighl5/pre-rendered-blazor-wasm-console-errors.png 1120w, https://swimburger.net/cdn-cgi/image/format=auto,quality=90,width=1436/media/4ctighl5/pre-rendered-blazor-wasm-console-errors.png 1436w" sizes="(max-width: 480px) 430px, (max-width: 768px) 718px, 1120px" width="1120" height="189" alt="Screenshot of non-interactive pre-rendered Blazor WASM application with errors in the console" loading="lazy" decoding="async">
</picture>

Normally, the output of a Blazor WASM application will have the following JavaScript reference at the bottom of the body-tag:

<pre style="color:#000000;background:#ffffff;"><span style="color:#7f0055; ">&lt;</span><span style="color:#7f0055; font-weight:bold; ">script</span> src=<span style="color:#2a00ff; ">"_framework/blazor.webassembly.js"</span><span style="color:#7f0055; ">&gt;</span><span style="color:#7f0055; ">&lt;/</span><span style="color:#7f0055; font-weight:bold; ">script</span><span style="color:#7f0055; ">&gt;</span>&#10;</pre>

In the pre-rendered HTML files, there are multiple script-tags:

<pre style="color:#000000;background:#ffffff;"><span style="color:#7f0055; ">&lt;</span><span style="color:#7f0055; font-weight:bold; ">script</span> src=<span style="color:#2a00ff; ">"_framework/blazor.webassembly.js"</span><span style="color:#7f0055; ">&gt;</span><span style="color:#7f0055; ">&lt;/</span><span style="color:#7f0055; font-weight:bold; ">script</span><span style="color:#7f0055; ">&gt;</span>&#10;<span style="color:#7f0055; ">&lt;</span><span style="color:#7f0055; font-weight:bold; ">script</span> type=<span style="color:#2a00ff; ">"text/javascript"</span><span style="color:#7f0055; ">&gt;</span><span style="color:#7f0055; font-weight:bold; ">var</span> Module; window.__wasmmodulecallback__(); <span style="color:#7f0055; font-weight:bold; ">delete</span> window.__wasmmodulecallback__;<span style="color:#7f0055; ">&lt;/</span><span style="color:#7f0055; font-weight:bold; ">script</span><span style="color:#7f0055; ">&gt;</span>&#10;<span style="color:#7f0055; ">&lt;</span><span style="color:#7f0055; font-weight:bold; ">script</span> src=<span style="color:#2a00ff; ">"_framework/dotnet.5.0.1.js"</span> defer=<span style="color:#2a00ff; ">""</span> integrity=<span style="color:#2a00ff; ">"sha256-SWZOE2EsCqc/7dPgJrcFqUvVvdeJ9cipeZ2NFMC9v2s="</span> crossorigin=<span style="color:#2a00ff; ">"anonymous"</span><span style="color:#7f0055; ">&gt;</span><span style="color:#7f0055; ">&lt;/</span><span style="color:#7f0055; font-weight:bold; ">script</span><span style="color:#7f0055; ">&gt;</span>&#10;</pre>


In a normal Blazor WASM scenario, the new script-tags are generated by the script <em>blazor.webassembly.js </em>when the browser loads the script. The problem arises because the <strong>script was executed as part of the pre-rendering</strong>, but then the <strong>script is executed again when the browser loads it</strong>. The script wasn't developed with this edge case in mind and cannot handle this scenario.<br>When you remove these two extra script-tags, and refresh the browser, the Blazor's interactivity will be restored. To make this easier, you can use some PowerShell or Bash scripting to automate this.


**PowerShell**:


<pre style="color:#000000;background:#ffffff;">Get-ChildItem <span style="color:#2a00ff; ">"</span><span style="color:#2a00ff; ">.\output\wwwroot\*.html</span><span style="color:#2a00ff; ">"</span> -Recurse <span style="color:#7f0055; font-weight:bold; ">|</span> ForEach-Object {&nbsp;&#10;    $HtmlFileContent = (Get-Content -Path $_.FullName -Raw);&#10;    $HtmlFileContent = $HtmlFileContent.Replace(<span style="color:#2a00ff; ">'</span><span style="color:#2a00ff; ">[HTML YOU WANT TO REMOVE]</span><span style="color:#2a00ff; ">'</span>,<span style="color:#2a00ff; ">'</span><span style="color:#2a00ff; ">'</span>)&#10;    Set-Content -Path $_.FullName -Value $HtmlFileContent&#10;}&#10;</pre>


**Bash**:


<pre style="color:#000000;background:#ffffff;">find <span style="color:#7f0055; font-weight:bold; ">.</span> -name <span style="color:#2a00ff; ">"*.html"</span> | <span style="color:#7f0055; font-weight:bold; ">while</span> <span style="color:#7f0055; font-weight:bold; ">read</span> htmlFile; <span style="color:#7f0055; font-weight:bold; ">do</span>&#10;    <span style="color:#7f0055; font-weight:bold; ">sed</span> -i <span style="color:#2a00ff; ">'</span><span style="color:#7f0055; font-weight:bold; ">s</span><span style="color:#2a00ff; ">/</span><span style="color:#2a00ff; ">[</span><span style="color:#2a00ff; ">ESCAPED HTML YOU WANT TO REMOVE</span><span style="color:#2a00ff; ">]</span><span style="color:#2a00ff; ">/</span><span style="color:#2a00ff; ">/</span><span style="color:#7f0055; font-weight:bold; ">g</span><span style="color:#2a00ff; ">'</span> $htmlFile&#10;<span style="color:#7f0055; font-weight:bold; ">done</span>&#10;</pre>

It is likely that the HTML will differ depending on the version of .NET you are using. Here’s the same script with the HTML from .NET 5 copied in:


**PowerShell**:


<pre style="color:#000000;background:#ffffff;">Get-ChildItem <span style="color:#2a00ff; ">"</span><span style="color:#2a00ff; ">.\output\wwwroot\*.html</span><span style="color:#2a00ff; ">"</span> -Recurse <span style="color:#7f0055; font-weight:bold; ">|</span> ForEach-Object {&nbsp;    &#10;    $HtmlFileContent = (Get-Content -Path $_.FullName -Raw)&#10;    $HtmlFileContent = $HtmlFileContent.Replace(<span style="color:#2a00ff; ">'</span><span style="color:#2a00ff; ">&lt;script type="text/javascript"&gt;var Module; window.__wasmmodulecallback__(); delete window.__wasmmodulecallback__;&lt;/script&gt;&lt;script src="_framework/dotnet.5.0.1.js" defer="" integrity="sha256-SWZOE2EsCqc/7dPgJrcFqUvVvdeJ9cipeZ2NFMC9v2s=" crossorigin="anonymous"&gt;&lt;/script&gt;</span><span style="color:#2a00ff; ">'</span>,<span style="color:#2a00ff; ">'</span><span style="color:#2a00ff; ">'</span>)&#10;    Set-Content -Path $_.FullName -Value $HtmlFileContent&#10;}&#10;</pre>


**Bash**:


<pre style="color:#000000;background:#ffffff;">find <span style="color:#7f0055; font-weight:bold; ">.</span> -name <span style="color:#2a00ff; ">"output</span><span style="color:#3f3fbf; ">/</span><span style="color:#2a00ff; ">*.html"</span> | <span style="color:#7f0055; font-weight:bold; ">while</span> <span style="color:#7f0055; font-weight:bold; ">read</span> htmlFile; <span style="color:#7f0055; font-weight:bold; ">do</span>&#10;    <span style="color:#7f0055; font-weight:bold; ">sed</span> -i <span style="color:#2a00ff; ">'</span><span style="color:#7f0055; font-weight:bold; ">s</span><span style="color:#2a00ff; ">/</span><span style="color:#2a00ff; ">&lt;script type="text</span><span style="color:#2a00ff; ">\/</span><span style="color:#2a00ff; ">javascript"&gt;var Module; window</span><span style="color:#2a00ff; ">.</span><span style="color:#2a00ff; ">__wasmmodulecallback__</span><span style="color:#2a00ff; ">(</span><span style="color:#2a00ff; ">)</span><span style="color:#2a00ff; ">; delete window</span><span style="color:#2a00ff; ">.</span><span style="color:#2a00ff; ">__wasmmodulecallback__;&lt;</span><span style="color:#2a00ff; ">\/</span><span style="color:#2a00ff; ">script&gt;&lt;script src="_framework</span><span style="color:#2a00ff; ">\/</span><span style="color:#2a00ff; ">dotnet</span><span style="color:#2a00ff; ">.</span><span style="color:#2a00ff; ">5</span><span style="color:#2a00ff; ">.</span><span style="color:#2a00ff; ">0</span><span style="color:#2a00ff; ">.</span><span style="color:#2a00ff; ">1</span><span style="color:#2a00ff; ">.</span><span style="color:#2a00ff; ">js" defer="" integrity="sha256-SWZOE2EsCqc</span><span style="color:#2a00ff; ">\/</span><span style="color:#2a00ff; ">7dPgJrcFqUvVvdeJ9cipeZ2NFMC9v2s=" crossorigin="anonymous"&gt;&lt;</span><span style="color:#2a00ff; ">\/</span><span style="color:#2a00ff; ">script&gt;</span><span style="color:#2a00ff; ">/</span><span style="color:#2a00ff; ">/</span><span style="color:#7f0055; font-weight:bold; ">g</span><span style="color:#2a00ff; ">'</span> $htmlFile&#10;<span style="color:#7f0055; font-weight:bold; ">done</span>&#10;</pre>

This script will search for all HTML-files recursively and remove the extra script tags from the files. (React-snap minified the HTML and put everything on a single file.)

<p class="panel panel--warning">The moment any of the HTML you’re trying to remove changes, the script won’t work as expected. If you’re feeling adventurous, you can update the scripts to be more robust by using commands/utilities that understand HTML. </p>


**After fixing all the HTML-files, you can refresh the browser, and you now have a pre-rendered Blazor WASM application that is still interactive!**


Here’s a script that puts together the publish, pre-rendering, and HTML fixing:


**PowerShell**:


<pre style="color:#000000;background:#ffffff;"><span style="color:#7f0055; font-weight:bold; ">If</span>(Test-Path <span style="color:#2a00ff; ">.\Prerender\output</span>)&#10;{&#10;    Remove-Item -Path <span style="color:#2a00ff; ">.\Prerender\output</span> -Recurse&#10;}&#10;&nbsp;&#10;dotnet <span style="color:#2a00ff; ">publish</span> <span style="color:#2a00ff; ">.\Client\BlazorWasmPrerender.csproj</span> -c <span style="color:#2a00ff; ">Release</span> -o <span style="color:#2a00ff; ">Prerender/output</span> <span style="color:#2a00ff; ">--nologo</span>&#10;Push-Location <span style="color:#2a00ff; ">.\Prerender</span>&#10;npx <span style="color:#2a00ff; ">react-snap</span>&#10;Get-ChildItem <span style="color:#2a00ff; ">"</span><span style="color:#2a00ff; ">.\output\wwwroot\*.html</span><span style="color:#2a00ff; ">"</span> -Recurse <span style="color:#7f0055; font-weight:bold; ">|</span> ForEach-Object {&nbsp;&#10;    $HtmlFileContent = (Get-Content -Path $_.FullName -Raw);&#10;    $HtmlFileContent = $HtmlFileContent.Replace(<span style="color:#2a00ff; ">'</span><span style="color:#2a00ff; ">&lt;script type="text/javascript"&gt;var Module; window.__wasmmodulecallback__(); delete window.__wasmmodulecallback__;&lt;/script&gt;&lt;script src="_framework/dotnet.5.0.1.js" defer="" integrity="sha256-SWZOE2EsCqc/7dPgJrcFqUvVvdeJ9cipeZ2NFMC9v2s=" crossorigin="anonymous"&gt;&lt;/script&gt;</span><span style="color:#2a00ff; ">'</span>,<span style="color:#2a00ff; ">'</span><span style="color:#2a00ff; ">'</span>)&#10;    Set-Content -Path $_.FullName -Value $HtmlFileContent&#10;}&#10;Pop-Location&#10;</pre>


**Bash**:


<pre style="color:#000000;background:#ffffff;"><span style="color:#3f7f59; ">#!/bin/bash</span>&#10;rm -rf <span style="color:#2a00ff; ">Prerender/output</span>&#10;dotnet <span style="color:#2a00ff; ">publish</span> <span style="color:#2a00ff; ">Client/BlazorWasmPrerender.csproj</span> -c <span style="color:#2a00ff; ">Release</span> -o <span style="color:#2a00ff; ">Prerender/output</span> <span style="color:#2a00ff; ">--nologo</span>&#10;pushd <span style="color:#2a00ff; ">Prerender</span>&#10;npx <span style="color:#2a00ff; ">react-snap</span>&#10;find <span style="color:#2a00ff; ">./output</span> -name <span style="color:#2a00ff; ">"</span><span style="color:#2a00ff; ">*.html</span><span style="color:#2a00ff; ">"</span> <span style="color:#7f0055; font-weight:bold; ">|</span> while <span style="color:#2a00ff; ">read</span> <span style="color:#2a00ff; ">htmlFile</span>; <span style="color:#7f0055; font-weight:bold; ">do</span>&#10;&nbsp;&nbsp;&nbsp;&nbsp;sed -i 's/&lt;script type="text\/javascript"&gt;var Module; window.__wasmmodulecallback__(); delete <span style="color:#2a00ff; ">window.__wasmmodulecallback__</span>;&lt;\/script&gt;&lt;script <span style="color:#2a00ff; ">src=</span><span style="color:#2a00ff; ">"</span><span style="color:#2a00ff; ">_framework\/dotnet.5.0.1.js</span><span style="color:#2a00ff; ">"</span> <span style="color:#2a00ff; ">defer=</span><span style="color:#2a00ff; ">"</span><span style="color:#2a00ff; ">"</span> <span style="color:#2a00ff; ">integrity=</span><span style="color:#2a00ff; ">"</span><span style="color:#2a00ff; ">sha256-SWZOE2EsCqc\/7dPgJrcFqUvVvdeJ9cipeZ2NFMC9v2s=</span><span style="color:#2a00ff; ">"</span> <span style="color:#2a00ff; ">crossorigin=</span><span style="color:#2a00ff; ">"</span><span style="color:#2a00ff; ">anonymous</span><span style="color:#2a00ff; ">"</span><span style="color:#7f0055; font-weight:bold; ">&gt;</span><span style="color:#2a00ff; ">&lt;\/script&gt;//g</span><span style="color:#2a00ff; ">'</span><span style="color:#2a00ff; "> $htmlFile</span>&#10;<span style="color:#2a00ff; ">done</span>&#10;<span style="color:#2a00ff; ">popd</span>&#10;</pre>


### Build and publish to GitHub Pages using GitHub Actions {#build-and-publish-to-github-pages-using-github-actions}

There’s a prerequisite blog post which shows you [how to build and deploy Blazor WASM to GitHub Pages](https://swimburger.net/blog/dotnet/how-to-deploy-aspnet-blazor-webassembly-to-github-pages) which goes into more details. This tutorial will focus on integrating react-snap and the script to fix the HTML into GitHub Actions.

#### Push Blazor project to GitHub {#push-blazor-project-to-github}

To make sure you only track the relevant files, you can use the following command to create a .NET specific *.gitignore* file:

<pre style="color:#000000;background:#ffffff;"><span style="color:#3f7f59; "># add the gitignore file tailored for dotnet applications, this will ignore bin/obj and many other non-source code files</span>&#10;dotnet <span style="color:#2a00ff; ">new</span> <span style="color:#2a00ff; ">gitignore</span>&#10;<span style="color:#3f7f59; "># ignore the Prerender/output directory</span>&#10;echo <span style="color:#2a00ff; ">"</span><span style="color:#2a00ff; ">"</span> <span style="color:#7f0055; font-weight:bold; ">&gt;&gt;</span> <span style="color:#2a00ff; ">.gitignore</span>&#10;echo <span style="color:#2a00ff; ">"</span><span style="color:#2a00ff; ">Prerender/output</span><span style="color:#2a00ff; ">"</span> <span style="color:#7f0055; font-weight:bold; ">&gt;&gt;</span> <span style="color:#2a00ff; ">.gitignore</span>&#10;</pre>

You need to create a local Git repository and commit your source code to the repository using these commands:

<pre style="color:#000000;background:#ffffff;"><span style="color:#3f7f59; "># create the git repository</span>&#10;git <span style="color:#2a00ff; ">init</span>&#10;<span style="color:#3f7f59; "># track all files that are not ignore by .gitignore</span>&#10;git <span style="color:#2a00ff; ">add</span> <span style="color:#2a00ff; ">--all</span>&#10;<span style="color:#3f7f59; "># commit all changes to the repository</span>&#10;git <span style="color:#2a00ff; ">commit</span> -m <span style="color:#2a00ff; ">"</span><span style="color:#2a00ff; ">Initial commit</span><span style="color:#2a00ff; ">"</span>&#10;</pre>


Create a new GitHub repository ([instructions](https://docs.github.com/en/github/getting-started-with-github/create-a-repo)) and copy the commands to "push an existing repository from the command line" from the empty GitHub repository page, here's what it should looks like but with a different URL:


<pre style="color:#000000;background:#ffffff;">git <span style="color:#2a00ff; ">remote</span> <span style="color:#2a00ff; ">add</span> <span style="color:#2a00ff; ">origin</span> <span style="color:#2a00ff; ">https://github.com/Swimburger/BlazorWasmPrerender.git</span>&#10;git <span style="color:#2a00ff; ">push</span> -u <span style="color:#2a00ff; ">origin</span> <span style="color:#2a00ff; ">main</span>&#10;</pre>


#### Create GitHub Action {#create-github-action}


Create a new file at *.github/workflows/* named *main.yml*:


**PowerShell**:


<pre style="color:#000000;background:#ffffff;">mkdir <span style="color:#2a00ff; ">.github/workflows</span>&#10;New-Item <span style="color:#2a00ff; ">.github/workflows/main.yml</span> -ItemType <span style="color:#2a00ff; ">File</span>&#10;</pre>


**Bash**:


<pre style="color:#000000;background:#ffffff;">mkdir <span style="color:#7f0055; font-weight:bold; ">.</span><span style="color:#3f3fbf; ">github/workflows</span>&#10;touch <span style="color:#7f0055; font-weight:bold; ">.</span><span style="color:#3f3fbf; ">github/workflows/main.yml</span>&#10;</pre>


Copy the following content to *main.yml*:


<pre style="color:#000000;background:#ffffff;">name: Deploy to GitHub Pages&#10;&nbsp;&#10;# Run workflow on every push to the master branch&#10;on:&#10;&nbsp;&nbsp;push:&#10;&nbsp;&nbsp;&nbsp;&nbsp;branches: [ main ]&#10;&nbsp;&#10;jobs:&#10;&nbsp;&nbsp;deploy-to-github-pages:&#10;&nbsp;&nbsp;&nbsp;&nbsp;# use ubuntu-latest image to run steps on&#10;&nbsp;&nbsp;&nbsp;&nbsp;runs-on: ubuntu-latest&#10;&nbsp;&nbsp;&nbsp;&nbsp;steps:&#10;&nbsp;&nbsp;&nbsp;&nbsp;# uses GitHub<span style="color:#2a00ff; ">'</span>s checkout action to checkout code form the master branch&#10;&nbsp;&nbsp;&nbsp;&nbsp;- uses: actions/checkout@v2&#10;&nbsp;&nbsp;&nbsp;&nbsp;&#10;&nbsp;&nbsp;&nbsp;&nbsp;# sets up .NET Core SDK 5.0.101&#10;&nbsp;&nbsp;&nbsp;&nbsp;- name: Setup .NET Core SDK&#10;&nbsp;&nbsp;&nbsp;&nbsp;&nbsp;&nbsp;uses: actions/setup-dotnet@v1&#10;&nbsp;&nbsp;&nbsp;&nbsp;&nbsp;&nbsp;with:&#10;&nbsp;&nbsp;&nbsp;&nbsp;&nbsp;&nbsp;&nbsp;&nbsp;dotnet-version: 5.0.101&#10;&nbsp;&#10;&nbsp;&nbsp;&nbsp;&nbsp;# publishes Blazor project to the Prerender/output folder&#10;&nbsp;&nbsp;&nbsp;&nbsp;- name: Publish .NET Core Project&#10;&nbsp;&nbsp;&nbsp;&nbsp;&nbsp;&nbsp;run: dotnet publish Client/BlazorWasmPrerender.csproj -c Release -o Prerender/output --nologo&#10;&nbsp;&nbsp;&nbsp;&nbsp;&#10;&nbsp;&nbsp;&nbsp;&nbsp;# Use NodeJS react-snap utitility to prerender static website&#10;&nbsp;&nbsp;&nbsp;&nbsp;- name: prerender Blazor client&#10;&nbsp;&nbsp;&nbsp;&nbsp;&nbsp;&nbsp;working-directory: Prerender&#10;&nbsp;&nbsp;&nbsp;&nbsp;&nbsp;&nbsp;run: npx react-snap&#10;&nbsp;&nbsp;&nbsp;&nbsp;&#10;&nbsp;&nbsp;&nbsp;&nbsp;# change base tag in all html files to include subfolder&#10;&nbsp;&nbsp;&nbsp;&nbsp;- name: Change base tag&#10;&nbsp;&nbsp;&nbsp;&nbsp;&nbsp;&nbsp;working-directory: Prerender/output/wwwroot&#10;&nbsp;&nbsp;&nbsp;&nbsp;&nbsp;&nbsp;run: |&#10;&nbsp;&nbsp;&nbsp;&nbsp;&nbsp;&nbsp;&nbsp;&nbsp;find . -name <span style="color:#2a00ff; ">"</span><span style="color:#2a00ff; ">*.html</span><span style="color:#2a00ff; ">"</span> | while read htmlFile; do&#10;&nbsp;&nbsp;&nbsp;&nbsp;&nbsp;&nbsp;&nbsp;&nbsp;&nbsp;&nbsp;&nbsp;&nbsp;sed -i <span style="color:#2a00ff; ">'</span><span style="color:#2a00ff; ">s/&lt;base href="\/"/&lt;base href="\/BlazorWasmPrerender\/"/g</span><span style="color:#2a00ff; ">'</span> $htmlFile&#10;&nbsp;&nbsp;&nbsp;&nbsp;&nbsp;&nbsp;&nbsp;&nbsp;&nbsp;&nbsp;&nbsp;&nbsp;sed -i <span style="color:#2a00ff; ">'</span><span style="color:#2a00ff; ">s/&lt;script type="text\/javascript"&gt;var Module; window.__wasmmodulecallback__(); delete window.__wasmmodulecallback__;&lt;\/script&gt;&lt;script src="_framework\/dotnet.5.0.1.js" defer="" integrity="sha256-SWZOE2EsCqc\/7dPgJrcFqUvVvdeJ9cipeZ2NFMC9v2s=" crossorigin="anonymous"&gt;&lt;\/script&gt;//g</span><span style="color:#2a00ff; ">'</span> $htmlFile&#10;&nbsp;&nbsp;&nbsp;&nbsp;&nbsp;&nbsp;&nbsp;&nbsp;done&#10;&nbsp;&nbsp;&nbsp;&nbsp;# add .nojekyll file to tell GitHub pages to not treat this as a Jekyll project. (Allow files and folders starting with an underscore)&#10;&nbsp;&nbsp;&nbsp;&nbsp;- name: Add .nojekyll file&#10;&nbsp;&nbsp;&nbsp;&nbsp;&nbsp;&nbsp;run: touch Prerender/output/wwwroot/.nojekyll&#10;&nbsp;&nbsp;&nbsp;&nbsp;&nbsp;&nbsp;&#10;&nbsp;&nbsp;&nbsp;&nbsp;- name: Commit wwwroot to GitHub Pages&#10;&nbsp;&nbsp;&nbsp;&nbsp;&nbsp;&nbsp;uses: JamesIves/<span style="color:#3f3fbf; ">github-pages-deploy-action@3.7.1</span>&#10;&nbsp;&nbsp;&nbsp;&nbsp;&nbsp;&nbsp;with:&#10;&nbsp;&nbsp;&nbsp;&nbsp;&nbsp;&nbsp;&nbsp;&nbsp;GITHUB_TOKEN: ${{ secrets.GITHUB_TOKEN }}&#10;&nbsp;&nbsp;&nbsp;&nbsp;&nbsp;&nbsp;&nbsp;&nbsp;BRANCH: gh-pages&#10;&nbsp;&nbsp;&nbsp;&nbsp;&nbsp;&nbsp;&nbsp;&nbsp;FOLDER: Prerender/output/wwwroot&#10;</pre>

Let’s dissect the adjustments made to integrate pre-rendering:

<pre style="color:#000000;background:#ffffff;"># publishes Blazor project to the Prerender/output folder&#10;- name: Publish .NET Core Project&#10;&nbsp;&nbsp;run: dotnet publish Client/BlazorWasmPrerender.csproj -c Release -o Prerender/output --nologo&#10;</pre>


Just as you published the project locally, GitHub Actions will publish the Blazor WASM project to *Prerender/output*.


<pre style="color:#000000;background:#ffffff;"># Use NodeJS react-snap utitility to prerender static website&#10;- name: prerender Blazor client&#10;&nbsp;&nbsp;working-directory: Prerender&#10;&nbsp;&nbsp;run: npx react-snap&#10;</pre>


**NodeJS is pre-installed on the 'ubuntu-latest' images**, so you can simply run the `npx react-snap` command. The command will be run with 'Prerender' as the CWD.


<pre style="color:#000000;background:#ffffff;"># change base tag in all html files to include subfolder&#10;- name: Change base tag&#10;&nbsp;&nbsp;working-directory: Prerender/output/wwwroot&#10;&nbsp;&nbsp;run: |&#10;&nbsp;&nbsp;&nbsp;&nbsp;find . -name <span style="color:#2a00ff; ">"</span><span style="color:#2a00ff; ">*.html</span><span style="color:#2a00ff; ">"</span> | while read htmlFile; do&#10;&nbsp;&nbsp;&nbsp;&nbsp;&nbsp;&nbsp;&nbsp;&nbsp;sed -i <span style="color:#2a00ff; ">'</span><span style="color:#2a00ff; ">s/&lt;base href="\/"/&lt;base href="\/BlazorWasmPrerender\/"/g</span><span style="color:#2a00ff; ">'</span> $htmlFile&#10;&nbsp;&nbsp;&nbsp;&nbsp;&nbsp;&nbsp;&nbsp;&nbsp;sed -i <span style="color:#2a00ff; ">'</span><span style="color:#2a00ff; ">s/&lt;script type="text\/javascript"&gt;var Module; window.__wasmmodulecallback__(); delete window.__wasmmodulecallback__;&lt;\/script&gt;&lt;script src="_framework\/dotnet.5.0.1.js" defer="" integrity="sha256-SWZOE2EsCqc\/7dPgJrcFqUvVvdeJ9cipeZ2NFMC9v2s=" crossorigin="anonymous"&gt;&lt;\/script&gt;//g</span><span style="color:#2a00ff; ">'</span> $htmlFile&#10;&nbsp;&nbsp;&nbsp;&nbsp;done&#10;</pre>

Just like the bash script locally, GitHub Actions will go through all HTML-files to fix the script-tag issues. In addition to that, the base-tag will be updated to reflect the GitHub Pages subdirectory it will be hosted in. For more details on the base-tag issue, refer to the prerequisite tutorial.


The rest of the workflow YAML file is exactly the same as the prerequisite article. In addition to the Blazor project being pre-rendered to optimize for search engines, **GitHub Pages will now not return 404 status codes anymore when requesting child subpaths in the application**.


## Summary {#summary}


SPA frameworks like Blazor require the execution of JavaScript to function. Most search engine crawler’s don’t execute JavaScript which means JavaScript generated content won’t be indexed. Google’s crawlers do execute JavaScript and they can successfully index Blazor WASM apps. To optimize for other search engines, you can pre-render Blazor WASM on the server, but that requires server side code execution. 


For static site hosts like GitHub Actions and Azure Static Web Apps, server side code execution is not available. Instead of pre-rendering in response to HTTP requests, you can move the pre-rendering to the build pipeline.<br>Using pre-rendering tools like react-snap, you can pre-render Blazor WASM. Additionally, you can integrate these pre-rendering tools inside of your continuous integration and continuous deployment pipelines. Using GitHub Actions, you can pre-render your Blazor application and deploy it to GitHub Pages. Deploying pre-rendered applications to GitHub Pages will increase SEO but also resolve those pesky HTTP 404 errors.
