---
title: "How to deploy Blazor WebAssembly to DigitalOcean App Platform"
excerpt: "Blazor WebAssembly can be served as static files. These files can be hosted in static hosting services such as DigitalOcean App Platform."
publishDate: "2021-03-30T00:00:00"
createDate: "2021-03-11T05:58:09.353"
updateDate: "2021-04-02T23:33:59.597"
category: "dotnet"
categoryName: ".NET"
tags: [".NET","ASP.NET","Blazor","Blazor WASM","Blazor WebAssembly","DigitalOcean"]
permalink: "/blog/dotnet/how-to-deploy-blazor-webassembly-to-digitalocean-app-platform"
canonical: "/blog/dotnet/how-to-deploy-blazor-webassembly-to-digitalocean-app-platform"
image: {"src":"/media/ba4mb202/blazor-digitalocean-app-long.png","focalPoint":{"left":0.5,"top":0.5},"crops":[{"alias":"Banner","width":1120,"height":400,"coordinates":null}]}
imageAlt: "Title: \"How to deploy Blazor WebAssembly to DigitalOcean App Platform\". Below the title: Blazor logo pointing to the GitHub logo pointing to the DigitalOcean logo."
imageBackgroundColor: "#fff"
thumbnailImage: {"src":"/media/lrdndfux/blazor-digitalocean-app-square.png","focalPoint":{"left":0.5,"top":0.5},"crops":[{"alias":"thumbnail","width":250,"height":250,"coordinates":null}]}
thumbnailImageAlt: "Blazor logo pointing to the GitHub logo pointing to the DigitalOcean logo"
metaTitle: "How to deploy Blazor WebAssembly to DigitalOcean App Platform"
metaDescription: "Blazor WebAssembly can be served as static files. These files can be hosted in static hosting services such as DigitalOcean App Platform."
ogTitle: "How to deploy Blazor WebAssembly to DigitalOcean App Platform"
ogDescription: "Blazor WebAssembly can be served as static files. These files can be hosted in static hosting services such as DigitalOcean App Platform."
ogImage: {"src":"/media/dslhffdd/blazor-digitalocean-app-social.png","focalPoint":{"left":0.5,"top":0.5},"crops":[{"alias":"OpenGraph","width":1200,"height":630,"coordinates":null}]}
ogImageAlt: "Title: \"How to deploy Blazor WebAssembly to DigitalOcean Apps\". Below the title: Blazor logo pointing to the GitHub logo pointing to the DigitalOcean logo."
relatedPostKeys: ["3fa142faee1a488c91f507627e8059bb","b01d783c18284f05b29774abcd096471","1220545262ab42c291420e12ca2e6025","866430e9df2e4fe9a7805fbfa47eb9a4","0d375026e40743fdadc9c3b841802a6a","712bacbb348946db96f735a4f3171340","9cf8ccbb7b514682884b959e9d2e42df"]
noIndex: false
noFollow: false
sitemapExclude: false
source: {"nodeId":1475,"contentKey":"96c614eafbf54c34aa95e225ab4eba7e","sortOrder":90}
---


With ASP.NET Blazor WebAssembly (WASM) you can create .NET web applications that run completely inside of the browser sandbox. The published output of a Blazor WASM project are **static files**. Now that you can run .NET web applications without server-side code, you can deploy these applications to various **static site hosts, such as [DigitalOcean App Platform](https://www.digitalocean.com/docs/app-platform/)**.


Here are some other tutorials if you're interested in hosting Blazor WASM on other static site hosts:


-   [Azure Static Web Apps using GitHub](https://swimburger.net/blog/dotnet/how-to-deploy-aspnet-blazor-webassembly-to-azure-static-web-apps)
-   [Azure Static Web Apps using Azure DevOps (by Dave Brock)](https://daveabrock.com/2021/04/01/static-web-apps-azure-pipelines)
-   <a href="/blog/dotnet/how-to-deploy-blazor-webassembly-to-aws-amplify" title="How to deploy Blazor WebAssembly to AWS Amplify">AWS Amplify</a>
-   <a href="/blog/dotnet/how-to-deploy-blazor-webassembly-to-netlify" title="How to deploy Blazor WebAssembly to Netlify">Netlify</a>
-   <a href="/blog/dotnet/how-to-deploy-blazor-webassembly-to-cloudflare-pages" title="How to deploy Blazor WebAssembly to Cloudflare Pages">Cloudflare Pages</a><a href="/blog/dotnet/how-to-deploy-blazor-webassembly-to-digitalocean-app-platform" title="How to deploy Blazor WebAssembly to DigitalOcean App Platform"></a>
-   <a href="/blog/dotnet/how-to-deploy-blazor-webassembly-to-heroku" title="How to deploy Blazor WebAssembly to Heroku">Heroku</a>
-   [GitHub Pages](https://swimburger.net/blog/dotnet/how-to-deploy-aspnet-blazor-webassembly-to-github-pages)<a href="/blog/dotnet/how-to-deploy-blazor-webassembly-to-aws-amplify" title="How to deploy Blazor WebAssembly to AWS Amplify"></a>
-   [Firebase Hosting](https://swimburger.net/blog/dotnet/how-to-deploy-blazor-webassembly-to-firebase-hosting)<a href="/blog/dotnet/how-to-deploy-blazor-webassembly-to-netlify" title="How to deploy Blazor WebAssembly to Netlify"></a>


This walkthrough will show you how to deploy Blazor WASM to DigitalOcean **App Platform**.


<blockquote>App Platform is a Platform-as-a-Service (PaaS) offering that allows developers to publish code directly to DigitalOcean servers without worrying about the underlying infrastructure.<br>Source: <a href="https://www.digitalocean.com/docs/app-platform/">DigitalOcean</a></blockquote>

You can host multiple workloads using App Platform, such as services (workloads publicly accessible via HTTP), workers (workloads not publicly accessible via HTTP), and Static Sites for hosting static web content.


The App Platform can pull down your code from multiple Git providers and docker registries, then build your code on their build platform, and upload the resulting static files to their static site service. 


This guide will walk you through these high-level steps:


1.  Create Blazor WebAssembly project
2.  Commit the project to a Git repository
3.  Create a new GitHub project and push the Git repository to GitHub
4.  Create a new DigitalOcean App using the DigitalOcean Command Line Interface
5.  Build Blazor WASM using Docker


**Prerequisites**:


- .NET CLI
- Git
- GitHub account
- DigitalOcean account
- DigitalOcean command-line interface (doctl) (<a href="https://www.digitalocean.com/docs/apis-clis/doctl/how-to/install/">installation instructions</a>)


<p class="panel panel--info"><strong>You can find the <a href="https://github.com/Swimburger/BlazorWasmDigitalOcean">source code for this guide on GitHub</a>.</strong></p>


## Create Blazor WebAssembly project {#create-aspnet-core-blazor-webassembly-project no-anchor}

Run the following commands to create a new Blazor WASM project:

<pre style="color:#000000;background:#ffffff;">mkdir <span style="color:#2a00ff; ">BlazorWasmDigitalOcean</span>&#10;cd <span style="color:#2a00ff; ">BlazorWasmDigitalOcean</span>&#10;dotnet <span style="color:#2a00ff; ">new</span> <span style="color:#2a00ff; ">blazorwasm</span></pre>


To give your application a try, execute `dotnet run` and browse to the URL in the output (probably [https://localhost:5001](https://localhost:5001/)):


<pre style="color:#000000;background:#ffffff;">dotnet <span style="color:#2a00ff; ">run</span>&#10;<span style="color:#3f7f59; "># Building...</span>&#10;<span style="color:#3f7f59; "># info: Microsoft.Hosting.Lifetime[0]</span>&#10;<span style="color:#3f7f59; ">#       Now listening on: </span><span style="color:#3f3fbf; ">https://localhost:5001</span>&#10;<span style="color:#3f7f59; "># info: Microsoft.Hosting.Lifetime[0]</span>&#10;<span style="color:#3f7f59; ">#       Now listening on: </span><span style="color:#3f3fbf; ">http://localhost:5000</span>&#10;<span style="color:#3f7f59; "># info: Microsoft.Hosting.Lifetime[0]</span>&#10;<span style="color:#3f7f59; ">#       Application started. Press Ctrl+C to shut down.</span>&#10;<span style="color:#3f7f59; "># info: Microsoft.Hosting.Lifetime[0]</span>&#10;<span style="color:#3f7f59; ">#       Hosting environment: Development</span>&#10;<span style="color:#3f7f59; "># info: Microsoft.Hosting.Lifetime[0]</span>&#10;<span style="color:#3f7f59; ">#       Content root path: C:\Users\niels\source\repos\BlazorWasmDigitalOcean</span>&#10;<span style="color:#3f7f59; "># info: Microsoft.Hosting.Lifetime[0]</span>&#10;<span style="color:#3f7f59; ">#       Application is shutting down...</span>&#10;</pre>

Optional: You can use the `dotnet publish` command to publish the project and verify the output:

<pre style="color:#000000;background:#ffffff;">dotnet <span style="color:#2a00ff; ">publish</span>&#10;<span style="color:#3f7f59; "># Microsoft (R) Build Engine version 16.8.0+126527ff1 for .NET</span>&#10;<span style="color:#3f7f59; "># Copyright (C) Microsoft Corporation. All rights reserved.</span>&#10;<span style="color:#3f7f59; "># </span>&#10;<span style="color:#3f7f59; ">#   Determining projects to restore...</span>&#10;<span style="color:#3f7f59; ">#   All projects are up-to-date for restore.</span>&#10;<span style="color:#3f7f59; ">#   BlazorWasmDigitalOcean -&gt; C:\Users\niels\source\repos\BlazorWasmDigitalOcean\bin\Debug\net5.0\BlazorWasmDigitalOcean.dll</span>&#10;<span style="color:#3f7f59; ">#   BlazorWasmDigitalOcean (Blazor output) -&gt; C:\Users\niels\source\repos\BlazorWasmDigitalOcean\bin\Debug\net5.0\wwwroot  Optimizing assemblies for size, which may change the behavior of the app. Be sure to test after publishing. See: </span><span style="color:#3f3fbf; ">https://aka.ms/dotnet-illink</span>&#10;<span style="color:#3f7f59; ">#   Compressing Blazor WebAssembly publish artifacts. This may take a while...</span>&#10;<span style="color:#3f7f59; ">#   BlazorWasmDigitalOcean -&gt; C:\Users\niels\source\repos\BlazorWasmDigitalOcean\bin\Debug\net5.0\publish\</span>&#10;</pre>


In the publish directory, you will find a web.config file and a wwwroot folder. The config file helps you host your application in IIS, but you don't need that file for static site hosts. **Everything you need will be inside of the wwwroot folder. The wwwroot folder contains the index.html, CSS, JS, and DLL files necessary to run the Blazor application**.


## Push Blazor project to GitHub {#push-blazor-project-to-github no-anchor}

For this walkthrough, your application source code must be inside of a GitHub repository.<br>First, you need to create a local Git repository and commit your source code to the repository using these commands:

<pre style="color:#000000;background:#ffffff;"><span style="color:#3f7f59; "># add the gitignore file tailored for dotnet applications, this will ignore bin/obj and many other non-source code files</span>&#10;dotnet <span style="color:#2a00ff; ">new</span> <span style="color:#2a00ff; ">gitignore</span>&#10;<span style="color:#3f7f59; "># create the git repository</span>&#10;git <span style="color:#2a00ff; ">init</span>&#10;<span style="color:#3f7f59; "># track all files that are not ignore by .gitignore</span>&#10;git <span style="color:#2a00ff; ">add</span> <span style="color:#2a00ff; ">--all</span>&#10;<span style="color:#3f7f59; "># commit all changes to the repository</span>&#10;git <span style="color:#2a00ff; ">commit</span> -m <span style="color:#2a00ff; ">"</span><span style="color:#2a00ff; ">Initial commit</span><span style="color:#2a00ff; ">"</span>&#10;</pre>


Create a new GitHub repository (<a rel="noopener" href="https://docs.github.com/en/github/getting-started-with-github/create-a-repo" target="_blank">instructions</a>) and copy the commands to "push an existing repository from the command line" from the empty GitHub repository page, here's what it should look like but with a different URL:


<pre style="color:#000000;background:#ffffff;">git <span style="color:#2a00ff; ">remote</span> <span style="color:#2a00ff; ">add</span> <span style="color:#2a00ff; ">origin</span> <span style="color:#2a00ff; ">https://github.com/Swimburger/BlazorWasmDigitalOcean.git</span>&#10;git <span style="color:#2a00ff; ">push</span> -u <span style="color:#2a00ff; ">origin</span> <span style="color:#2a00ff; ">main</span>&#10;</pre>


## Add Dockerfile to build Blazor WASM {#add-dockerfile-to-build-blazor-wasm}

When you create a static site using the App Platform, you can provide a build command which will be used to build your static site before deploying it to the static site host.<br>Unfortunately, the build command option does not work for .NET applications. Before even running the build command, the App Platform gives up and complains about not finding an app from their list of supported languages and frameworks.<br>.NET isn't one of the supported platforms for App Platform. Luckily, there's an alternative way to build and run .NET apps on the App Platform: Docker containers


Instead of providing a build command, you can provide a dockerfile to build your Blazor WASM application. This feature isn't accessible using the GUI, but you can use the doctl to create the app and specify the dockerfile that way.<br>Before doing that, let's create the dockerfile. Create a new file called '*Dockerfile.build*' in your project with the following content:


<pre style="color:#000000;background:#ffffff;">FROM mcr.microsoft.com/dotnet/sdk:5.0&#10;WORKDIR /app&#10;COPY BlazorWasmDigitalOcean.csproj BlazorWasmDigitalOcean.csproj&#10;RUN dotnet restore BlazorWasmDigitalOcean.csproj&#10;COPY . .&#10;RUN dotnet publish -c Release -o /output --no-restore --nologo&#10;</pre>


Feel free to learn more about [docker and .NET at Microsoft's documentation](https://docs.microsoft.com/en-us/dotnet/core/docker/introduction), but you can keep going without knowing docker or having docker installed locally.


Essentially, this docker file does the following:


-   A container is created from the .NET 5 SDK image provided by Microsoft. All subsequent instructions will be run inside a container containing the .NET 5 SDK.
-   Change the current working directory in the container to '*/app*'.
-   Copy the csproj-file to the container so you can restore the packages listed in the file
-   Run the `dotnet restore` command to restore all packages
-   Copy all files from the current folder '.' outside of the container to the working directory inside the container. This will copy all your source code to the '*/app*' folder inside the container.
-   Run the `dotnet publish` command with the following arguments:
    -   **\-c**: Use the 'Release' configuration which will optimize the Blazor project.
    -   **\-o**: Put the publish output in the '*/output*' folder
    -   **\--no-restore**: Skip the restore step since the packages have been restored earlier.
    -   **\--nologo**: Removes some unneeded output


<p class="panel panel--info">You can restore, build, and publish all in a single command, but to optimize for Docker's caching features, the restore has been separated from the publish command.</p>

The App Platform will look for the dockerfile in your source code, so you need to commit the file to Git and push the change to GitHub:

<pre style="color:#000000;background:#ffffff;">git <span style="color:#2a00ff; ">add</span> <span style="color:#2a00ff; ">--all</span>&#10;git <span style="color:#2a00ff; ">commit</span> -m <span style="color:#2a00ff; ">"</span><span style="color:#2a00ff; ">Add dockerfile.build</span><span style="color:#2a00ff; ">"</span>&#10;git <span style="color:#2a00ff; ">push</span>&#10;</pre>

Next up, you'll create a static site app using doctl and App Platform YAML configuration.

## Create the DigitalOcean App {#create-the-digitalocean-app}


Make sure you have installed the DigitalOcean command-line interface (doctl) ([installation instructions](https://www.digitalocean.com/docs/apis-clis/doctl/how-to/install/)) and authenticate using the `doctl auth init` command if you haven't already.


Create a YAML file at '*.do/app.yaml*' with the following content:


<pre style="color:#000000;background:#ffffff;">name: swimburger-blazor-wasm&#10;static_sites:&#10;- name: site&#10;  github:&#10;    repo: Swimburger/BlazorWasmDigitalOcean&#10;    branch: main&#10;    deploy_on_push: true&#10;  dockerfile_path: Dockerfile.build &#10;  output_dir: /output/wwwroot&#10;  index_document: index.html&#10;  catchall_document: index.html&#10;</pre>

Update the properties in the YAML file:

- <strong>name</strong>: Enter a name that is unique across your account. <strong>Use your username suffixed with '-blazor-wasm'.</strong>
- <strong>static\_sites</strong>
  - <strong>name</strong>: Enter a name that is unique across the different components in this file. You can have multiple "components" such as workers, services, static\_sites, etc.<br>When you update the YAML file in the future, this name will be used to make the changes to the correct component. Since there's only one component, any name will do.
  - <strong>github</strong>
    - <strong>repo</strong>: enter your <strong>\[GITHUB\_USERNAME\]/\[GITHUB\_REPOSITORY\]</strong>
    - <strong>branch</strong>: specify the name of your main branch
    - deploy\_on\_push: When set to 'true', every time push to the branch specified above, the App Platform will rebuild and deploy your application
  - <strong>dockerfile\_path</strong>: The path relative from the root of Git repository pointing to the location of your dockerfile. Your dockerfile should be located at '<strong><em>Dockerfile.build</em></strong>'.
  - <strong>output\_dir</strong>: Specify the location of your static site after the build command or dockerfile is run. In '<em>Dockerfile.build</em>' the Blazor WASM application is published to '<em>/output</em>', but the actual Blazor App and its static files are in a subfolder called '<em>wwwroot</em>'.<br>Use '<em><strong>/output/wwwroot</strong></em>' for this property.
  - <strong>index\_document</strong>: Use '<strong>index.html</strong>' for this property.
  - <strong>catchall\_document</strong>: Also use '<strong>index.html</strong>' for this property. When no HTML file is found at the requested path, the catch\_all document will be returned which is exactly what you need for Blazor WASM.


 Run the following command to create the application on App Platform:


<pre style="color:#000000;background:#ffffff;">doctl <span style="color:#2a00ff; ">app</span> <span style="color:#2a00ff; ">create</span> <span style="color:#2a00ff; ">--spec</span> <span style="color:#2a00ff; ">.do/app.yaml</span>&#10;</pre>

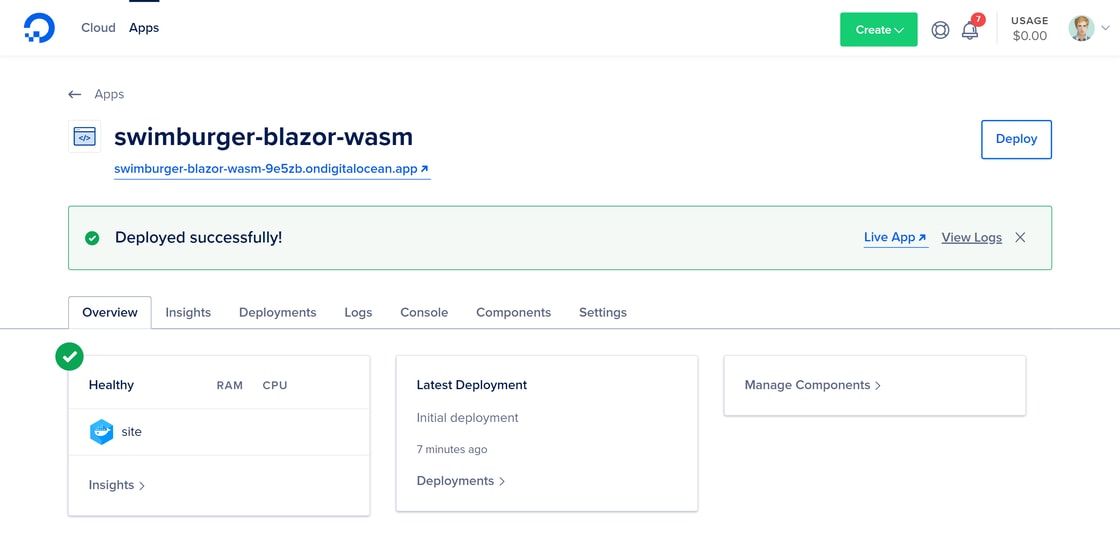
Navigate to the [Apps section in DigitalOcean](https://cloud.digitalocean.com/apps) and click on your new application.

<picture>
  <img src="https://swimburger.net/cdn-cgi/image/format=auto,quality=90,width=1120/media/5g5furhs/app-home.png" srcset="https://swimburger.net/cdn-cgi/image/format=auto,quality=90,width=430/media/5g5furhs/app-home.png 430w, https://swimburger.net/cdn-cgi/image/format=auto,quality=90,width=645/media/5g5furhs/app-home.png 645w, https://swimburger.net/cdn-cgi/image/format=auto,quality=90,width=718/media/5g5furhs/app-home.png 718w, https://swimburger.net/cdn-cgi/image/format=auto,quality=90,width=860/media/5g5furhs/app-home.png 860w, https://swimburger.net/cdn-cgi/image/format=auto,quality=90,width=1077/media/5g5furhs/app-home.png 1077w, https://swimburger.net/cdn-cgi/image/format=auto,quality=90,width=1120/media/5g5furhs/app-home.png 1120w, https://swimburger.net/cdn-cgi/image/format=auto,quality=90,width=1436/media/5g5furhs/app-home.png 1436w, https://swimburger.net/cdn-cgi/image/format=auto,quality=90,width=1680/media/5g5furhs/app-home.png 1680w, https://swimburger.net/cdn-cgi/image/format=auto,quality=90,width=2240/media/5g5furhs/app-home.png 2240w" sizes="(max-width: 480px) 430px, (max-width: 768px) 718px, 1120px" width="1120" height="535" alt="DigitalOcean App Home page" loading="lazy" decoding="async">
</picture>

You can watch the deployment logs stream in real-time while you wait for your application to be deployed. When the deployment is finished, click on "Live App" to verify your Blazor WASM application is running.

## Summary {#summary}

Blazor WebAssembly can be served as static files. These files can be hosted in static hosting services such as DigitalOcean App Platform. You can create a new DigitalOcean App Platform static site using GitHub as the source code provider. DigitalOcean's App Platform does not contain .NET support so you have to use docker to build your Blazor WASM application. The App Platform will upload the static files of the Blazor WASM application in the docker container to the static site.
