---
title: "How to deploy Blazor WebAssembly to AWS Amplify"
excerpt: "Blazor WebAssembly can be served as static files. These files can be hosted in static hosting services such as AWS Amplify."
publishDate: "2021-02-21T00:00:00"
createDate: "2021-02-15T07:52:35.453"
updateDate: "2021-04-02T23:33:20.837"
category: "dotnet"
categoryName: ".NET"
tags: ["AWS","Amplify",".NET","ASP.NET","Blazor","Blazor WASM","Blazor WebAssembly"]
permalink: "/blog/dotnet/how-to-deploy-blazor-webassembly-to-aws-amplify"
canonical: "/blog/dotnet/how-to-deploy-blazor-webassembly-to-aws-amplify"
image: {"src":"/media/bmmgfy2h/blazor-amplify-long.png","focalPoint":{"left":0.5,"top":0.4993280071679235},"crops":[{"alias":"Banner","width":1120,"height":400,"coordinates":null}]}
imageAlt: "Title: \"How to deploy Blazor WebAssembly to AWS Amplify\". Below the title: Blazor logo pointing to the GitHub logo pointing to the AWS Amplify logo."
imageBackgroundColor: "#fff"
thumbnailImage: {"src":"/media/l3rhhbsm/blazor-amplify-square.png","focalPoint":{"left":0.5,"top":0.5},"crops":[{"alias":"thumbnail","width":250,"height":250,"coordinates":null}]}
thumbnailImageAlt: "Blazor logo pointing to the GitHub logo pointing to the AWS Amplify logo."
metaTitle: "How to deploy Blazor WebAssembly to AWS Amplify"
metaDescription: "Blazor WebAssembly can be served as static files. These files can be hosted in static hosting services such as AWS Amplify."
ogTitle: "How to deploy Blazor WebAssembly to AWS Amplify"
ogDescription: "Blazor WebAssembly can be served as static files. These files can be hosted in static hosting services such as AWS Amplify."
ogImage: {"src":"/media/d4znbbfy/blazor-amplify-social.png","focalPoint":{"left":0.5,"top":0.501507697190922},"crops":[{"alias":"OpenGraph","width":1200,"height":630,"coordinates":null}]}
ogImageAlt: "Title: \"How to deploy Blazor WebAssembly to AWS Amplify\". Below the title: Blazor logo pointing to the GitHub logo pointing to the AWS Amplify logo."
relatedPostKeys: ["3fa142faee1a488c91f507627e8059bb","0d375026e40743fdadc9c3b841802a6a","1220545262ab42c291420e12ca2e6025","b01d783c18284f05b29774abcd096471"]
noIndex: false
noFollow: false
sitemapExclude: false
source: {"nodeId":1436,"contentKey":"866430e9df2e4fe9a7805fbfa47eb9a4","sortOrder":84}
---


With ASP.NET Blazor WebAssembly (WASM) you can create .NET web applications that run completely inside of the browser sandbox. The published output of a Blazor WASM project are **static files**. Now that you can run .NET web applications without server-side code, you can deploy these applications to various **static site hosts, such as [AWS Amplify](https://aws.amazon.com/amplify/)**.


Here are some other tutorials if you're interested in hosting Blazor WASM on other static site hosts:


-   [Azure Static Web Apps using GitHub](https://swimburger.net/blog/dotnet/how-to-deploy-aspnet-blazor-webassembly-to-azure-static-web-apps)
-   [Azure Static Web Apps using Azure DevOps (by Dave Brock)](https://daveabrock.com/2021/04/01/static-web-apps-azure-pipelines)
-   <a href="/blog/dotnet/how-to-deploy-blazor-webassembly-to-netlify" title="How to deploy Blazor WebAssembly to Netlify">Netlify</a>
-   <a href="/blog/dotnet/how-to-deploy-blazor-webassembly-to-cloudflare-pages" title="How to deploy Blazor WebAssembly to Cloudflare Pages">Cloudflare Pages</a>
-   <a href="/blog/dotnet/how-to-deploy-blazor-webassembly-to-digitalocean-app-platform" title="How to deploy Blazor WebAssembly to DigitalOcean App Platform">DigitalOcean App Platform</a>
-   <a href="/blog/dotnet/how-to-deploy-blazor-webassembly-to-heroku" title="How to deploy Blazor WebAssembly to Heroku">Heroku</a>
-   [GitHub Pages](https://swimburger.net/blog/dotnet/how-to-deploy-aspnet-blazor-webassembly-to-github-pages)<a href="/blog/dotnet/how-to-deploy-blazor-webassembly-to-aws-amplify" title="How to deploy Blazor WebAssembly to AWS Amplify"></a>
-   [Firebase Hosting](https://swimburger.net/blog/dotnet/how-to-deploy-blazor-webassembly-to-firebase-hosting)


This walkthrough will show you how to deploy Blazor WASM to AWS Amplify. Amplify is a set of tools and services to build full-stack applications by Amazon Web Services (AWS). One of the services Amplify offers is [static web app hosting](https://aws.amazon.com/amplify/hosting/), with built-in CI/CD which is what you'll be using to build, deploy, and host Blazor WASM in this tutorial.


This guide will walk you through these high-level steps:


1.  Create Blazor WebAssembly project
2.  Commit the project to a Git repository
3.  Create a new GitHub project and push the Git repository to GitHub
4.  Create a new AWS Amplify application
5.  Rewrite all requests to index.html


**Prerequisites**:


-   .NET CLI
-   Git
-   GitHub account
-   AWS account


<p class="panel panel--info"><strong>You can find the <a href="https://github.com/Swimburger/BlazorWasmAwsAmplify">source code for this guide on GitHub</a>.</strong></p>


## Create Blazor WebAssembly project {#create-aspnet-core-blazor-webassembly-project no-anchor}

Run the following commands to create a new Blazor WASM project:

<pre style="color:#000000;background:#ffffff;">mkdir <span style="color:#2a00ff; ">BlazorWasmAwsAmplify</span>&#10;cd <span style="color:#2a00ff; ">BlazorWasmAwsAmplify</span>&#10;dotnet <span style="color:#2a00ff; ">new</span> <span style="color:#2a00ff; ">blazorwasm</span></pre>


To give your application a try, execute `dotnet run` and browse to the URL in the output (probably [https://localhost:5001](https://localhost:5001/)):


<pre style="color:#000000;background:#ffffff;">dotnet <span style="color:#2a00ff; ">run</span>&#10;<span style="color:#3f7f59; "># Building...</span>&#10;<span style="color:#3f7f59; "># info: Microsoft.Hosting.Lifetime[0]</span>&#10;<span style="color:#3f7f59; ">#       Now listening on: </span><span style="color:#3f3fbf; ">https://localhost:5001</span>&#10;<span style="color:#3f7f59; "># info: Microsoft.Hosting.Lifetime[0]</span>&#10;<span style="color:#3f7f59; ">#       Now listening on: </span><span style="color:#3f3fbf; ">http://localhost:5000</span>&#10;<span style="color:#3f7f59; "># info: Microsoft.Hosting.Lifetime[0]</span>&#10;<span style="color:#3f7f59; ">#       Application started. Press Ctrl+C to shut down.</span>&#10;<span style="color:#3f7f59; "># info: Microsoft.Hosting.Lifetime[0]</span>&#10;<span style="color:#3f7f59; ">#       Hosting environment: Development</span>&#10;<span style="color:#3f7f59; "># info: Microsoft.Hosting.Lifetime[0]</span>&#10;<span style="color:#3f7f59; ">#       Content root path: C:\Users\niels\source\repos\BlazorWasmAwsAmplify</span>&#10;<span style="color:#3f7f59; "># info: Microsoft.Hosting.Lifetime[0]</span>&#10;<span style="color:#3f7f59; ">#       Application is shutting down...</span>&#10;</pre>

Optional: You can use the `dotnet publish` command to publish the project and verify the output:

<pre style="color:#000000;background:#ffffff;">dotnet <span style="color:#2a00ff; ">publish</span>&#10;<span style="color:#3f7f59; "># Microsoft (R) Build Engine version 16.8.0+126527ff1 for .NET</span>&#10;<span style="color:#3f7f59; "># Copyright (C) Microsoft Corporation. All rights reserved.</span>&#10;<span style="color:#3f7f59; "># </span>&#10;<span style="color:#3f7f59; ">#   Determining projects to restore...</span>&#10;<span style="color:#3f7f59; ">#   All projects are up-to-date for restore.</span>&#10;<span style="color:#3f7f59; ">#   BlazorWasmAwsAmplify -&gt; C:\Users\niels\source\repos\BlazorWasmAwsAmplify\bin\Debug\net5.0\BlazorWasmAwsAmplify.dll</span>&#10;<span style="color:#3f7f59; ">#   BlazorWasmAwsAmplify (Blazor output) -&gt; C:\Users\niels\source\repos\BlazorWasmAwsAmplify\bin\Debug\net5.0\wwwroot  Optimizing assemblies for size, which may change the behavior of the app. Be sure to test after publishing. See: </span><span style="color:#3f3fbf; ">https://aka.ms/dotnet-illink</span>&#10;<span style="color:#3f7f59; ">#   Compressing Blazor WebAssembly publish artifacts. This may take a while...</span>&#10;<span style="color:#3f7f59; ">#   BlazorWasmAwsAmplify -&gt; C:\Users\niels\source\repos\BlazorWasmAwsAmplify\bin\Debug\net5.0\publish\</span>&#10;</pre>


In the publish directory, you will find a web.config file and a wwwroot folder. The config file helps you host your application in IIS, but you don't need that file for static site hosts. **Everything you need will be inside of the wwwroot folder. The wwwroot folder contains the index.html, CSS, JS, and DLL files necessary to run the Blazor application**.


## Push Blazor project to GitHub {#push-blazor-project-to-github no-anchor}

For this walkthrough, your application source code must be inside of a GitHub repository.<br>First, you need to create a local Git repository and commit your source code to the repository using these commands:

<pre style="color:#000000;background:#ffffff;"><span style="color:#3f7f59; "># add the gitignore file tailored for dotnet applications, this will ignore bin/obj and many other non-source code files</span>&#10;dotnet <span style="color:#2a00ff; ">new</span> <span style="color:#2a00ff; ">gitignore</span>&#10;<span style="color:#3f7f59; "># create the git repository</span>&#10;git <span style="color:#2a00ff; ">init</span>&#10;<span style="color:#3f7f59; "># track all files that are not ignore by .gitignore</span>&#10;git <span style="color:#2a00ff; ">add</span> <span style="color:#2a00ff; ">--all</span>&#10;<span style="color:#3f7f59; "># commit all changes to the repository</span>&#10;git <span style="color:#2a00ff; ">commit</span> -m <span style="color:#2a00ff; ">"</span><span style="color:#2a00ff; ">Initial commit</span><span style="color:#2a00ff; ">"</span>&#10;</pre>


Create a new GitHub repository (<a rel="noopener" href="https://docs.github.com/en/github/getting-started-with-github/create-a-repo" target="_blank">instructions</a>) and copy the commands to "push an existing repository from the command line" from the empty GitHub repository page, here's what it should look like but with a different URL:


<pre style="color:#000000;background:#ffffff;">git <span style="color:#2a00ff; ">remote</span> <span style="color:#2a00ff; ">add</span> <span style="color:#2a00ff; ">origin</span> <span style="color:#2a00ff; ">https://github.com/Swimburger/BlazorWasmAwsAmplify.git</span>&#10;git <span style="color:#2a00ff; ">push</span> -u <span style="color:#2a00ff; ">origin</span> <span style="color:#2a00ff; ">main</span>&#10;</pre>


## Create the AWS Amplify application {#create-the-aws-amplify-application}


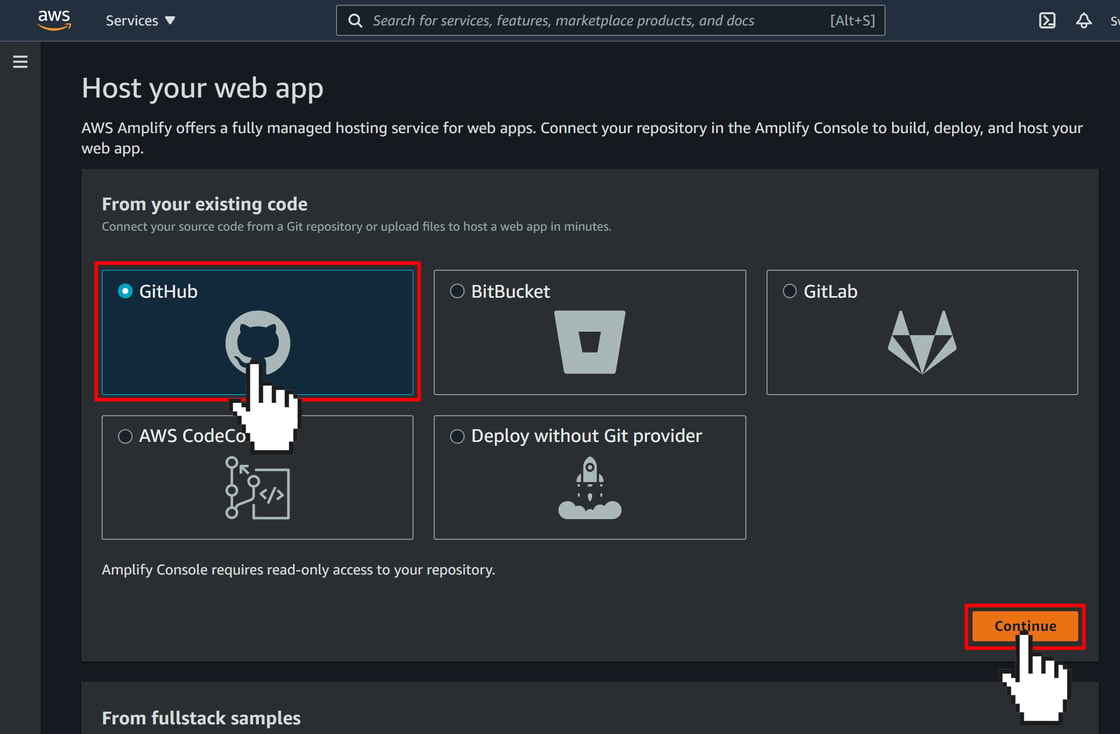
Navigate to the <a rel="noopener" href="https://console.aws.amazon.com/amplify/home#/create" target="_blank">Amplify Create page</a>, select GitHub as the Git source code provider, and click the "continue" button. Note that you can also use different Git source code providers.


<picture>
  <img src="https://swimburger.net/cdn-cgi/image/format=auto,quality=90,width=1120/media/m4unrfje/aws-amplify-create-1-host-your-web-app.png" srcset="https://swimburger.net/cdn-cgi/image/format=auto,quality=90,width=430/media/m4unrfje/aws-amplify-create-1-host-your-web-app.png 430w, https://swimburger.net/cdn-cgi/image/format=auto,quality=90,width=645/media/m4unrfje/aws-amplify-create-1-host-your-web-app.png 645w, https://swimburger.net/cdn-cgi/image/format=auto,quality=90,width=718/media/m4unrfje/aws-amplify-create-1-host-your-web-app.png 718w, https://swimburger.net/cdn-cgi/image/format=auto,quality=90,width=860/media/m4unrfje/aws-amplify-create-1-host-your-web-app.png 860w, https://swimburger.net/cdn-cgi/image/format=auto,quality=90,width=1077/media/m4unrfje/aws-amplify-create-1-host-your-web-app.png 1077w, https://swimburger.net/cdn-cgi/image/format=auto,quality=90,width=1120/media/m4unrfje/aws-amplify-create-1-host-your-web-app.png 1120w, https://swimburger.net/cdn-cgi/image/format=auto,quality=90,width=1436/media/m4unrfje/aws-amplify-create-1-host-your-web-app.png 1436w, https://swimburger.net/cdn-cgi/image/format=auto,quality=90,width=1680/media/m4unrfje/aws-amplify-create-1-host-your-web-app.png 1680w" sizes="(max-width: 480px) 430px, (max-width: 768px) 718px, 1120px" width="1120" height="734" alt="AWS Amplify Create page. Showing different Git sources. Pointer clicks on the GitHub source and clicks continue button." loading="lazy" decoding="async">
</picture>

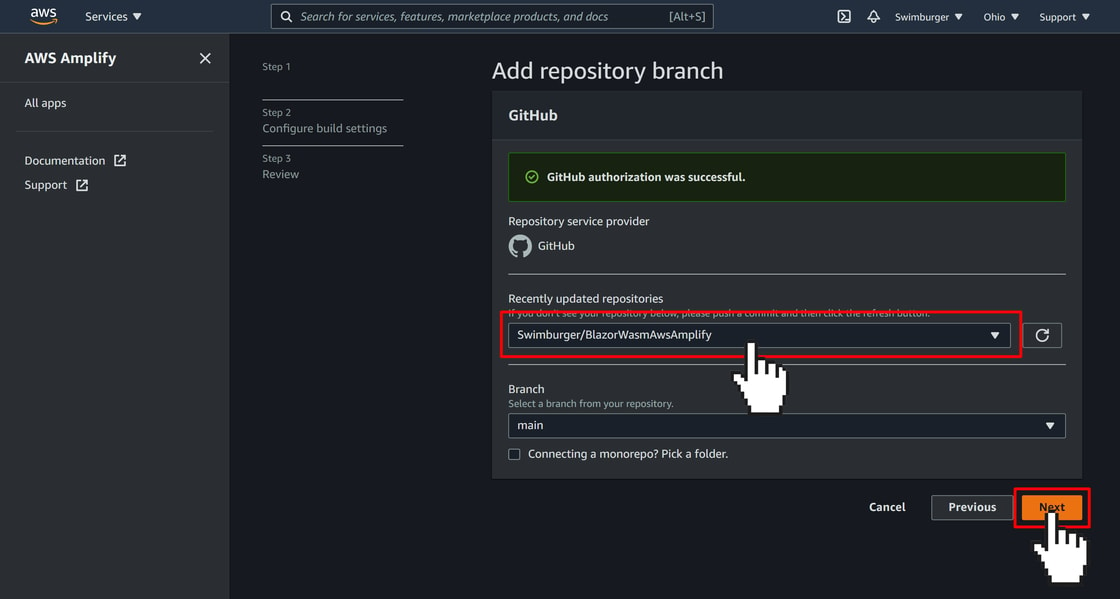
You will be prompted to give AWS Amplify permissions to your GitHub account. When you get back to Amplify, select the GitHub repository you just created and click the "next" button:
<picture>
  <img src="https://swimburger.net/cdn-cgi/image/format=auto,quality=90,width=1120/media/fvsl4bzv/aws-amplify-create-2-host-add-repo-branch.png" srcset="https://swimburger.net/cdn-cgi/image/format=auto,quality=90,width=430/media/fvsl4bzv/aws-amplify-create-2-host-add-repo-branch.png 430w, https://swimburger.net/cdn-cgi/image/format=auto,quality=90,width=645/media/fvsl4bzv/aws-amplify-create-2-host-add-repo-branch.png 645w, https://swimburger.net/cdn-cgi/image/format=auto,quality=90,width=718/media/fvsl4bzv/aws-amplify-create-2-host-add-repo-branch.png 718w, https://swimburger.net/cdn-cgi/image/format=auto,quality=90,width=860/media/fvsl4bzv/aws-amplify-create-2-host-add-repo-branch.png 860w, https://swimburger.net/cdn-cgi/image/format=auto,quality=90,width=1077/media/fvsl4bzv/aws-amplify-create-2-host-add-repo-branch.png 1077w, https://swimburger.net/cdn-cgi/image/format=auto,quality=90,width=1120/media/fvsl4bzv/aws-amplify-create-2-host-add-repo-branch.png 1120w, https://swimburger.net/cdn-cgi/image/format=auto,quality=90,width=1436/media/fvsl4bzv/aws-amplify-create-2-host-add-repo-branch.png 1436w, https://swimburger.net/cdn-cgi/image/format=auto,quality=90,width=1680/media/fvsl4bzv/aws-amplify-create-2-host-add-repo-branch.png 1680w, https://swimburger.net/cdn-cgi/image/format=auto,quality=90,width=2240/media/fvsl4bzv/aws-amplify-create-2-host-add-repo-branch.png 2240w" sizes="(max-width: 480px) 430px, (max-width: 768px) 718px, 1120px" width="1120" height="599" alt="AWS Amplify select Git repository and branch page. A dropdown listing out different git repositories. Another dropdown listing out the different branches for the selected git repository." loading="lazy" decoding="async">
</picture>

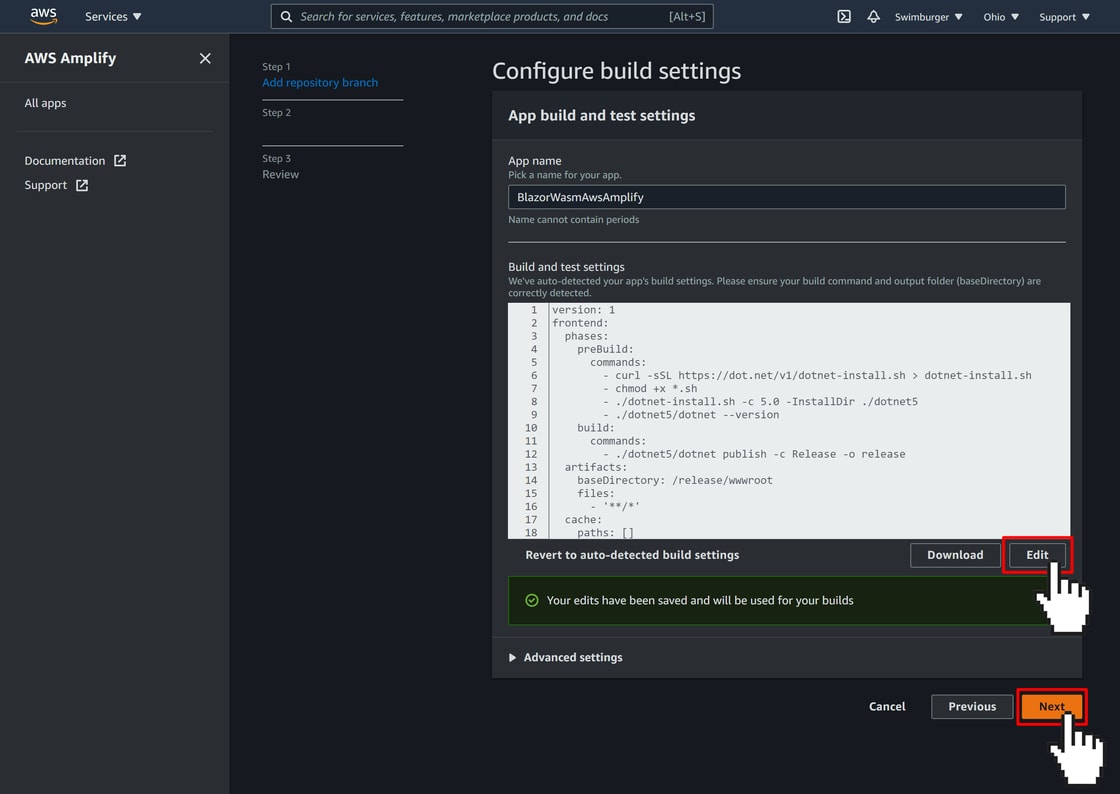
On the next page, you need to enter the build settings for your project. Click the edit button below the YAML build code:
<picture>
  <img src="https://swimburger.net/cdn-cgi/image/format=auto,quality=90,width=1120/media/sbzlzgbc/aws-amplify-create-3-configure-build-settings.png" srcset="https://swimburger.net/cdn-cgi/image/format=auto,quality=90,width=430/media/sbzlzgbc/aws-amplify-create-3-configure-build-settings.png 430w, https://swimburger.net/cdn-cgi/image/format=auto,quality=90,width=645/media/sbzlzgbc/aws-amplify-create-3-configure-build-settings.png 645w, https://swimburger.net/cdn-cgi/image/format=auto,quality=90,width=718/media/sbzlzgbc/aws-amplify-create-3-configure-build-settings.png 718w, https://swimburger.net/cdn-cgi/image/format=auto,quality=90,width=860/media/sbzlzgbc/aws-amplify-create-3-configure-build-settings.png 860w, https://swimburger.net/cdn-cgi/image/format=auto,quality=90,width=1077/media/sbzlzgbc/aws-amplify-create-3-configure-build-settings.png 1077w, https://swimburger.net/cdn-cgi/image/format=auto,quality=90,width=1120/media/sbzlzgbc/aws-amplify-create-3-configure-build-settings.png 1120w, https://swimburger.net/cdn-cgi/image/format=auto,quality=90,width=1436/media/sbzlzgbc/aws-amplify-create-3-configure-build-settings.png 1436w, https://swimburger.net/cdn-cgi/image/format=auto,quality=90,width=1680/media/sbzlzgbc/aws-amplify-create-3-configure-build-settings.png 1680w, https://swimburger.net/cdn-cgi/image/format=auto,quality=90,width=2240/media/sbzlzgbc/aws-amplify-create-3-configure-build-settings.png 2240w" sizes="(max-width: 480px) 430px, (max-width: 768px) 718px, 1120px" width="1120" height="794" alt="AWS Amplify configure build settings. A YAML code editor with YAML code for configuring how to build the project." loading="lazy" decoding="async">
</picture>

Enter the following YAML code:

<pre style="color:#000000;background:#ffffff;">version: 1&#10;frontend:&#10;  phases:&#10;    preBuild:&#10;      commands:&#10;        - curl -sSL <span style="color:#3f3fbf; ">https://dot.net/v1/dotnet-install.sh</span> &gt; dotnet-install.sh&#10;        - chmod +x *.sh&#10;        - ./dotnet-install.sh -c 5.0 -InstallDir ./dotnet5&#10;        - ./dotnet5/dotnet --version&#10;    build:&#10;      commands:&#10;        - ./dotnet5/dotnet publish -c Release -o release&#10;  artifacts:&#10;    baseDirectory: /release/wwwroot&#10;    files:&#10;      - <span style="color:#2a00ff; ">'</span><span style="color:#2a00ff; ">**/*</span><span style="color:#2a00ff; ">'</span>&#10;  cache:&#10;    paths: []&#10;</pre>

The preBuild commands do the following:


-   The **curl** command download a shell script to install dotnet provided by Microsoft.
-   The **chmod** command changes the permission of the shell script to allow execution of the script.
-   The '**dotnet-install.sh**' script installs the .NET SDK:
    -   The **\-c** argument tells the install script to install .NET **version 5.0** which is the version I am using. Change 5.0 to your version if you're using a different version.<br>**Amplify already has a version of the .NET SDK pre-installed on their build machines, but not necessarily the version you need. That's why you need to install the correct version.**
    -   The **\-InstallDir** argument will instruct the script to install the SDK in a specific directory. In this case it will create a directory called 'dotnet5' and put the SDK there.
-   The last command will print the version of the .NET SDK to verify the successful installation of the .NET SDK. Note how it is invoking the dotnet CLI from the 'dotnet5' folder where the .NET 5 SDK was installed by the 'dotnet-install.sh'.


The build command invokes the `dotnet publish` command using the .NET 5 SDK installed in the 'dotnet5' folder in the preBuild step.


- The <strong>-c</strong> argument tells the CLI to build in Release configuration.
- The <strong>-o </strong>argument tells the CLI to put the output in the release folder.


The `artifacts.baseDirectory` property is set to */release/wwwroot*. This is the location the `dotnet publish` command put the publish output. As a result, Amplify will deploy all the files found in */release/wwwroot*.


Save your changes and click on the "next" button. The next screen will give you an overview of the choices you've made. Click on the "Save and deploy" button. 


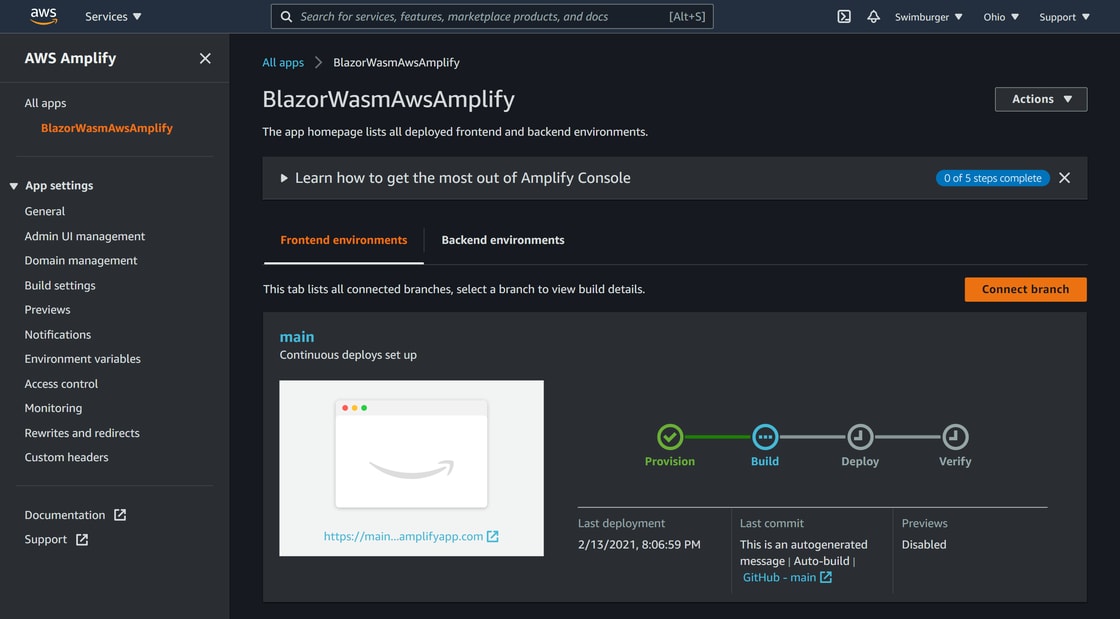
Your Amplify application will be created and you will be taken to the homepage of your Amplify app. Here you can see the status in real-time for the branch you selected earlier:
<picture>
  <img src="https://swimburger.net/cdn-cgi/image/format=auto,quality=90,width=1120/media/a5vg4ojw/aws-amplify-home.png" srcset="https://swimburger.net/cdn-cgi/image/format=auto,quality=90,width=430/media/a5vg4ojw/aws-amplify-home.png 430w, https://swimburger.net/cdn-cgi/image/format=auto,quality=90,width=645/media/a5vg4ojw/aws-amplify-home.png 645w, https://swimburger.net/cdn-cgi/image/format=auto,quality=90,width=718/media/a5vg4ojw/aws-amplify-home.png 718w, https://swimburger.net/cdn-cgi/image/format=auto,quality=90,width=860/media/a5vg4ojw/aws-amplify-home.png 860w, https://swimburger.net/cdn-cgi/image/format=auto,quality=90,width=1077/media/a5vg4ojw/aws-amplify-home.png 1077w, https://swimburger.net/cdn-cgi/image/format=auto,quality=90,width=1120/media/a5vg4ojw/aws-amplify-home.png 1120w, https://swimburger.net/cdn-cgi/image/format=auto,quality=90,width=1436/media/a5vg4ojw/aws-amplify-home.png 1436w, https://swimburger.net/cdn-cgi/image/format=auto,quality=90,width=1680/media/a5vg4ojw/aws-amplify-home.png 1680w, https://swimburger.net/cdn-cgi/image/format=auto,quality=90,width=2240/media/a5vg4ojw/aws-amplify-home.png 2240w" sizes="(max-width: 480px) 430px, (max-width: 768px) 718px, 1120px" width="1120" height="619" alt="AWS Amplify app homepage" loading="lazy" decoding="async">
</picture>

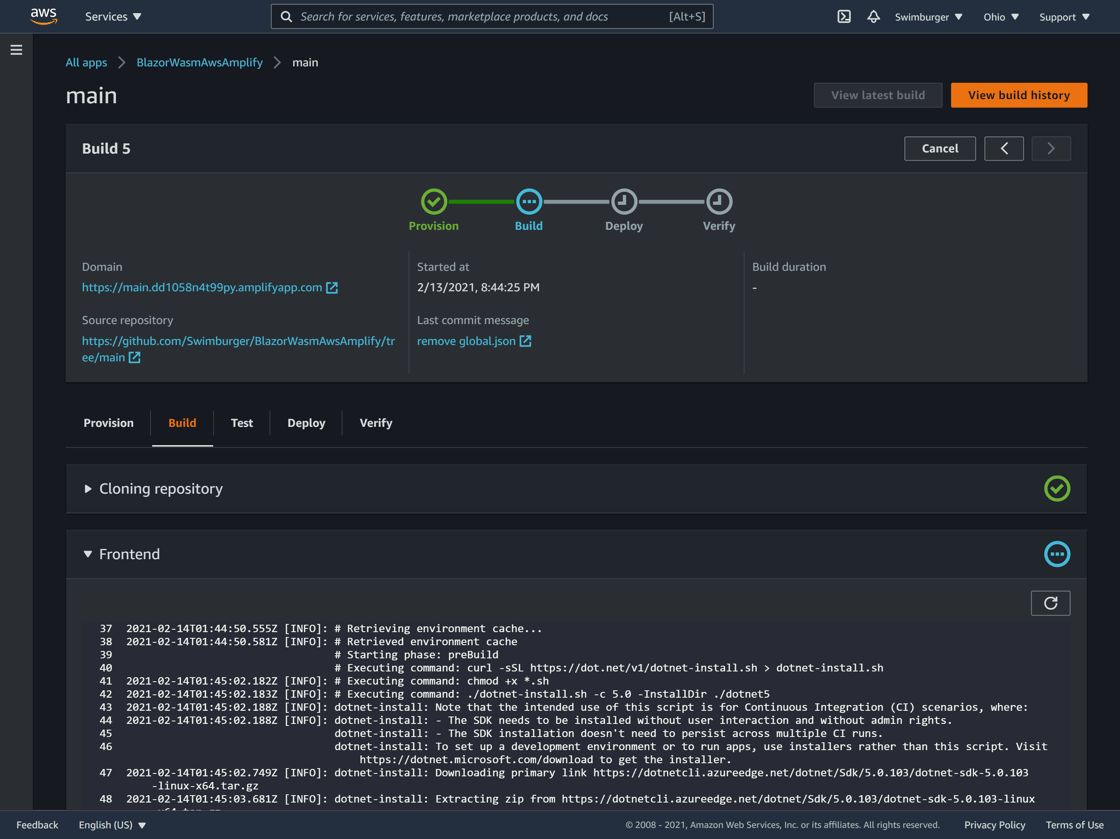
When you click on the branch, you will see the build log in real-time:
<picture>
  <img src="https://swimburger.net/cdn-cgi/image/format=auto,quality=90,width=1120/media/yasjs1vn/aws-amplify-build-log.png" srcset="https://swimburger.net/cdn-cgi/image/format=auto,quality=90,width=430/media/yasjs1vn/aws-amplify-build-log.png 430w, https://swimburger.net/cdn-cgi/image/format=auto,quality=90,width=645/media/yasjs1vn/aws-amplify-build-log.png 645w, https://swimburger.net/cdn-cgi/image/format=auto,quality=90,width=718/media/yasjs1vn/aws-amplify-build-log.png 718w, https://swimburger.net/cdn-cgi/image/format=auto,quality=90,width=860/media/yasjs1vn/aws-amplify-build-log.png 860w, https://swimburger.net/cdn-cgi/image/format=auto,quality=90,width=1077/media/yasjs1vn/aws-amplify-build-log.png 1077w, https://swimburger.net/cdn-cgi/image/format=auto,quality=90,width=1120/media/yasjs1vn/aws-amplify-build-log.png 1120w, https://swimburger.net/cdn-cgi/image/format=auto,quality=90,width=1436/media/yasjs1vn/aws-amplify-build-log.png 1436w, https://swimburger.net/cdn-cgi/image/format=auto,quality=90,width=1680/media/yasjs1vn/aws-amplify-build-log.png 1680w, https://swimburger.net/cdn-cgi/image/format=auto,quality=90,width=2240/media/yasjs1vn/aws-amplify-build-log.png 2240w" sizes="(max-width: 480px) 430px, (max-width: 768px) 718px, 1120px" width="1120" height="839" alt="AWS Amplify real-time build log" loading="lazy" decoding="async">
</picture>

Once Amplify finished deploying, visit your Blazor app hosted in Amplify by clicking on the link below the "Domain" label.


Verify the Blazor WASM application is working as expected. Even when you navigate to the counter or fetch data pages and then refresh, the Blazor WASM application is returning as expected. **But when you look in the browser developer tools, you will see the page is actually returned with an HTTP status code 404.**


## Rewrite all requests to index.html {#rewrite-all-requests-to-indexhtml}


To fix the 404 issues, you need to tell Amplify to rewrite all requests to index.html. Go back to the Amplify console and navigate to the "**Rewrites and redirects**" section. There's already one redirect rule pre-configured which matches all requests and return index.html with a 404 status code.


Click the "Edit" button and add the following redirect rule:


-   **Source address**: `</^[^.]+$|\.(?!(css|gif|ico|jpg|js|png|txt|svg|woff|ttf|map|json|br|gz|html|md|eot|otf|dll|blat|wasm|dat)$)([^.]+$)/>`
-   **Target address**: index.html
-   **Type**: 200 (Rewrite)


Move the rule to the top and click the "Save" button.


This rule will match all requests except if they end with the listed file extensions. This rule is based on the rule provided by <a href="https://docs.aws.amazon.com/amplify/latest/userguide/redirects.html#redirects-for-single-page-web-apps-spa">Amplify's documentation "Redirects for single page web apps (SPA)"</a>, but **with extra file extensions required by the Blazor WASM application**. You can find out all the extensions used in your Blazor WASM application using PowerShell. Open a PowerShell window, publish the Blazor WASM application using the .NET CLI, and the last command will recursively look for all files and list out all unique extensions:


<pre style="color:#000000;background:#ffffff;">dotnet <span style="color:#2a00ff; ">publish</span> -c <span style="color:#2a00ff; ">Release</span> -o <span style="color:#2a00ff; ">release</span>&#10;Get-ChildItem <span style="color:#2a00ff; ">./release/wwwroot</span> -Recurse <span style="color:#7f0055; font-weight:bold; ">|</span> Select-Object -Property <span style="color:#2a00ff; ">Extension</span> -Unique&#10;<span style="color:#3f7f59; "># Output:</span>&#10;<span style="color:#3f7f59; ">#   Extension</span>&#10;<span style="color:#3f7f59; ">#   ---------</span>&#10;<span style="color:#3f7f59; ">#   </span>&#10;<span style="color:#3f7f59; ">#   .css</span>&#10;<span style="color:#3f7f59; ">#   .br</span>&#10;<span style="color:#3f7f59; ">#   .gz</span>&#10;<span style="color:#3f7f59; ">#   .ico</span>&#10;<span style="color:#3f7f59; ">#   .html</span>&#10;<span style="color:#3f7f59; ">#   .map</span>&#10;<span style="color:#3f7f59; ">#   .md</span>&#10;<span style="color:#3f7f59; ">#   .eot</span>&#10;<span style="color:#3f7f59; ">#   .otf</span>&#10;<span style="color:#3f7f59; ">#   .svg</span>&#10;<span style="color:#3f7f59; ">#   .ttf</span>&#10;<span style="color:#3f7f59; ">#   .woff</span>&#10;<span style="color:#3f7f59; ">#   .json</span>&#10;<span style="color:#3f7f59; ">#   .js</span>&#10;<span style="color:#3f7f59; ">#   .dll</span>&#10;<span style="color:#3f7f59; ">#   .blat</span>&#10;<span style="color:#3f7f59; ">#   .wasm</span>&#10;<span style="color:#3f7f59; ">#   .dat</span>&#10;</pre>

When you navigate back to the Blazor WASM application hosted in AWS Amplify, the 404 response codes should now be 200.

## Bonus: Pull Request Previews {#bonus-pull-request-previews}

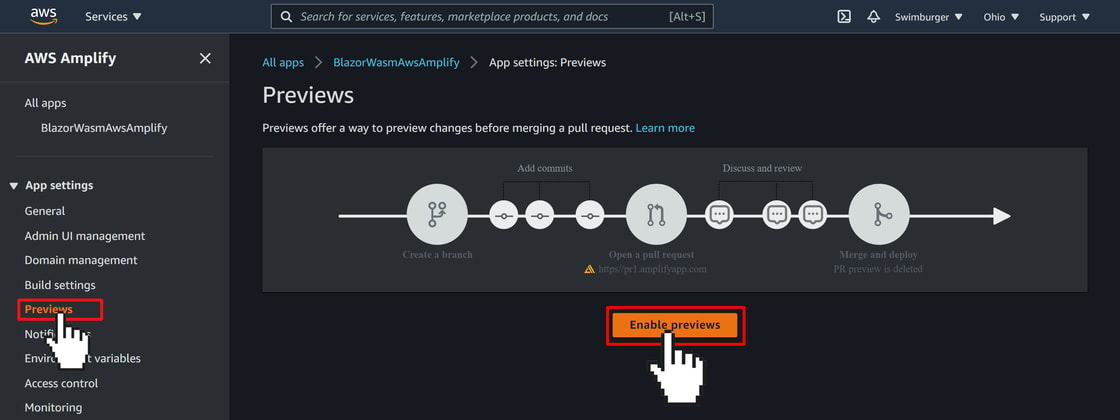
Amplify has built-in support for creating a unique preview environment for your pull requests.

Navigate to the **"Previews"** section and click on the "Enable previews" button:
<picture>
  <img src="https://swimburger.net/cdn-cgi/image/format=auto,quality=90,width=1120/media/jbglc4c3/aws-amplify-build-previews-1.png" srcset="https://swimburger.net/cdn-cgi/image/format=auto,quality=90,width=430/media/jbglc4c3/aws-amplify-build-previews-1.png 430w, https://swimburger.net/cdn-cgi/image/format=auto,quality=90,width=645/media/jbglc4c3/aws-amplify-build-previews-1.png 645w, https://swimburger.net/cdn-cgi/image/format=auto,quality=90,width=718/media/jbglc4c3/aws-amplify-build-previews-1.png 718w, https://swimburger.net/cdn-cgi/image/format=auto,quality=90,width=860/media/jbglc4c3/aws-amplify-build-previews-1.png 860w, https://swimburger.net/cdn-cgi/image/format=auto,quality=90,width=1077/media/jbglc4c3/aws-amplify-build-previews-1.png 1077w, https://swimburger.net/cdn-cgi/image/format=auto,quality=90,width=1120/media/jbglc4c3/aws-amplify-build-previews-1.png 1120w, https://swimburger.net/cdn-cgi/image/format=auto,quality=90,width=1436/media/jbglc4c3/aws-amplify-build-previews-1.png 1436w, https://swimburger.net/cdn-cgi/image/format=auto,quality=90,width=1680/media/jbglc4c3/aws-amplify-build-previews-1.png 1680w, https://swimburger.net/cdn-cgi/image/format=auto,quality=90,width=2240/media/jbglc4c3/aws-amplify-build-previews-1.png 2240w" sizes="(max-width: 480px) 430px, (max-width: 768px) 718px, 1120px" width="1120" height="420" alt="AWS Amplify Console previews section with a big button in the middle &quot;Enable previews&quot;" loading="lazy" decoding="async">
</picture>

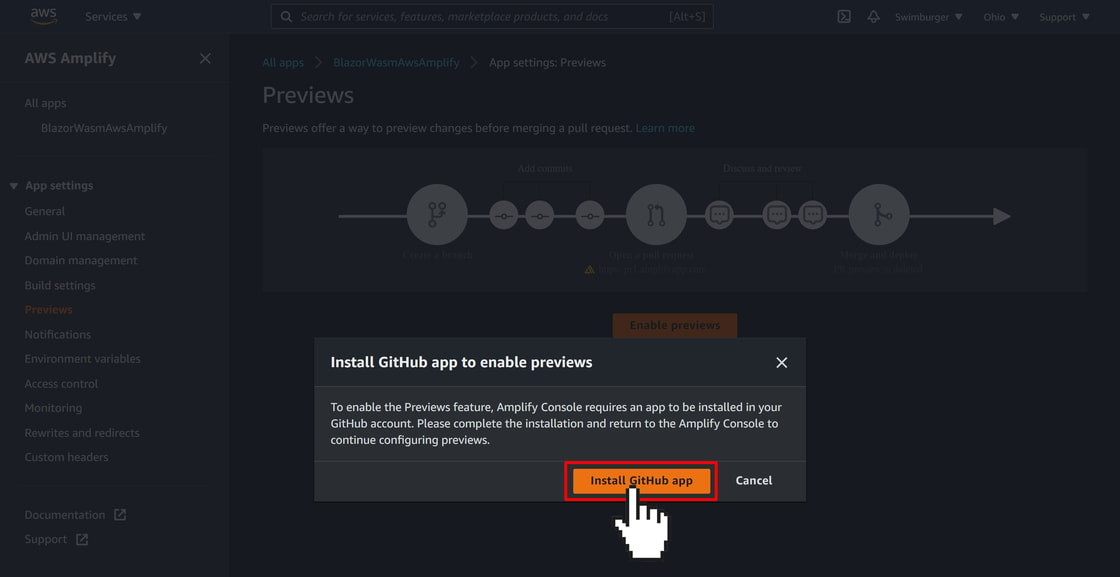
A modal will appear prompting you to install the GitHub app. Click on the "Install GitHub app" button.
<picture>
  <img src="https://swimburger.net/cdn-cgi/image/format=auto,quality=90,width=1120/media/nedpzear/aws-amplify-build-previews-2.png" srcset="https://swimburger.net/cdn-cgi/image/format=auto,quality=90,width=430/media/nedpzear/aws-amplify-build-previews-2.png 430w, https://swimburger.net/cdn-cgi/image/format=auto,quality=90,width=645/media/nedpzear/aws-amplify-build-previews-2.png 645w, https://swimburger.net/cdn-cgi/image/format=auto,quality=90,width=718/media/nedpzear/aws-amplify-build-previews-2.png 718w, https://swimburger.net/cdn-cgi/image/format=auto,quality=90,width=860/media/nedpzear/aws-amplify-build-previews-2.png 860w, https://swimburger.net/cdn-cgi/image/format=auto,quality=90,width=1077/media/nedpzear/aws-amplify-build-previews-2.png 1077w, https://swimburger.net/cdn-cgi/image/format=auto,quality=90,width=1120/media/nedpzear/aws-amplify-build-previews-2.png 1120w, https://swimburger.net/cdn-cgi/image/format=auto,quality=90,width=1436/media/nedpzear/aws-amplify-build-previews-2.png 1436w, https://swimburger.net/cdn-cgi/image/format=auto,quality=90,width=1680/media/nedpzear/aws-amplify-build-previews-2.png 1680w, https://swimburger.net/cdn-cgi/image/format=auto,quality=90,width=2240/media/nedpzear/aws-amplify-build-previews-2.png 2240w" sizes="(max-width: 480px) 430px, (max-width: 768px) 718px, 1120px" width="1120" height="577" alt="A modal prompting to install the AWS Amplify GitHub app" loading="lazy" decoding="async">
</picture>

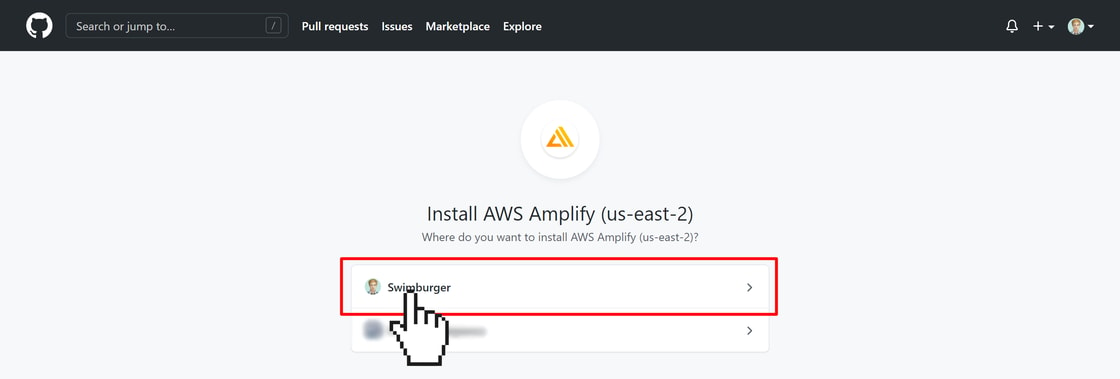
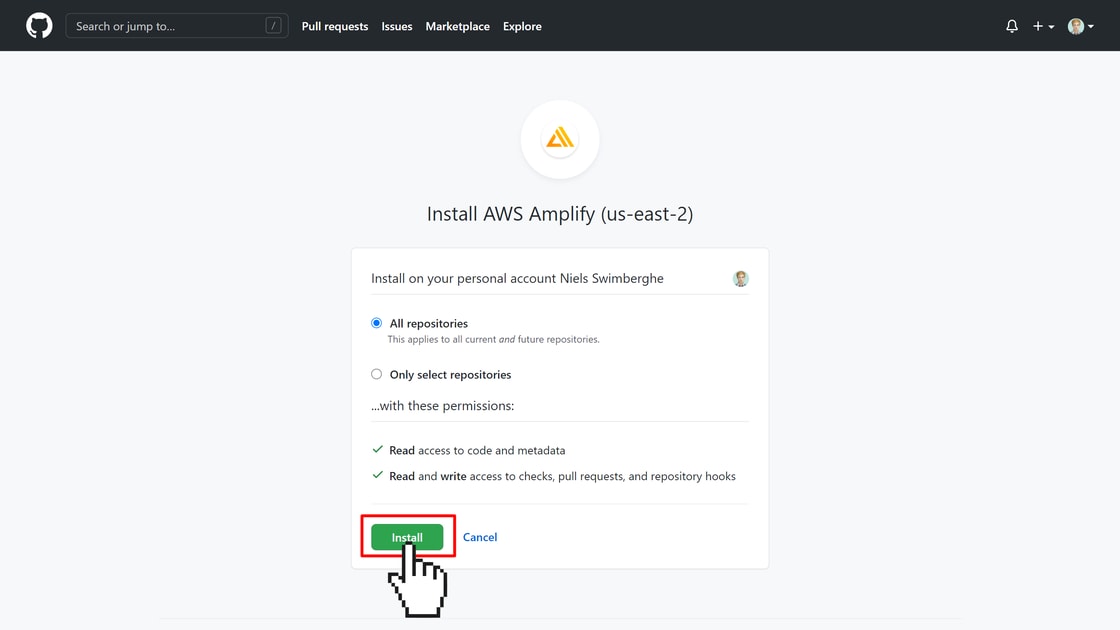
Select the organization or account you want to install the GitHub app for and which repositories to give access to. You have to give access to at least the repository you want to enable previews for.
<picture>
  <img src="https://swimburger.net/cdn-cgi/image/format=auto,quality=90,width=1120/media/2uwjzert/aws-amplify-build-previews-3.png" srcset="https://swimburger.net/cdn-cgi/image/format=auto,quality=90,width=430/media/2uwjzert/aws-amplify-build-previews-3.png 430w, https://swimburger.net/cdn-cgi/image/format=auto,quality=90,width=645/media/2uwjzert/aws-amplify-build-previews-3.png 645w, https://swimburger.net/cdn-cgi/image/format=auto,quality=90,width=718/media/2uwjzert/aws-amplify-build-previews-3.png 718w, https://swimburger.net/cdn-cgi/image/format=auto,quality=90,width=860/media/2uwjzert/aws-amplify-build-previews-3.png 860w, https://swimburger.net/cdn-cgi/image/format=auto,quality=90,width=1077/media/2uwjzert/aws-amplify-build-previews-3.png 1077w, https://swimburger.net/cdn-cgi/image/format=auto,quality=90,width=1120/media/2uwjzert/aws-amplify-build-previews-3.png 1120w, https://swimburger.net/cdn-cgi/image/format=auto,quality=90,width=1436/media/2uwjzert/aws-amplify-build-previews-3.png 1436w, https://swimburger.net/cdn-cgi/image/format=auto,quality=90,width=1680/media/2uwjzert/aws-amplify-build-previews-3.png 1680w, https://swimburger.net/cdn-cgi/image/format=auto,quality=90,width=2240/media/2uwjzert/aws-amplify-build-previews-3.png 2240w" sizes="(max-width: 480px) 430px, (max-width: 768px) 718px, 1120px" width="1120" height="379" alt="GitHub asking which organization to install the AWS Amplify GitHub app for" loading="lazy" decoding="async">
</picture>


<picture>
  <img src="https://swimburger.net/cdn-cgi/image/format=auto,quality=90,width=1120/media/ueemcui4/aws-amplify-build-previews-4.png" srcset="https://swimburger.net/cdn-cgi/image/format=auto,quality=90,width=430/media/ueemcui4/aws-amplify-build-previews-4.png 430w, https://swimburger.net/cdn-cgi/image/format=auto,quality=90,width=645/media/ueemcui4/aws-amplify-build-previews-4.png 645w, https://swimburger.net/cdn-cgi/image/format=auto,quality=90,width=718/media/ueemcui4/aws-amplify-build-previews-4.png 718w, https://swimburger.net/cdn-cgi/image/format=auto,quality=90,width=860/media/ueemcui4/aws-amplify-build-previews-4.png 860w, https://swimburger.net/cdn-cgi/image/format=auto,quality=90,width=1077/media/ueemcui4/aws-amplify-build-previews-4.png 1077w, https://swimburger.net/cdn-cgi/image/format=auto,quality=90,width=1120/media/ueemcui4/aws-amplify-build-previews-4.png 1120w, https://swimburger.net/cdn-cgi/image/format=auto,quality=90,width=1436/media/ueemcui4/aws-amplify-build-previews-4.png 1436w, https://swimburger.net/cdn-cgi/image/format=auto,quality=90,width=1680/media/ueemcui4/aws-amplify-build-previews-4.png 1680w, https://swimburger.net/cdn-cgi/image/format=auto,quality=90,width=2240/media/ueemcui4/aws-amplify-build-previews-4.png 2240w" sizes="(max-width: 480px) 430px, (max-width: 768px) 718px, 1120px" width="1120" height="630" alt="GitHub asking which repositories the AWS Amplify app should have access to" loading="lazy" decoding="async">
</picture>

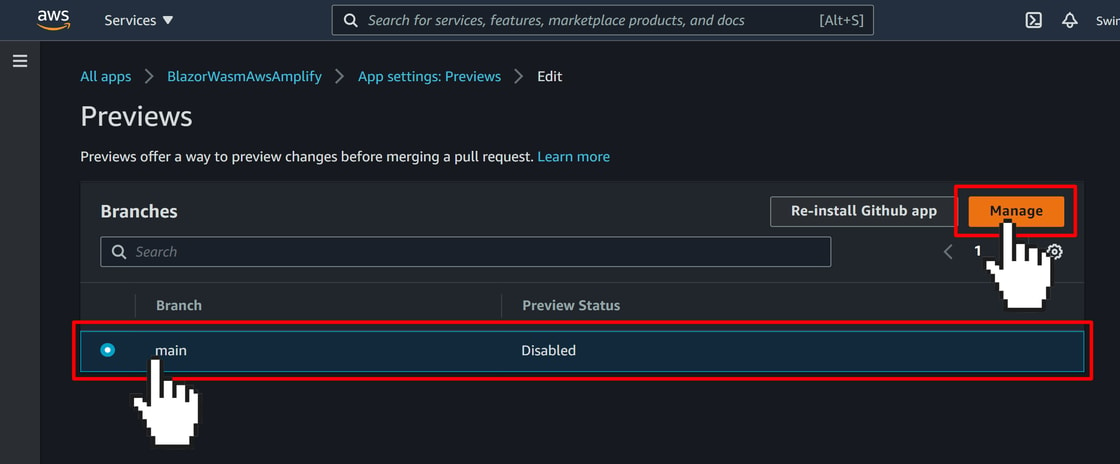
Head back to the Amplify console, select the main branch, and click the "Manage" button on the top right:
<picture>
  <img src="https://swimburger.net/cdn-cgi/image/format=auto,quality=90,width=1120/media/prijrrvw/aws-amplify-build-previews-5.png" srcset="https://swimburger.net/cdn-cgi/image/format=auto,quality=90,width=430/media/prijrrvw/aws-amplify-build-previews-5.png 430w, https://swimburger.net/cdn-cgi/image/format=auto,quality=90,width=645/media/prijrrvw/aws-amplify-build-previews-5.png 645w, https://swimburger.net/cdn-cgi/image/format=auto,quality=90,width=718/media/prijrrvw/aws-amplify-build-previews-5.png 718w, https://swimburger.net/cdn-cgi/image/format=auto,quality=90,width=860/media/prijrrvw/aws-amplify-build-previews-5.png 860w, https://swimburger.net/cdn-cgi/image/format=auto,quality=90,width=1077/media/prijrrvw/aws-amplify-build-previews-5.png 1077w, https://swimburger.net/cdn-cgi/image/format=auto,quality=90,width=1120/media/prijrrvw/aws-amplify-build-previews-5.png 1120w, https://swimburger.net/cdn-cgi/image/format=auto,quality=90,width=1436/media/prijrrvw/aws-amplify-build-previews-5.png 1436w, https://swimburger.net/cdn-cgi/image/format=auto,quality=90,width=1680/media/prijrrvw/aws-amplify-build-previews-5.png 1680w" sizes="(max-width: 480px) 430px, (max-width: 768px) 718px, 1120px" width="1120" height="464" alt="AWS Amplify Previews section listing all branches" loading="lazy" decoding="async">
</picture>

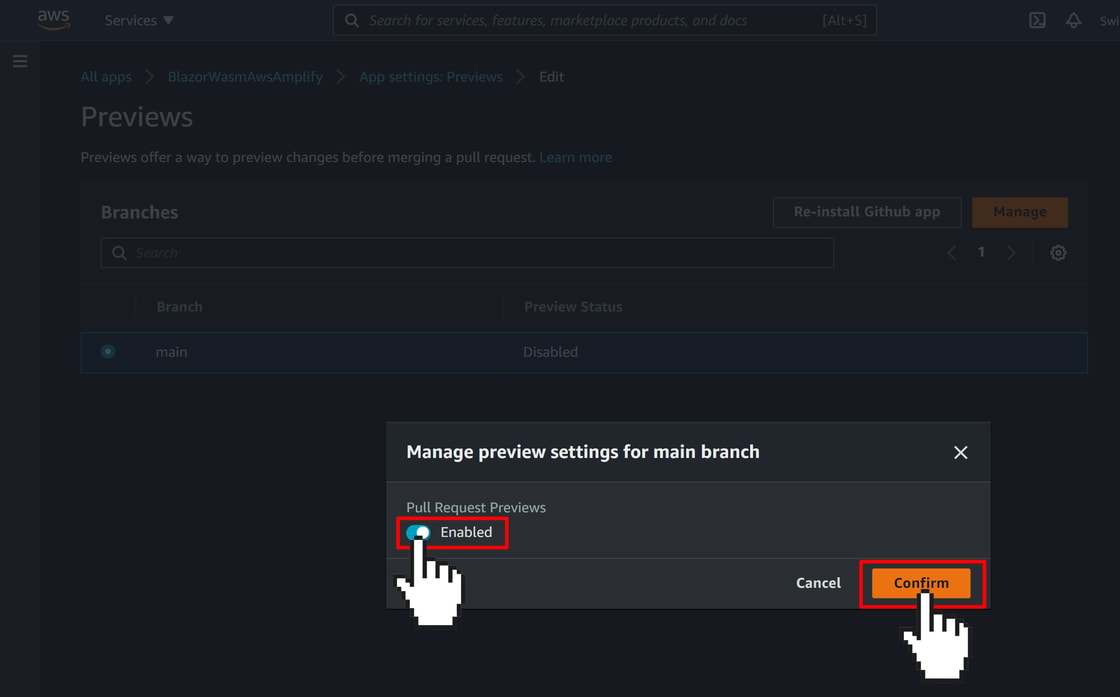
A modal will appear with a toggle to enable previews for the previously selected branch. Set the toggle to enabled and click the "Confirm" button:
<picture>
  <img src="https://swimburger.net/cdn-cgi/image/format=auto,quality=90,width=1120/media/d1ueyb0f/aws-amplify-build-previews-6.png" srcset="https://swimburger.net/cdn-cgi/image/format=auto,quality=90,width=430/media/d1ueyb0f/aws-amplify-build-previews-6.png 430w, https://swimburger.net/cdn-cgi/image/format=auto,quality=90,width=645/media/d1ueyb0f/aws-amplify-build-previews-6.png 645w, https://swimburger.net/cdn-cgi/image/format=auto,quality=90,width=718/media/d1ueyb0f/aws-amplify-build-previews-6.png 718w, https://swimburger.net/cdn-cgi/image/format=auto,quality=90,width=860/media/d1ueyb0f/aws-amplify-build-previews-6.png 860w, https://swimburger.net/cdn-cgi/image/format=auto,quality=90,width=1077/media/d1ueyb0f/aws-amplify-build-previews-6.png 1077w, https://swimburger.net/cdn-cgi/image/format=auto,quality=90,width=1120/media/d1ueyb0f/aws-amplify-build-previews-6.png 1120w, https://swimburger.net/cdn-cgi/image/format=auto,quality=90,width=1436/media/d1ueyb0f/aws-amplify-build-previews-6.png 1436w, https://swimburger.net/cdn-cgi/image/format=auto,quality=90,width=1680/media/d1ueyb0f/aws-amplify-build-previews-6.png 1680w" sizes="(max-width: 480px) 430px, (max-width: 768px) 718px, 1120px" width="1120" height="697" alt="A modal with a toggle button for enabling AWS Amplify previews for pull requests." loading="lazy" decoding="async">
</picture>

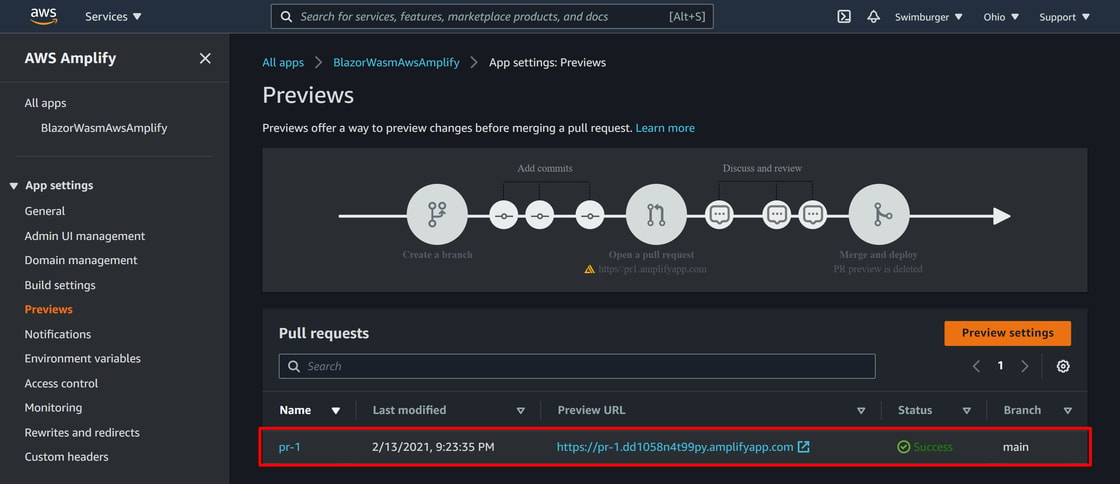
Now you can create a Pull Request in GitHub and Amplify will automatically create a preview environment for you as you can see in the screenshot below:
<picture>
  <img src="https://swimburger.net/cdn-cgi/image/format=auto,quality=90,width=1120/media/1hopyorl/aws-amplify-build-previews-7.png" srcset="https://swimburger.net/cdn-cgi/image/format=auto,quality=90,width=430/media/1hopyorl/aws-amplify-build-previews-7.png 430w, https://swimburger.net/cdn-cgi/image/format=auto,quality=90,width=645/media/1hopyorl/aws-amplify-build-previews-7.png 645w, https://swimburger.net/cdn-cgi/image/format=auto,quality=90,width=718/media/1hopyorl/aws-amplify-build-previews-7.png 718w, https://swimburger.net/cdn-cgi/image/format=auto,quality=90,width=860/media/1hopyorl/aws-amplify-build-previews-7.png 860w, https://swimburger.net/cdn-cgi/image/format=auto,quality=90,width=1077/media/1hopyorl/aws-amplify-build-previews-7.png 1077w, https://swimburger.net/cdn-cgi/image/format=auto,quality=90,width=1120/media/1hopyorl/aws-amplify-build-previews-7.png 1120w, https://swimburger.net/cdn-cgi/image/format=auto,quality=90,width=1436/media/1hopyorl/aws-amplify-build-previews-7.png 1436w, https://swimburger.net/cdn-cgi/image/format=auto,quality=90,width=1680/media/1hopyorl/aws-amplify-build-previews-7.png 1680w, https://swimburger.net/cdn-cgi/image/format=auto,quality=90,width=2240/media/1hopyorl/aws-amplify-build-previews-7.png 2240w" sizes="(max-width: 480px) 430px, (max-width: 768px) 718px, 1120px" width="1120" height="484" alt="AWS Amplify Preview section listing out the pull requests and their previews" loading="lazy" decoding="async">
</picture>


## Summary {#summary}

Blazor WebAssembly can be served as static files. These files can be hosted in static hosting services such as AWS Amplify. You can create a new Amplify application using a GitHub or other Git source code provider. Amplify's build images already contains .NET tooling, but not necessarily the correct version. You can install a different version of the .NET SDK to the build machine and use that to publish the Blazor WASM project. Out of the box, when you refresh the Blazor WASM application while not at the root path, Amplify will return the index.html file but with a 404 status code. You can use Amplify's "Rewrites and redirects" functionality to return the index.html file with status code 200 for all requests not requesting a specific list of extensions.
