---
title: "How to deploy Power Apps Solutions using Azure Pipelines"
description: "Learn how to automatically deploy Power Apps solutions using the Power Platform Build Tools and Azure DevOps."
canonical: "https://swimburger.net/blog/dynamics/how-to-deploy-power-apps-solutions-using-azure-pipelines"
published: "2021-08-29T00:00:00.000Z"
updated: "2021-09-05T02:51:09.103Z"
---

# How to deploy Power Apps Solutions using Azure Pipelines

You can manually export Power Apps solutions from one environment and import them to another environment, but you can now also automate this using Azure Pipelines and the [Power Platform Build tools](https://docs.microsoft.com/en-us/power-platform/alm/devops-build-tools).  
In this tutorial, you will take the following steps to set up automated solution deploys:

1.  Create an Azure Active Directory (AAD) App Registration with access to your Dataverse
2.  Create a system user in Dataverse linked to your AAD App Registration
3.  Create an Azure Pipeline with Power Platform Build Tools to pack and import solution

## Create an Azure Active Directory (AAD) App Registration with access to your Dataverse 

To access your Azure Active Directory, you can go straight to the [Azure Portal](https://portal.azure.com) and look up "Azure Active Directory" in the search bar at the top. Click on the "Azure Active Directory" link listed under services.

There's also a shortcut in the admin center. Browse to [admin.microsoft.com](https://admin.microsoft.com/), and in the side-navigation click on "Show all". Now, all available admin centers are listed. Click on the "Azure Active Directory" link under "Admin centers". This will take you to a specific Azure dashboard for Azure Active Directory.

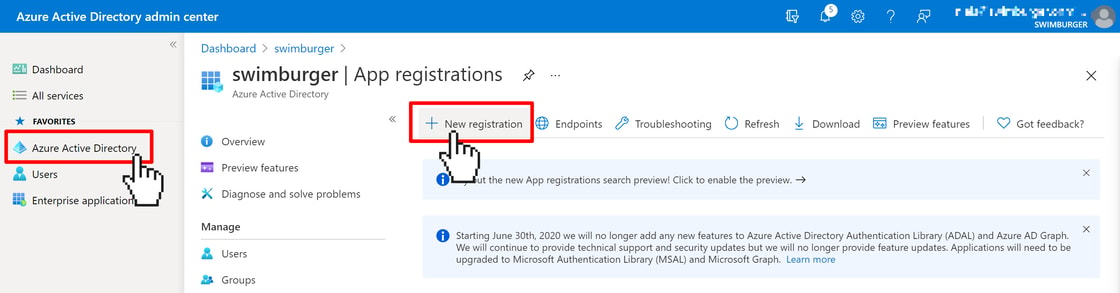
Click on "Azure Active Directory" in the side navigation and then click on "App Registrations". Click on the "New registration" button.
<picture><img src="https://swimburger.net/cdn-cgi/image/format=auto,quality=90,width=1120/media/lc4ftfi0/aad-new-app-registration.png" srcset="https://swimburger.net/cdn-cgi/image/format=auto,quality=90,width=430/media/lc4ftfi0/aad-new-app-registration.png 430w, https://swimburger.net/cdn-cgi/image/format=auto,quality=90,width=645/media/lc4ftfi0/aad-new-app-registration.png 645w, https://swimburger.net/cdn-cgi/image/format=auto,quality=90,width=718/media/lc4ftfi0/aad-new-app-registration.png 718w, https://swimburger.net/cdn-cgi/image/format=auto,quality=90,width=860/media/lc4ftfi0/aad-new-app-registration.png 860w, https://swimburger.net/cdn-cgi/image/format=auto,quality=90,width=1077/media/lc4ftfi0/aad-new-app-registration.png 1077w, https://swimburger.net/cdn-cgi/image/format=auto,quality=90,width=1120/media/lc4ftfi0/aad-new-app-registration.png 1120w, https://swimburger.net/cdn-cgi/image/format=auto,quality=90,width=1436/media/lc4ftfi0/aad-new-app-registration.png 1436w, https://swimburger.net/cdn-cgi/image/format=auto,quality=90,width=1680/media/lc4ftfi0/aad-new-app-registration.png 1680w, https://swimburger.net/cdn-cgi/image/format=auto,quality=90,width=2240/media/lc4ftfi0/aad-new-app-registration.png 2240w" sizes="(max-width: 480px) 430px, (max-width: 768px) 718px, 1120px" width="1120" height="293" alt="Screenshot of Azure Active Directory App Registration screen. Cursor clicks on the &quot;New registration&quot; button." loading="lazy" decoding="async"></picture>

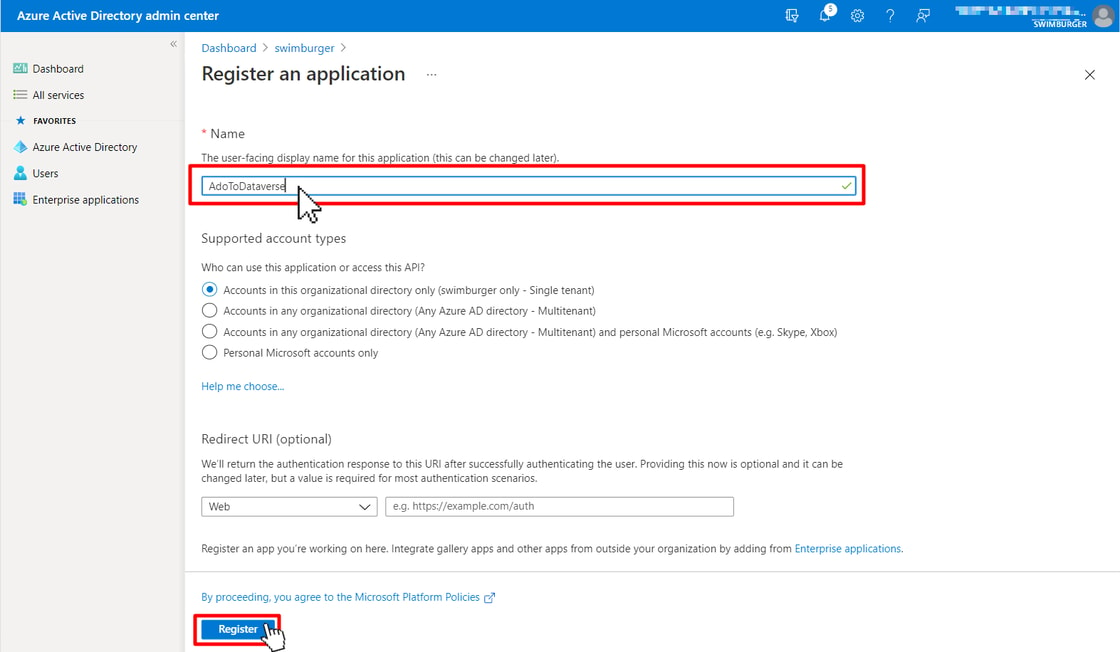
Give your app a name (fe. AdoToDataverse) and click on "Register".
<picture><img src="https://swimburger.net/cdn-cgi/image/format=auto,quality=90,width=1120/media/yznh1b1k/aad-register-an-app.png" srcset="https://swimburger.net/cdn-cgi/image/format=auto,quality=90,width=430/media/yznh1b1k/aad-register-an-app.png 430w, https://swimburger.net/cdn-cgi/image/format=auto,quality=90,width=645/media/yznh1b1k/aad-register-an-app.png 645w, https://swimburger.net/cdn-cgi/image/format=auto,quality=90,width=718/media/yznh1b1k/aad-register-an-app.png 718w, https://swimburger.net/cdn-cgi/image/format=auto,quality=90,width=860/media/yznh1b1k/aad-register-an-app.png 860w, https://swimburger.net/cdn-cgi/image/format=auto,quality=90,width=1077/media/yznh1b1k/aad-register-an-app.png 1077w, https://swimburger.net/cdn-cgi/image/format=auto,quality=90,width=1120/media/yznh1b1k/aad-register-an-app.png 1120w, https://swimburger.net/cdn-cgi/image/format=auto,quality=90,width=1436/media/yznh1b1k/aad-register-an-app.png 1436w" sizes="(max-width: 480px) 430px, (max-width: 768px) 718px, 1120px" width="1120" height="652" alt="Screen to register an application in Azure Active Directory." loading="lazy" decoding="async"></picture>

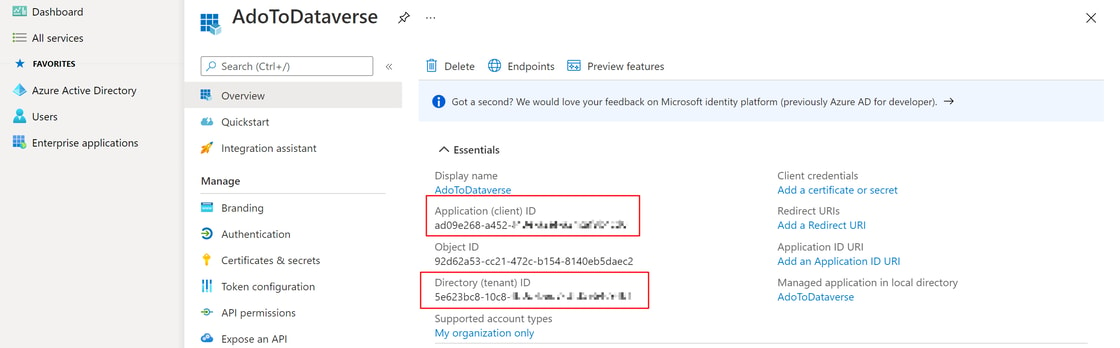
Navigate to your App registration when it is created. On the overview page, take note of the "**Application (client) ID**" and the "**Directory (tenant) ID**". **You will need these later!**
<picture><img src="https://swimburger.net/cdn-cgi/image/format=auto,quality=90,width=1120/media/ucijhydn/aad-app-overview.png" srcset="https://swimburger.net/cdn-cgi/image/format=auto,quality=90,width=430/media/ucijhydn/aad-app-overview.png 430w, https://swimburger.net/cdn-cgi/image/format=auto,quality=90,width=645/media/ucijhydn/aad-app-overview.png 645w, https://swimburger.net/cdn-cgi/image/format=auto,quality=90,width=718/media/ucijhydn/aad-app-overview.png 718w, https://swimburger.net/cdn-cgi/image/format=auto,quality=90,width=860/media/ucijhydn/aad-app-overview.png 860w, https://swimburger.net/cdn-cgi/image/format=auto,quality=90,width=1077/media/ucijhydn/aad-app-overview.png 1077w, https://swimburger.net/cdn-cgi/image/format=auto,quality=90,width=1120/media/ucijhydn/aad-app-overview.png 1120w, https://swimburger.net/cdn-cgi/image/format=auto,quality=90,width=1436/media/ucijhydn/aad-app-overview.png 1436w, https://swimburger.net/cdn-cgi/image/format=auto,quality=90,width=1680/media/ucijhydn/aad-app-overview.png 1680w, https://swimburger.net/cdn-cgi/image/format=auto,quality=90,width=2240/media/ucijhydn/aad-app-overview.png 2240w" sizes="(max-width: 480px) 430px, (max-width: 768px) 718px, 1120px" width="1120" height="348" alt="Overview page of the AAD app registration with the Application ID and Directory ID circled in red." loading="lazy" decoding="async"></picture>

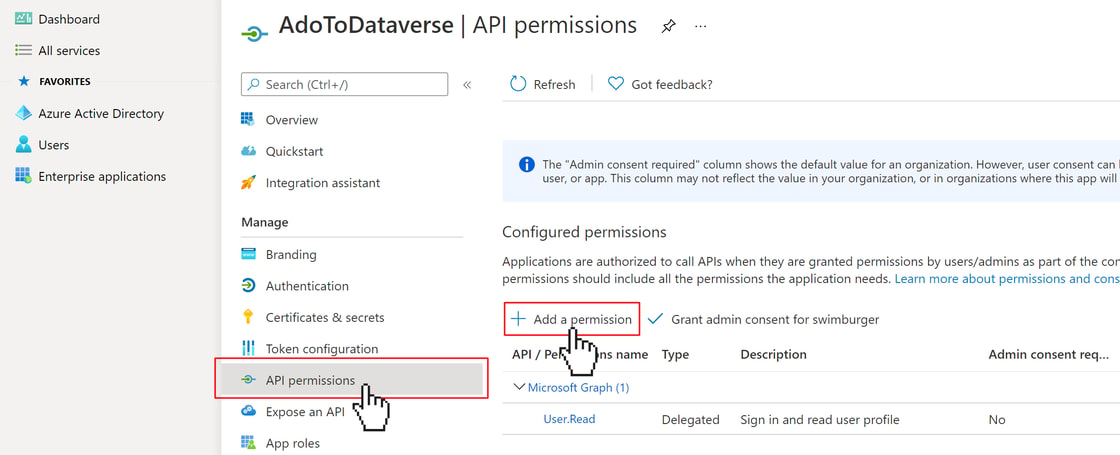
Navigate to the **API permissions** screen and click on **Add permission**.
<picture><img src="https://swimburger.net/cdn-cgi/image/format=auto,quality=90,width=1120/media/fx5fdugi/aad-app-registration-api-permissions.png" srcset="https://swimburger.net/cdn-cgi/image/format=auto,quality=90,width=430/media/fx5fdugi/aad-app-registration-api-permissions.png 430w, https://swimburger.net/cdn-cgi/image/format=auto,quality=90,width=645/media/fx5fdugi/aad-app-registration-api-permissions.png 645w, https://swimburger.net/cdn-cgi/image/format=auto,quality=90,width=718/media/fx5fdugi/aad-app-registration-api-permissions.png 718w, https://swimburger.net/cdn-cgi/image/format=auto,quality=90,width=860/media/fx5fdugi/aad-app-registration-api-permissions.png 860w, https://swimburger.net/cdn-cgi/image/format=auto,quality=90,width=1077/media/fx5fdugi/aad-app-registration-api-permissions.png 1077w, https://swimburger.net/cdn-cgi/image/format=auto,quality=90,width=1120/media/fx5fdugi/aad-app-registration-api-permissions.png 1120w, https://swimburger.net/cdn-cgi/image/format=auto,quality=90,width=1436/media/fx5fdugi/aad-app-registration-api-permissions.png 1436w, https://swimburger.net/cdn-cgi/image/format=auto,quality=90,width=1680/media/fx5fdugi/aad-app-registration-api-permissions.png 1680w, https://swimburger.net/cdn-cgi/image/format=auto,quality=90,width=2240/media/fx5fdugi/aad-app-registration-api-permissions.png 2240w" sizes="(max-width: 480px) 430px, (max-width: 768px) 718px, 1120px" width="1120" height="455" alt="AAD App Registration API Permissions Screen with cursor clicking on the &quot;Add a permission&quot; button." loading="lazy" decoding="async"></picture>

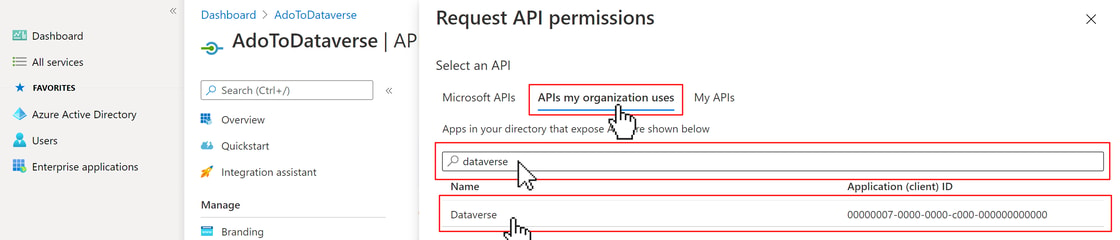
Click on the **APIs my organization uses** and search for **Dataverse**. Click on the **Dataverse** item.
<picture><img src="https://swimburger.net/cdn-cgi/image/format=auto,quality=90,width=1120/media/2appe53i/aad-app-registration-api-permissions-add-dataverse-permission.png" srcset="https://swimburger.net/cdn-cgi/image/format=auto,quality=90,width=430/media/2appe53i/aad-app-registration-api-permissions-add-dataverse-permission.png 430w, https://swimburger.net/cdn-cgi/image/format=auto,quality=90,width=645/media/2appe53i/aad-app-registration-api-permissions-add-dataverse-permission.png 645w, https://swimburger.net/cdn-cgi/image/format=auto,quality=90,width=718/media/2appe53i/aad-app-registration-api-permissions-add-dataverse-permission.png 718w, https://swimburger.net/cdn-cgi/image/format=auto,quality=90,width=860/media/2appe53i/aad-app-registration-api-permissions-add-dataverse-permission.png 860w, https://swimburger.net/cdn-cgi/image/format=auto,quality=90,width=1077/media/2appe53i/aad-app-registration-api-permissions-add-dataverse-permission.png 1077w, https://swimburger.net/cdn-cgi/image/format=auto,quality=90,width=1120/media/2appe53i/aad-app-registration-api-permissions-add-dataverse-permission.png 1120w, https://swimburger.net/cdn-cgi/image/format=auto,quality=90,width=1436/media/2appe53i/aad-app-registration-api-permissions-add-dataverse-permission.png 1436w, https://swimburger.net/cdn-cgi/image/format=auto,quality=90,width=1680/media/2appe53i/aad-app-registration-api-permissions-add-dataverse-permission.png 1680w, https://swimburger.net/cdn-cgi/image/format=auto,quality=90,width=2240/media/2appe53i/aad-app-registration-api-permissions-add-dataverse-permission.png 2240w" sizes="(max-width: 480px) 430px, (max-width: 768px) 718px, 1120px" width="1120" height="240" alt="Screen to add new permissions to AAD app registration and the Dataverse permission is selected." loading="lazy" decoding="async"></picture>

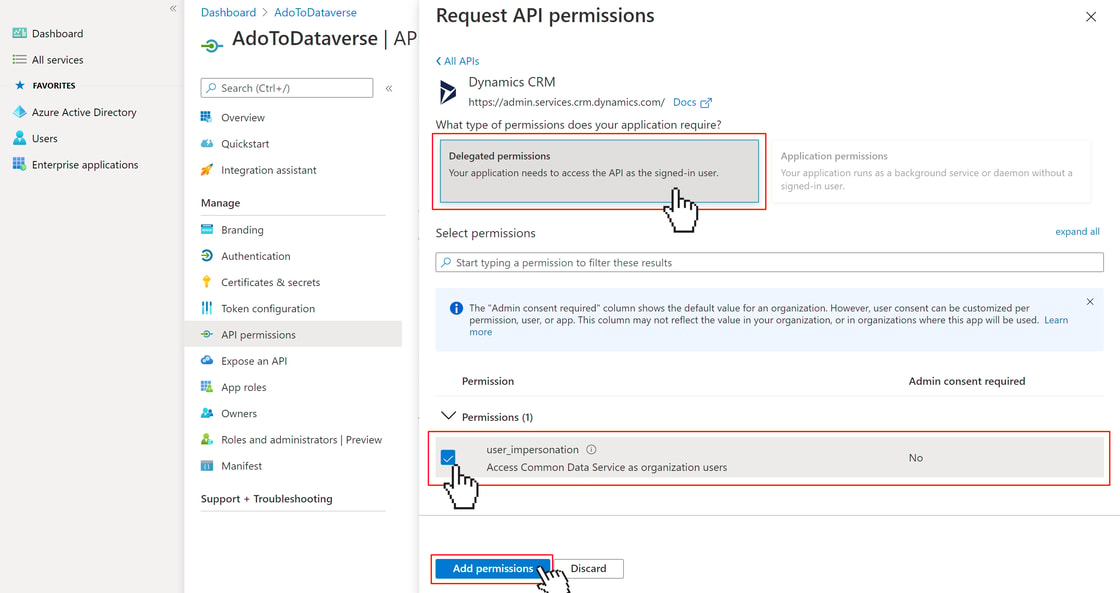
On the next screen click on the **Delegated permissions** box and check the box for **user\_impersionation**.  
Click on **Add permissions**.
<picture><img src="https://swimburger.net/cdn-cgi/image/format=auto,quality=90,width=1120/media/rdcdkwud/aad-request-dynamics-crm-permission.png" srcset="https://swimburger.net/cdn-cgi/image/format=auto,quality=90,width=430/media/rdcdkwud/aad-request-dynamics-crm-permission.png 430w, https://swimburger.net/cdn-cgi/image/format=auto,quality=90,width=645/media/rdcdkwud/aad-request-dynamics-crm-permission.png 645w, https://swimburger.net/cdn-cgi/image/format=auto,quality=90,width=718/media/rdcdkwud/aad-request-dynamics-crm-permission.png 718w, https://swimburger.net/cdn-cgi/image/format=auto,quality=90,width=860/media/rdcdkwud/aad-request-dynamics-crm-permission.png 860w, https://swimburger.net/cdn-cgi/image/format=auto,quality=90,width=1077/media/rdcdkwud/aad-request-dynamics-crm-permission.png 1077w, https://swimburger.net/cdn-cgi/image/format=auto,quality=90,width=1120/media/rdcdkwud/aad-request-dynamics-crm-permission.png 1120w, https://swimburger.net/cdn-cgi/image/format=auto,quality=90,width=1436/media/rdcdkwud/aad-request-dynamics-crm-permission.png 1436w, https://swimburger.net/cdn-cgi/image/format=auto,quality=90,width=1680/media/rdcdkwud/aad-request-dynamics-crm-permission.png 1680w, https://swimburger.net/cdn-cgi/image/format=auto,quality=90,width=2240/media/rdcdkwud/aad-request-dynamics-crm-permission.png 2240w" sizes="(max-width: 480px) 430px, (max-width: 768px) 718px, 1120px" width="1120" height="593" alt="Details screen for request Dataverse permission for AAD App Registration" loading="lazy" decoding="async"></picture>

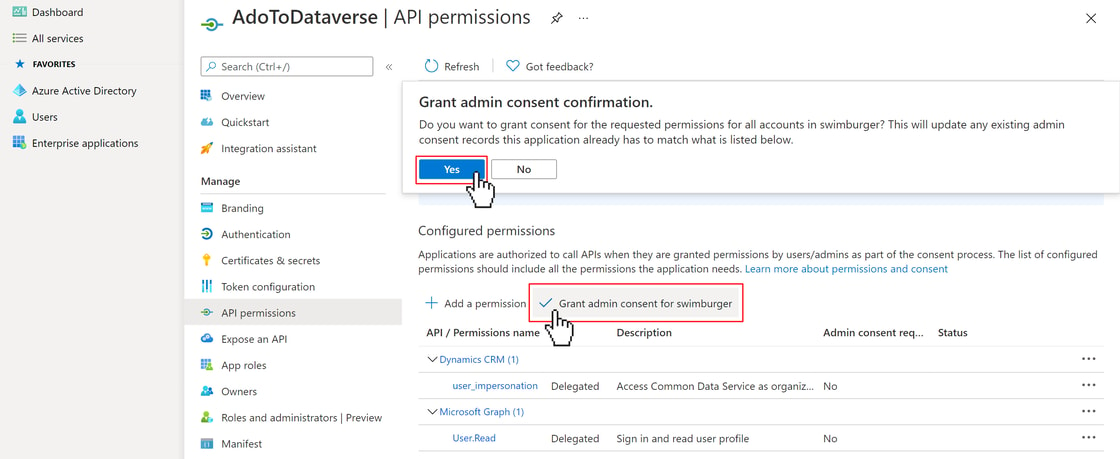
While you are still on the API permission screen, click on **Grant admin consent for your\_tenant\_name**.
<picture><img src="https://swimburger.net/cdn-cgi/image/format=auto,quality=90,width=1120/media/2ushmybs/aad-app-registration-api-permissions-grant-admin-consent.png" srcset="https://swimburger.net/cdn-cgi/image/format=auto,quality=90,width=430/media/2ushmybs/aad-app-registration-api-permissions-grant-admin-consent.png 430w, https://swimburger.net/cdn-cgi/image/format=auto,quality=90,width=645/media/2ushmybs/aad-app-registration-api-permissions-grant-admin-consent.png 645w, https://swimburger.net/cdn-cgi/image/format=auto,quality=90,width=718/media/2ushmybs/aad-app-registration-api-permissions-grant-admin-consent.png 718w, https://swimburger.net/cdn-cgi/image/format=auto,quality=90,width=860/media/2ushmybs/aad-app-registration-api-permissions-grant-admin-consent.png 860w, https://swimburger.net/cdn-cgi/image/format=auto,quality=90,width=1077/media/2ushmybs/aad-app-registration-api-permissions-grant-admin-consent.png 1077w, https://swimburger.net/cdn-cgi/image/format=auto,quality=90,width=1120/media/2ushmybs/aad-app-registration-api-permissions-grant-admin-consent.png 1120w, https://swimburger.net/cdn-cgi/image/format=auto,quality=90,width=1436/media/2ushmybs/aad-app-registration-api-permissions-grant-admin-consent.png 1436w, https://swimburger.net/cdn-cgi/image/format=auto,quality=90,width=1680/media/2ushmybs/aad-app-registration-api-permissions-grant-admin-consent.png 1680w, https://swimburger.net/cdn-cgi/image/format=auto,quality=90,width=2240/media/2ushmybs/aad-app-registration-api-permissions-grant-admin-consent.png 2240w" sizes="(max-width: 480px) 430px, (max-width: 768px) 718px, 1120px" width="1120" height="459" alt="Grant AAD App Registration admin consent " loading="lazy" decoding="async"></picture>

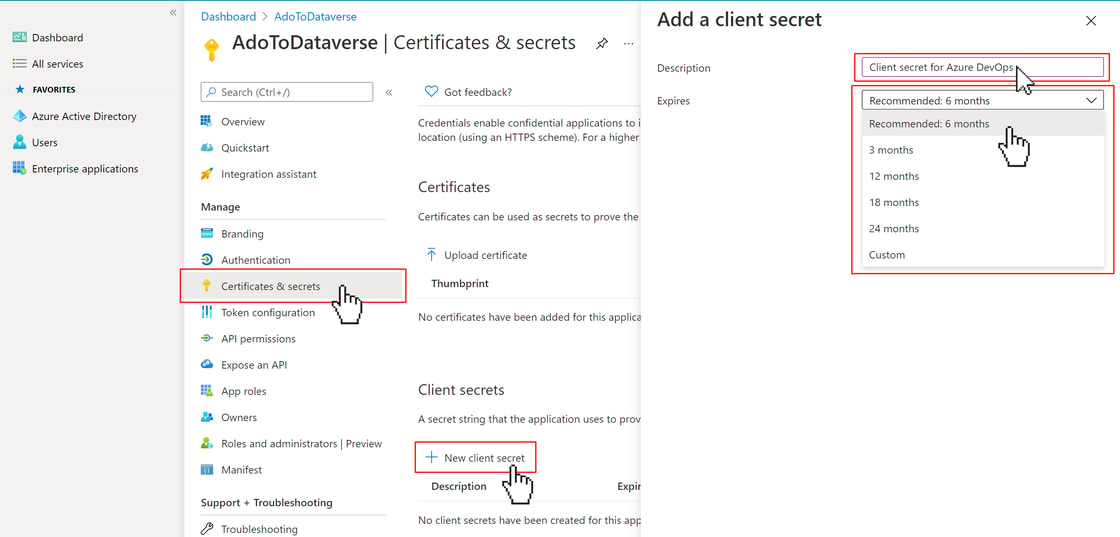
Navigate to the **Certificates & secrets** screen and click on **New client secret**.
<picture><img src="https://swimburger.net/cdn-cgi/image/format=auto,quality=90,width=1120/media/xmdip1k1/aad-app-registration-add-client-secret.png" srcset="https://swimburger.net/cdn-cgi/image/format=auto,quality=90,width=430/media/xmdip1k1/aad-app-registration-add-client-secret.png 430w, https://swimburger.net/cdn-cgi/image/format=auto,quality=90,width=645/media/xmdip1k1/aad-app-registration-add-client-secret.png 645w, https://swimburger.net/cdn-cgi/image/format=auto,quality=90,width=718/media/xmdip1k1/aad-app-registration-add-client-secret.png 718w, https://swimburger.net/cdn-cgi/image/format=auto,quality=90,width=860/media/xmdip1k1/aad-app-registration-add-client-secret.png 860w, https://swimburger.net/cdn-cgi/image/format=auto,quality=90,width=1077/media/xmdip1k1/aad-app-registration-add-client-secret.png 1077w, https://swimburger.net/cdn-cgi/image/format=auto,quality=90,width=1120/media/xmdip1k1/aad-app-registration-add-client-secret.png 1120w, https://swimburger.net/cdn-cgi/image/format=auto,quality=90,width=1436/media/xmdip1k1/aad-app-registration-add-client-secret.png 1436w, https://swimburger.net/cdn-cgi/image/format=auto,quality=90,width=1680/media/xmdip1k1/aad-app-registration-add-client-secret.png 1680w, https://swimburger.net/cdn-cgi/image/format=auto,quality=90,width=2240/media/xmdip1k1/aad-app-registration-add-client-secret.png 2240w" sizes="(max-width: 480px) 430px, (max-width: 768px) 718px, 1120px" width="1120" height="537" alt="AAD App Registration screen to add new client secret" loading="lazy" decoding="async"></picture>

  
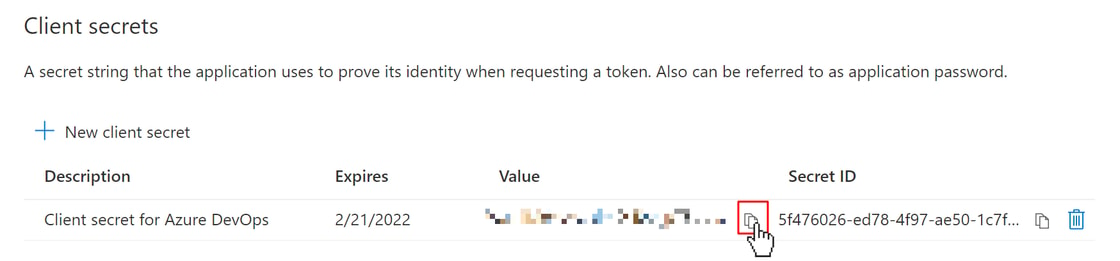
Enter a description that will help you identify what this secret is for in the future. For example **Client secret for Azure DevOps**.  
Select when the secret expires. When the secret expires, you can create a new client secret and stop using the old one.
<picture><img src="https://swimburger.net/cdn-cgi/image/format=auto,quality=90,width=1120/media/cgxdsyxf/aad-app-registration-client-secret-for-ado.png" srcset="https://swimburger.net/cdn-cgi/image/format=auto,quality=90,width=430/media/cgxdsyxf/aad-app-registration-client-secret-for-ado.png 430w, https://swimburger.net/cdn-cgi/image/format=auto,quality=90,width=645/media/cgxdsyxf/aad-app-registration-client-secret-for-ado.png 645w, https://swimburger.net/cdn-cgi/image/format=auto,quality=90,width=718/media/cgxdsyxf/aad-app-registration-client-secret-for-ado.png 718w, https://swimburger.net/cdn-cgi/image/format=auto,quality=90,width=860/media/cgxdsyxf/aad-app-registration-client-secret-for-ado.png 860w, https://swimburger.net/cdn-cgi/image/format=auto,quality=90,width=1077/media/cgxdsyxf/aad-app-registration-client-secret-for-ado.png 1077w, https://swimburger.net/cdn-cgi/image/format=auto,quality=90,width=1120/media/cgxdsyxf/aad-app-registration-client-secret-for-ado.png 1120w, https://swimburger.net/cdn-cgi/image/format=auto,quality=90,width=1436/media/cgxdsyxf/aad-app-registration-client-secret-for-ado.png 1436w, https://swimburger.net/cdn-cgi/image/format=auto,quality=90,width=1680/media/cgxdsyxf/aad-app-registration-client-secret-for-ado.png 1680w" sizes="(max-width: 480px) 430px, (max-width: 768px) 718px, 1120px" width="1120" height="261" alt="Screenshot of the new client secret entry in AAD App registration" loading="lazy" decoding="async"></picture>

**Make sure you copy the secret "Value". You will need this secret and it will never be shown again.**

## Create a system user in Dataverse linked to your AAD App Registration 

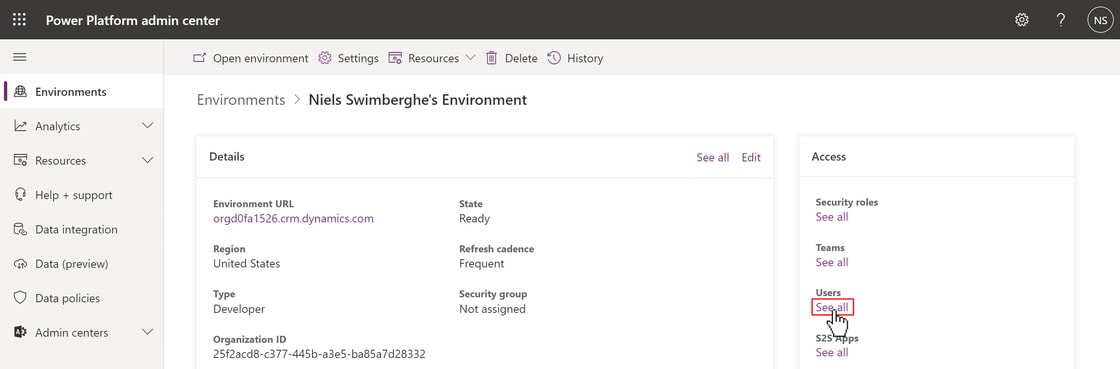
Browse to the [Power Platform admin center](https://admin.powerplatform.microsoft.com/) and click on your environment.   
In your environment settings, click on the **See all** link for Users.
<picture><img src="https://swimburger.net/cdn-cgi/image/format=auto,quality=90,width=1120/media/cn0pujg2/pp-admin-center.png" srcset="https://swimburger.net/cdn-cgi/image/format=auto,quality=90,width=430/media/cn0pujg2/pp-admin-center.png 430w, https://swimburger.net/cdn-cgi/image/format=auto,quality=90,width=645/media/cn0pujg2/pp-admin-center.png 645w, https://swimburger.net/cdn-cgi/image/format=auto,quality=90,width=718/media/cn0pujg2/pp-admin-center.png 718w, https://swimburger.net/cdn-cgi/image/format=auto,quality=90,width=860/media/cn0pujg2/pp-admin-center.png 860w, https://swimburger.net/cdn-cgi/image/format=auto,quality=90,width=1077/media/cn0pujg2/pp-admin-center.png 1077w, https://swimburger.net/cdn-cgi/image/format=auto,quality=90,width=1120/media/cn0pujg2/pp-admin-center.png 1120w, https://swimburger.net/cdn-cgi/image/format=auto,quality=90,width=1436/media/cn0pujg2/pp-admin-center.png 1436w, https://swimburger.net/cdn-cgi/image/format=auto,quality=90,width=1680/media/cn0pujg2/pp-admin-center.png 1680w, https://swimburger.net/cdn-cgi/image/format=auto,quality=90,width=2240/media/cn0pujg2/pp-admin-center.png 2240w" sizes="(max-width: 480px) 430px, (max-width: 768px) 718px, 1120px" width="1120" height="369" alt="Power Platform Admin center with the cursor clicking on See all users link" loading="lazy" decoding="async"></picture>

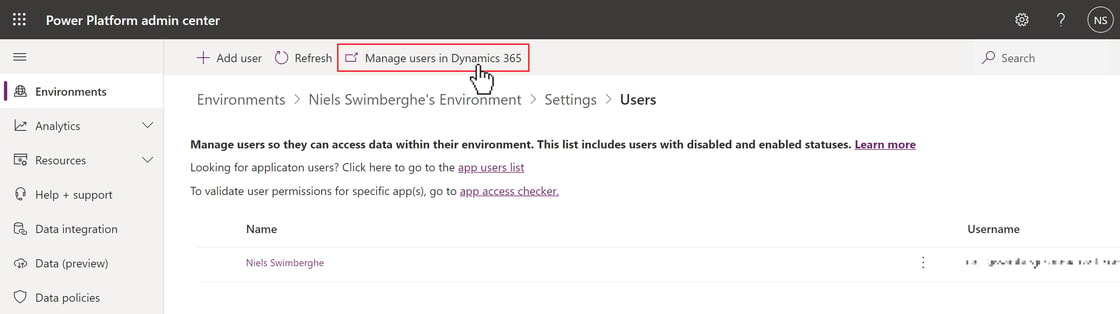
On the Users screen, click on the **Manage users in Dynamics 365** button.
<picture><img src="https://swimburger.net/cdn-cgi/image/format=auto,quality=90,width=1120/media/x2zpu4mh/pp-admin-center-manage-users.png" srcset="https://swimburger.net/cdn-cgi/image/format=auto,quality=90,width=430/media/x2zpu4mh/pp-admin-center-manage-users.png 430w, https://swimburger.net/cdn-cgi/image/format=auto,quality=90,width=645/media/x2zpu4mh/pp-admin-center-manage-users.png 645w, https://swimburger.net/cdn-cgi/image/format=auto,quality=90,width=718/media/x2zpu4mh/pp-admin-center-manage-users.png 718w, https://swimburger.net/cdn-cgi/image/format=auto,quality=90,width=860/media/x2zpu4mh/pp-admin-center-manage-users.png 860w, https://swimburger.net/cdn-cgi/image/format=auto,quality=90,width=1077/media/x2zpu4mh/pp-admin-center-manage-users.png 1077w, https://swimburger.net/cdn-cgi/image/format=auto,quality=90,width=1120/media/x2zpu4mh/pp-admin-center-manage-users.png 1120w, https://swimburger.net/cdn-cgi/image/format=auto,quality=90,width=1436/media/x2zpu4mh/pp-admin-center-manage-users.png 1436w, https://swimburger.net/cdn-cgi/image/format=auto,quality=90,width=1680/media/x2zpu4mh/pp-admin-center-manage-users.png 1680w, https://swimburger.net/cdn-cgi/image/format=auto,quality=90,width=2240/media/x2zpu4mh/pp-admin-center-manage-users.png 2240w" sizes="(max-width: 480px) 430px, (max-width: 768px) 718px, 1120px" width="1120" height="314" alt="Power Platform Admin Center screen to manage users, but the cursor is clicking on &quot;Manager users in Dynamics 365&quot; button." loading="lazy" decoding="async"></picture>

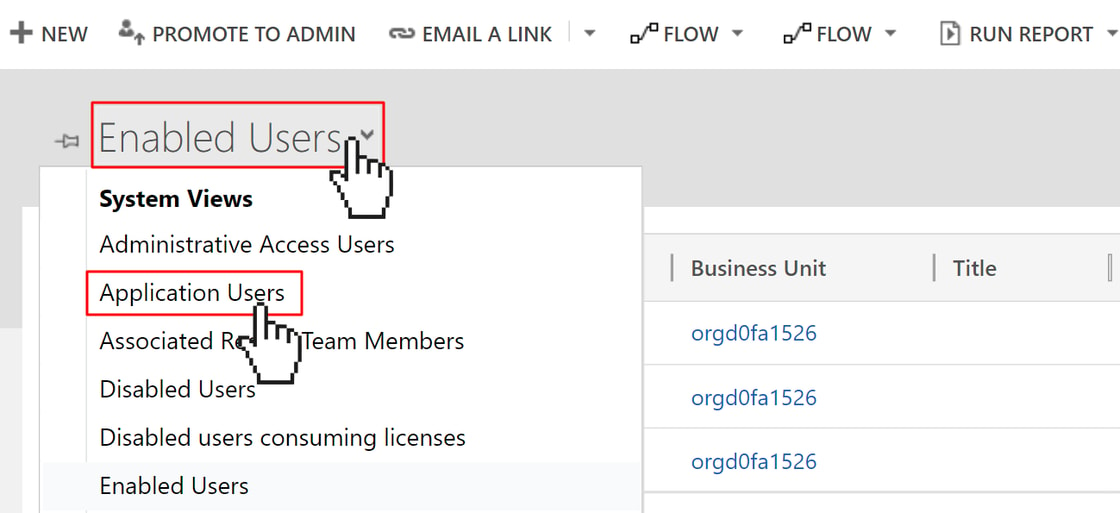
Switch to the **Application Users** view and click on the **New** button.
<picture><img src="https://swimburger.net/cdn-cgi/image/format=auto,quality=90,width=1120/media/3bnlg3mb/manage-users-switch-to-app-users.png" srcset="https://swimburger.net/cdn-cgi/image/format=auto,quality=90,width=430/media/3bnlg3mb/manage-users-switch-to-app-users.png 430w, https://swimburger.net/cdn-cgi/image/format=auto,quality=90,width=645/media/3bnlg3mb/manage-users-switch-to-app-users.png 645w, https://swimburger.net/cdn-cgi/image/format=auto,quality=90,width=718/media/3bnlg3mb/manage-users-switch-to-app-users.png 718w, https://swimburger.net/cdn-cgi/image/format=auto,quality=90,width=860/media/3bnlg3mb/manage-users-switch-to-app-users.png 860w, https://swimburger.net/cdn-cgi/image/format=auto,quality=90,width=1077/media/3bnlg3mb/manage-users-switch-to-app-users.png 1077w, https://swimburger.net/cdn-cgi/image/format=auto,quality=90,width=1120/media/3bnlg3mb/manage-users-switch-to-app-users.png 1120w" sizes="(max-width: 480px) 430px, (max-width: 768px) 718px, 1120px" width="1120" height="513" alt="Dynamics 365 user management view, but the cursor is swapping to the &quot;Application Users&quot; view." loading="lazy" decoding="async"></picture>

This will open a new window with a form to create the user.
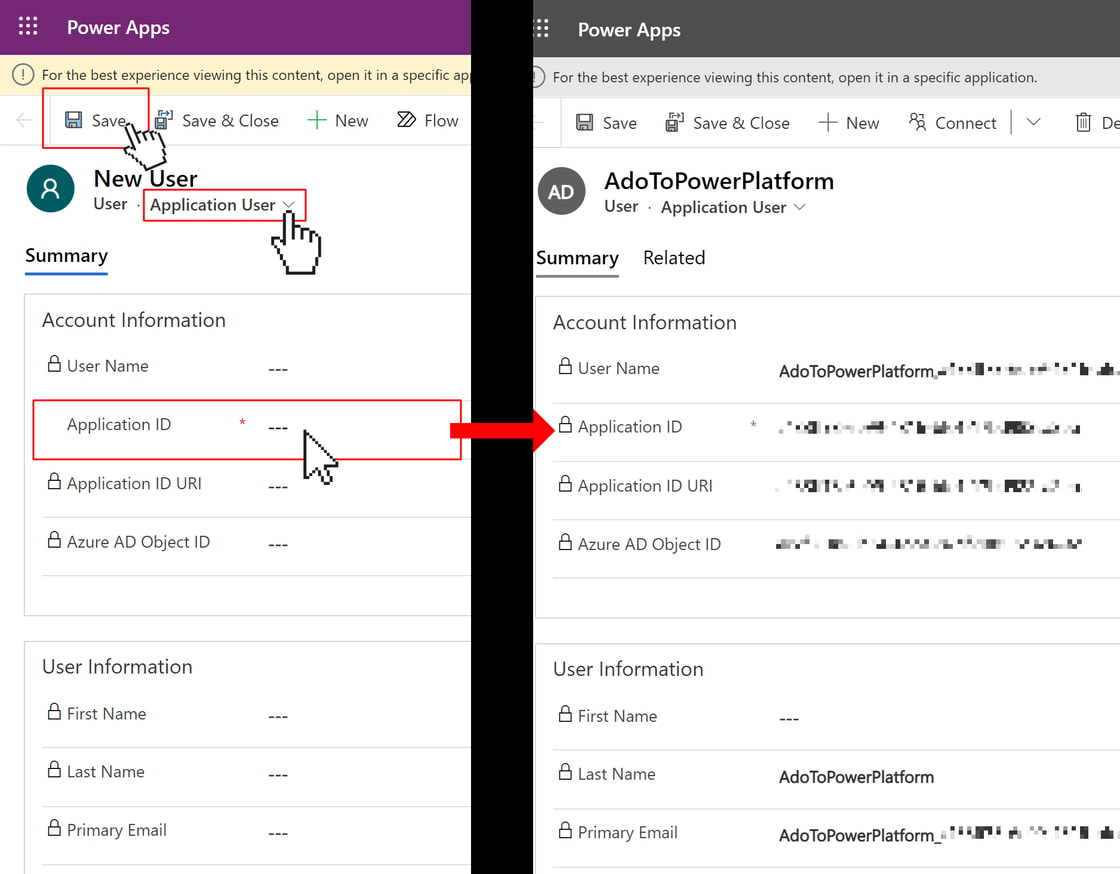
<picture><img src="https://swimburger.net/cdn-cgi/image/format=auto,quality=90,width=1120/media/tycpgb1a/manage-users-new-app-user-details.png" srcset="https://swimburger.net/cdn-cgi/image/format=auto,quality=90,width=430/media/tycpgb1a/manage-users-new-app-user-details.png 430w, https://swimburger.net/cdn-cgi/image/format=auto,quality=90,width=645/media/tycpgb1a/manage-users-new-app-user-details.png 645w, https://swimburger.net/cdn-cgi/image/format=auto,quality=90,width=718/media/tycpgb1a/manage-users-new-app-user-details.png 718w, https://swimburger.net/cdn-cgi/image/format=auto,quality=90,width=860/media/tycpgb1a/manage-users-new-app-user-details.png 860w, https://swimburger.net/cdn-cgi/image/format=auto,quality=90,width=1077/media/tycpgb1a/manage-users-new-app-user-details.png 1077w, https://swimburger.net/cdn-cgi/image/format=auto,quality=90,width=1120/media/tycpgb1a/manage-users-new-app-user-details.png 1120w, https://swimburger.net/cdn-cgi/image/format=auto,quality=90,width=1436/media/tycpgb1a/manage-users-new-app-user-details.png 1436w, https://swimburger.net/cdn-cgi/image/format=auto,quality=90,width=1680/media/tycpgb1a/manage-users-new-app-user-details.png 1680w" sizes="(max-width: 480px) 430px, (max-width: 768px) 718px, 1120px" width="1120" height="874" alt="Image of two screens, before and after creating the new application user." loading="lazy" decoding="async"></picture>

Make sure you are on the **Application User** form. If not, switch to the **Application User** form.  
Past in the **App Registration Application ID** from Azure Active Directory into the **Application ID** field and click on **Save**.

It takes a second to save, but once saved, the other fields will automatically populate as you can see in the screenshot above on the right side.

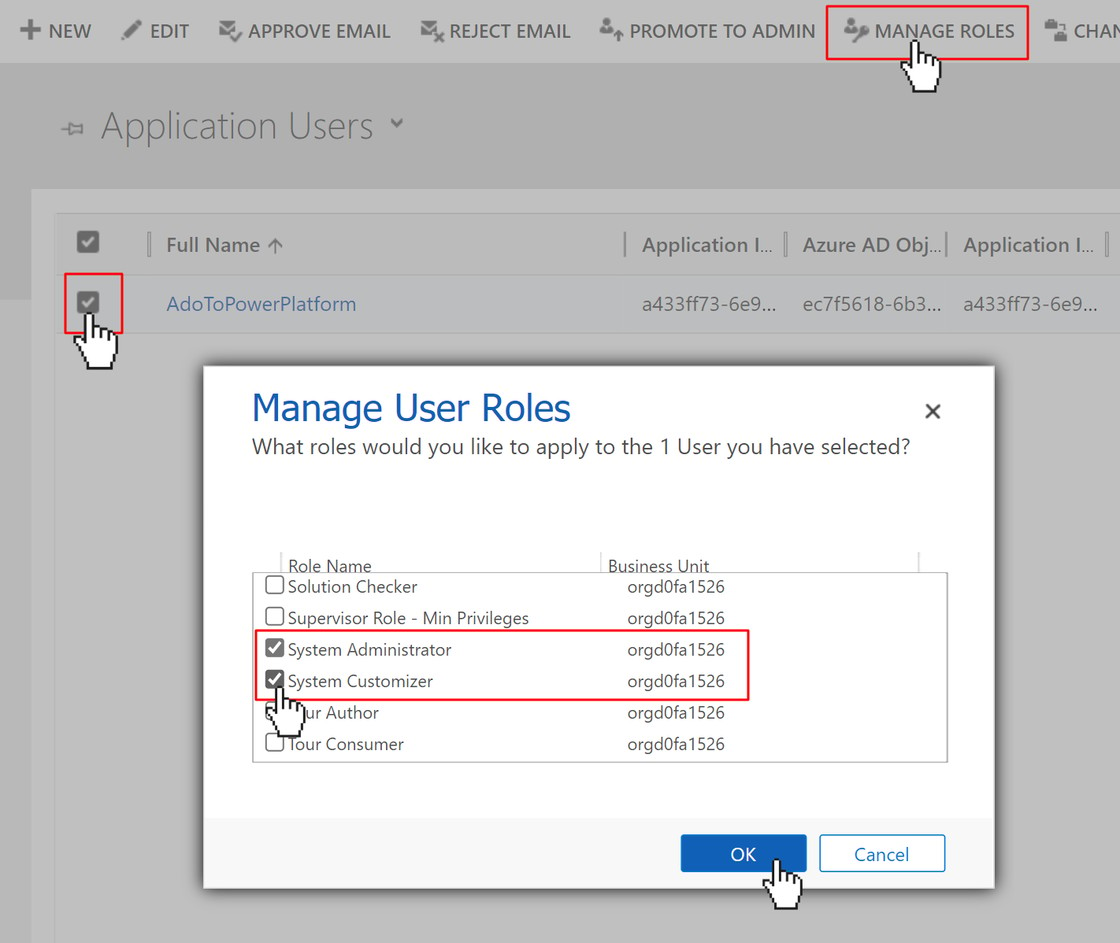
Go back to the **Application Users** view and select your new user using the checkbox at the beginning of the row.   
While the user is selected, click on **Manage Roles** and give the user the necessary role to import solutions. If you don't have a role specifically for those permissions, you can use System Administrator role for now.
<picture><img src="https://swimburger.net/cdn-cgi/image/format=auto,quality=90,width=1120/media/bmjgllnt/manage-users-new-app-user-roles.png" srcset="https://swimburger.net/cdn-cgi/image/format=auto,quality=90,width=430/media/bmjgllnt/manage-users-new-app-user-roles.png 430w, https://swimburger.net/cdn-cgi/image/format=auto,quality=90,width=645/media/bmjgllnt/manage-users-new-app-user-roles.png 645w, https://swimburger.net/cdn-cgi/image/format=auto,quality=90,width=718/media/bmjgllnt/manage-users-new-app-user-roles.png 718w, https://swimburger.net/cdn-cgi/image/format=auto,quality=90,width=860/media/bmjgllnt/manage-users-new-app-user-roles.png 860w, https://swimburger.net/cdn-cgi/image/format=auto,quality=90,width=1077/media/bmjgllnt/manage-users-new-app-user-roles.png 1077w, https://swimburger.net/cdn-cgi/image/format=auto,quality=90,width=1120/media/bmjgllnt/manage-users-new-app-user-roles.png 1120w" sizes="(max-width: 480px) 430px, (max-width: 768px) 718px, 1120px" width="1120" height="943" alt="Modal to manage user roles" loading="lazy" decoding="async"></picture>

## Create an Azure Pipeline with Power Platform Build Tools to pack and import solution 

You need to install the [Power Platform Build Tools extension from the Visual Studio Marketplace](https://marketplace.visualstudio.com/items?itemName=microsoft-IsvExpTools.PowerPlatform-BuildTools) before you can perform any Power Platform operations from Azure DevOps. Browse to [the extension](https://marketplace.visualstudio.com/items?itemName=microsoft-IsvExpTools.PowerPlatform-BuildTools) and press the **Get it free** button. On the next page select the Azure DevOps organization you want to add the extension to.

This extension will add a new type of service connection name **Power Platform** and a whole bunch of Azure Pipeline tasks.

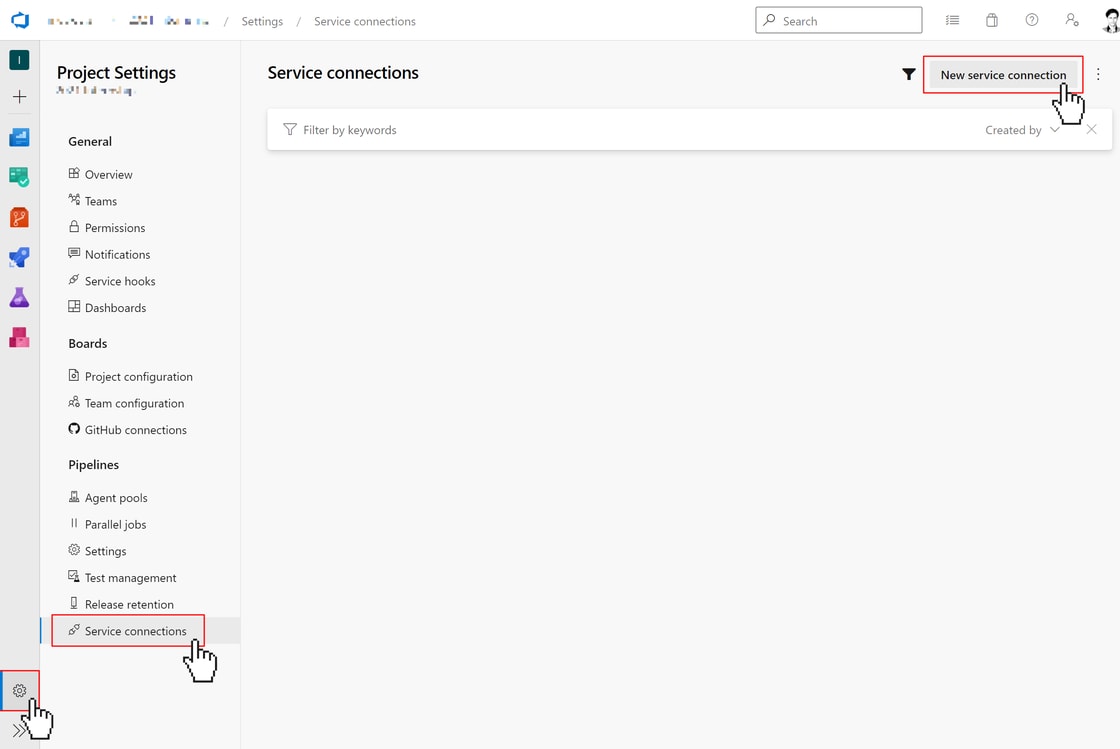
Navigate to your Azure DevOps project, or create a new one if you don't have any. Click on the **Project Settings** button on the bottom left.
<picture><img src="https://swimburger.net/cdn-cgi/image/format=auto,quality=90,width=1120/media/oyvpeg4u/ado-service-connections.png" srcset="https://swimburger.net/cdn-cgi/image/format=auto,quality=90,width=430/media/oyvpeg4u/ado-service-connections.png 430w, https://swimburger.net/cdn-cgi/image/format=auto,quality=90,width=645/media/oyvpeg4u/ado-service-connections.png 645w, https://swimburger.net/cdn-cgi/image/format=auto,quality=90,width=718/media/oyvpeg4u/ado-service-connections.png 718w, https://swimburger.net/cdn-cgi/image/format=auto,quality=90,width=860/media/oyvpeg4u/ado-service-connections.png 860w, https://swimburger.net/cdn-cgi/image/format=auto,quality=90,width=1077/media/oyvpeg4u/ado-service-connections.png 1077w, https://swimburger.net/cdn-cgi/image/format=auto,quality=90,width=1120/media/oyvpeg4u/ado-service-connections.png 1120w, https://swimburger.net/cdn-cgi/image/format=auto,quality=90,width=1436/media/oyvpeg4u/ado-service-connections.png 1436w, https://swimburger.net/cdn-cgi/image/format=auto,quality=90,width=1680/media/oyvpeg4u/ado-service-connections.png 1680w, https://swimburger.net/cdn-cgi/image/format=auto,quality=90,width=2240/media/oyvpeg4u/ado-service-connections.png 2240w" sizes="(max-width: 480px) 430px, (max-width: 768px) 718px, 1120px" width="1120" height="749" alt="Azure DevOps project settings screen for service connections. Cursor clicks on &quot;New service connection&quot;." loading="lazy" decoding="async"></picture>

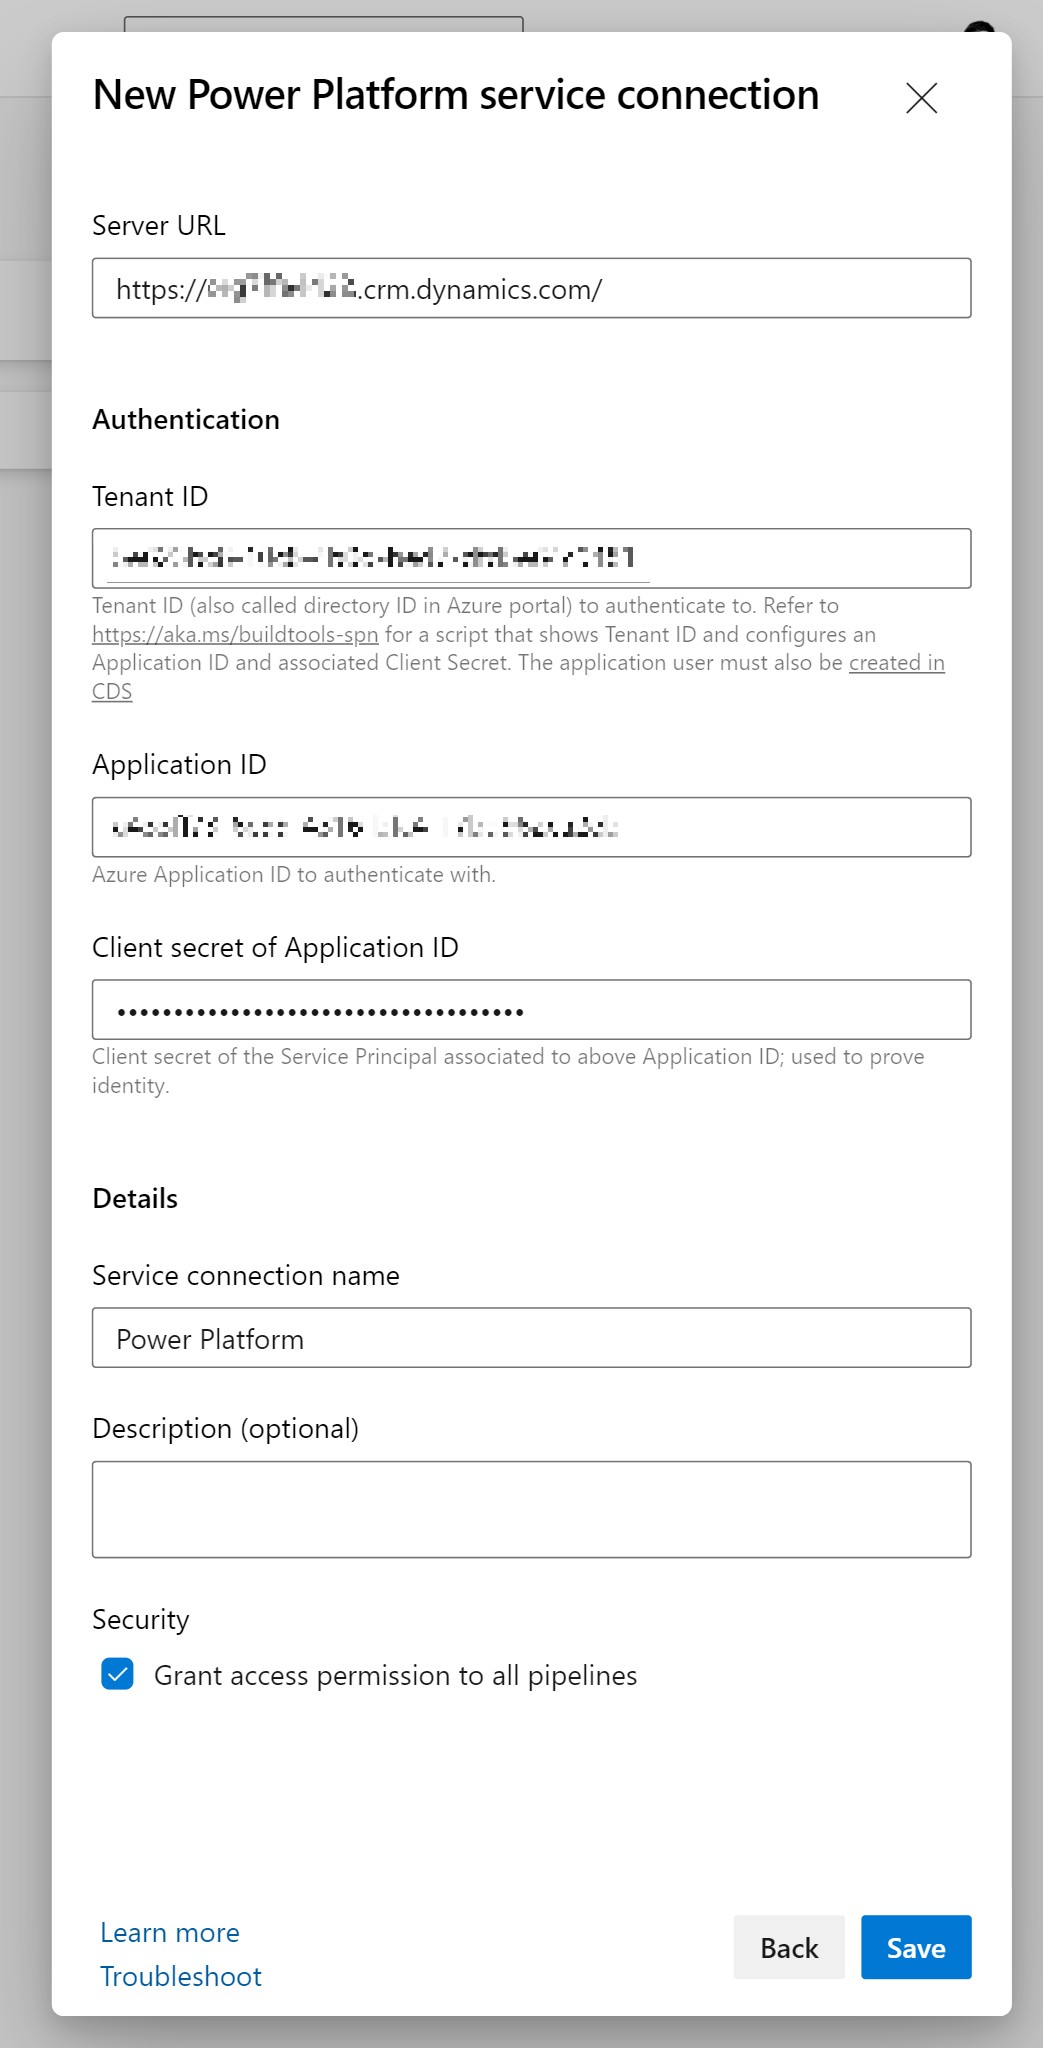
Navigate to **Service Connections** and click on the **New service connection** button.  
You need to enter the following data into the modal:

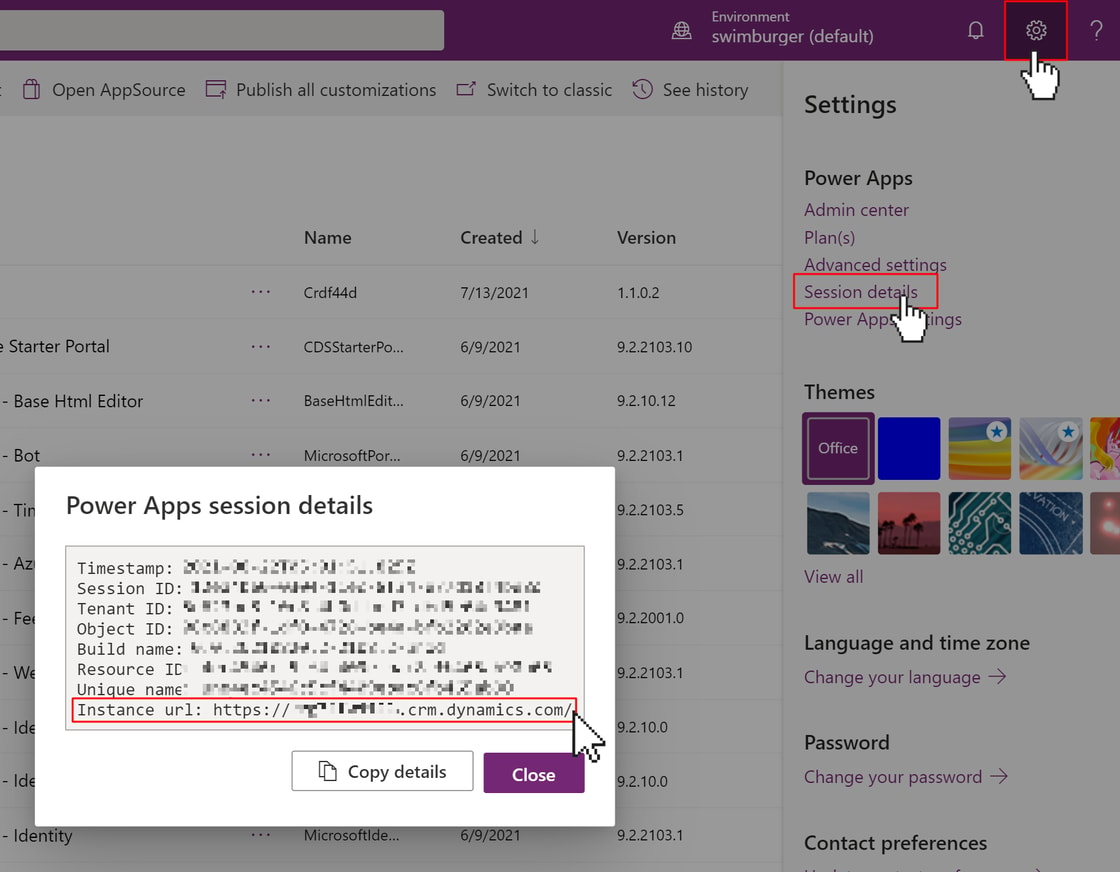
-   **Server URL**: this is the URL of your Dynamics CRM instance. You can find this URL by going to your Power Apps environment and clicking on the settings cog. A pane on the right will appear where you can click on the **Session details** link.  
    This will show a modal with details about your session including the Dynamics CRM URL which you can find after the label **Instance url**. Copy this URL and paste it into the **Server URL** back in Azure DevOps.
<picture><img src="https://swimburger.net/cdn-cgi/image/format=auto,quality=90,width=1120/media/5ignwptn/power-apps-session-details.png" srcset="https://swimburger.net/cdn-cgi/image/format=auto,quality=90,width=430/media/5ignwptn/power-apps-session-details.png 430w, https://swimburger.net/cdn-cgi/image/format=auto,quality=90,width=645/media/5ignwptn/power-apps-session-details.png 645w, https://swimburger.net/cdn-cgi/image/format=auto,quality=90,width=718/media/5ignwptn/power-apps-session-details.png 718w, https://swimburger.net/cdn-cgi/image/format=auto,quality=90,width=860/media/5ignwptn/power-apps-session-details.png 860w, https://swimburger.net/cdn-cgi/image/format=auto,quality=90,width=1077/media/5ignwptn/power-apps-session-details.png 1077w, https://swimburger.net/cdn-cgi/image/format=auto,quality=90,width=1120/media/5ignwptn/power-apps-session-details.png 1120w, https://swimburger.net/cdn-cgi/image/format=auto,quality=90,width=1436/media/5ignwptn/power-apps-session-details.png 1436w, https://swimburger.net/cdn-cgi/image/format=auto,quality=90,width=1680/media/5ignwptn/power-apps-session-details.png 1680w" sizes="(max-width: 480px) 430px, (max-width: 768px) 718px, 1120px" width="1120" height="872" alt="Modal of the Power Apps Session details" loading="lazy" decoding="async"></picture>

-   **Tenant ID**: Enter the ID you took note of earlier from your **AAD App Registration** that was labeled as **Directory (tenant) ID**
-   **Application ID**: Enter the other ID you took note of earlier from your **AAD App Registration** that was labeled as **Application (client) ID**.
-   **Client secret of Application ID**: Enter the **Value** from the **client secret** you created in your **AAD App Registration**.
-   **Service connection name**: Enter 'Power Platform', or any other meaningful name
<picture><img src="https://swimburger.net/cdn-cgi/image/format=auto,quality=90,width=1120/media/jlojww12/ado-create-new-service-connection.png" srcset="https://swimburger.net/cdn-cgi/image/format=auto,quality=90,width=430/media/jlojww12/ado-create-new-service-connection.png 430w, https://swimburger.net/cdn-cgi/image/format=auto,quality=90,width=645/media/jlojww12/ado-create-new-service-connection.png 645w, https://swimburger.net/cdn-cgi/image/format=auto,quality=90,width=718/media/jlojww12/ado-create-new-service-connection.png 718w, https://swimburger.net/cdn-cgi/image/format=auto,quality=90,width=860/media/jlojww12/ado-create-new-service-connection.png 860w" sizes="(max-width: 480px) 430px, (max-width: 768px) 718px, 1120px" width="1120" height="2199" alt="Modal asking for details to create service connection to Power Platform" loading="lazy" decoding="async"></picture>

Navigate to the **Pipelines > Pipelines** section of your project, and click on the **New pipeline** button. Azure DevOps will now ask where your code is hosted. You could host your code in any source control server (git, TFVC, or SVN) and integrate it using Azure Pipelines. You will have to set up your own source control and use it to track your unpacked Power Apps solutions inside. **This tutorial assumes you have already done this.**

Since you're already in Azure DevOps, let's assume you use **Azure Repos Git**.

Select your git repository with which tracks your unpacked Power Apps solutions.

Click on **Starter pipeline**.

In the last step, replace the YAML code with the following YAML.

```yaml
trigger: none

pool:
  vmImage: windows-latest

steps:
  - task: PowerPlatformToolInstaller@0
    inputs:
      DefaultVersion: true
  - task: PowerPlatformWhoAmi@0
    inputs:
      authenticationType: 'PowerPlatformSPN'
      PowerPlatformSPN: 'Power Platform'
```

If you gave your service connection a different name, make sure to change the **PowerPlatformSPN** property to your service connection name.

The YAML will do the following:

-   The pipeline is not automatically triggered, which means you will have to trigger it manually
-   When it is triggered, the pipeline will use a Windows machine to do the following two steps:
    -   The **PowerPlatformToolInstaller** step will install the Power Platform Build Tools on the machine
    -   The **PowerPlatformWhoAmi** step will send a **WhoAmI** request to Dynamics CRM which will return a bunch of information about the user authenticated against your Dynamics CRM instance.  
        This is a great first step to verify that your connection works as expected.

**Note: Power Platform Build tools are only supported on Windows.**

Click on **Save and run** and let's see the result.

On the run details page, click on **Job** under **Jobs** to see more details about the tasks that are being executed.  
Click on the **PowerPlatformWhoAmi** task and if all goes well, you should see details about your Power Apps environment.

Now that you have verified the connection works, let's add some more tasks.

Navigate back to the **Pipelines > Pipelines** section of your project and click on your new pipeline. Click on the **Edit** button and update the YAML code with the following:

```yaml
trigger: none

pool:
  vmImage: windows-latest

steps:
  - task: PowerPlatformToolInstaller@0
    inputs:
      DefaultVersion: true
  - task: PowerPlatformWhoAmi@0
    inputs:
      authenticationType: 'PowerPlatformSPN'
      PowerPlatformSPN: 'Power Platform'
  - task: PowerPlatformPackSolution@0
    inputs:
      SolutionSourceFolder: 'solution'
      SolutionOutputFile: 'solution.zip'
  - task: PublishPipelineArtifact@1
    inputs:
      targetPath: 'solution.zip'
      artifact: 'Solution Archive'
      publishLocation: 'pipeline'
  - task: PowerPlatformImportSolution@0
    inputs:
      authenticationType: 'PowerPlatformSPN'
      PowerPlatformSPN: 'Power Platform'
      SolutionInputFile: 'solution.zip'
      AsyncOperation: true
      MaxAsyncWaitTime: '60'
  - task: PowerPlatformPublishCustomizations@0
    inputs:
      authenticationType: 'PowerPlatformSPN'
      PowerPlatformSPN: 'Power Platform'
```

In addition to the first two steps, the pipeline now does the following steps:

-   In source control, the **solution** folder holds the unpacked Power Apps solution. The **PowerPlatformPackSolution** step will pack the unpacked solution and produce a **solution.zip** file.
-   The **PublishPipelineArtifact** step isn't a Power Platform step, but a built-in Azure Pipelines step. This step will publish the solution.zip file to the pipeline so you can download it at a later point.  
    This could be useful for debugging or to quickly deploy an older solution if you need to.
-   The **PowerPlatformInportSolution** step will upload your solution.zip file and import it into your Power Apps environment.
-   The **PowerPlatformPublishCustomizations** step will publish all customization in your Power Apps environment.  
    Unfortunately, there's no way to publish customization of just a single solution. If there were other customizations pending to be published from outside your solution, those will be published too.

Hit **Save and run** and verify everything is working as expected.

## Summary 

In this tutorial, you learned how to 

-   Create an Azure Active Directory App Registration and linked it to a Dynamics CRM user.
-   Used the App Registration to allow Azure DevOps to connect to your Power Apps environment as the Dynamics CRM user you created.
-   Create an Azure pipeline to pack and import a Power Apps solution and publish all customizations. 

Of course, everyone's source control structure is different and your process for deploying solutions to Power Apps may also be different.  
Hopefully, this is a useful reference for you to build your own process.
