---
title: "Making Phone Calls from Blazor WebAssembly with Twilio Voice"
excerpt: "Using Twilio Voice you can add the ability to make and receive phone calls from your own ASP.NET web applications. Twilio’s helper library for JavaScript makes it easy to integrate client functionality into web front ends built with Blazor WebAssembly, and the Twilio NuGet packages provide you with convenient interfaces to Twilio’s APIs for server-side tasks."
publishDate: "2020-11-30T00:00:00"
createDate: "2020-11-29T04:32:58.64"
updateDate: "2020-11-30T19:54:39.247"
category: "dotnet"
categoryName: ".NET"
tags: [".NET","ASP.NET","dotnet","aspnet","Twilio","Blazor",".NET Core","ASP.NET Core","aspnet core"]
permalink: "/blog/dotnet/making-phone-calls-from-blazor-webassembly-with-twilio-voice"
canonical: "https://www.twilio.com/en-us/blog/making-phone-calls-from-blazor-webassembly-with-twilio-voice"
image: {"src":"/media/1u0il5el/blazor-twilio-calls-long.png","focalPoint":{"left":0.5,"top":0.5},"crops":[{"alias":"Banner","width":1120,"height":400,"coordinates":null}]}
imageAlt: "Blazor and Twilio logo next to title: Making Phone Calls from Blazor WebAssembly with Twilio Voice"
imageBackgroundColor: "#fafafa"
thumbnailImage: {"src":"/media/rfhjjgka/blazor-twilio-calls-square.png","focalPoint":{"left":0.5,"top":0.5},"crops":[{"alias":"thumbnail","width":250,"height":250,"coordinates":null}]}
thumbnailImageAlt: "Blazor and Twilio logo"
metaTitle: "Making Phone Calls from Blazor WebAssembly with Twilio Voice"
metaDescription: "Using Twilio Voice you can add the ability to make and receive phone calls from your own ASP.NET web applications."
ogTitle: "Making Phone Calls from Blazor WebAssembly with Twilio Voice"
ogDescription: "Using Twilio Voice you can add the ability to make and receive phone calls from your own ASP.NET web applications."
ogImage: {"src":"/media/zgpdpg3u/blazor-twilio-calls-social.png","focalPoint":{"left":0.5,"top":0.5},"crops":[{"alias":"OpenGraph","width":1200,"height":630,"coordinates":null}]}
ogImageAlt: "Blazor and Twilio logo next to title: Making Phone Calls from Blazor WebAssembly with Twilio Voice"
relatedPostKeys: ["7606d5bc3e54480188f355f164bd1ece","3fa142faee1a488c91f507627e8059bb","685ea2dd839e410c8945ddf7f1e478e7","a90267e3e840468cadaf538780dd12c3","b01d783c18284f05b29774abcd096471"]
noIndex: false
noFollow: false
sitemapExclude: true
source: {"nodeId":1379,"contentKey":"99831c3f1722477fa6329b6a946bd961","sortOrder":67}
---


**This post was written for and [originally posted on the Twilio blog](https://www.twilio.com/blog/making-phone-calls-from-blazor-webassembly-with-twilio-voice).**


Mobile phones are ubiquitous and convenient but there are times when it’s more practical to be able to receive and place phone calls from a computer. If you’ve called customer service about the tickets you ordered, or anything else, it’s likely the rep you spoke to took your call with a mouse click.

Using Twilio Voice you can add the ability to make and receive phone calls from your own ASP.NET web applications. Twilio’s helper library for JavaScript makes it easy to integrate client functionality into web front ends built with Blazor WebAssembly, and the Twilio NuGet packages provide you with convenient interfaces to Twilio’s APIs for server-side tasks.


<a rel="noopener" href="https://docs.microsoft.com/en-us/aspnet/core/blazor/?view=aspnetcore-5.0#blazor-webassembly" target="_blank">Blazor WebAssembly</a> lets you build your application front end in C# and Razor, so you can focus the client-side JavaScript on functionality that requires JavaScript for implementation.


<a rel="noopener" href="https://docs.microsoft.com/en-us/aspnet/core/blazor/call-javascript-from-dotnet?view=aspnetcore-5.0" target="_blank">JavaScript&nbsp;interoperability</a> (JS interop) is a feature of Blazor that makes it easy to call JavaScript APIs and libraries from your C# code.


Both these technologies are built on <a rel="noopener" href="https://docs.microsoft.com/en-us/dotnet/standard/net-standard" target="_blank">.NET&nbsp;Standard</a>, so they’re available in both <a rel="noopener" href="https://docs.microsoft.com/en-us/dotnet/standard/net-standard" target="_blank">ASP.NET&nbsp;Core&nbsp;3.1</a> and <a rel="noopener" href="https://docs.microsoft.com/en-us/dotnet/core/dotnet-five" target="_blank">ASP.NET&nbsp;Core in .NET 5.0</a>.


In this post you’ll learn how to build a web application for making and receiving voice calls using these technologies. You’ll see how to integrate a Blazor component with the <a rel="noopener" href="https://www.twilio.com/docs/voice/client/javascript" target="_blank">Twilio&nbsp;Client&nbsp;JS&nbsp;SDK</a> and how to route Twilio calls using <a rel="noopener" href="https://docs.microsoft.com/en-us/aspnet/core/web-api/?view=aspnetcore-5.0" target="_blank">ASP.NET&nbsp;Core&nbsp;WebAPI</a>.  You’ll also learn how to use <a rel="noopener" href="https://www.twilio.com/docs/voice/twiml" target="_blank">TwiML</a>™ (the **Twi**lio **M**arkup **L**anguage) to tell Twilio what to do when a call comes into a Twilio phone number.


The tutorial in this post contains the complete source code and it’s provided under an MIT license so you can incorporate it into your own project.

## Prerequisites {#prerequisites}

This tutorial is for developers at any experience level. Prior experience with the following technologies is recommended, but not required:


-   C#
-   .NET and ASP.NET Core
-   HTML
-   JavaScript
-   Blazor


You’ll need the following development resources to build and run the project:


<a rel="noopener" href="https://dotnet.microsoft.com/download" target="_blank">.NET Core SDK</a> version 3.1 or .NET 5.0


Code editor – Any editor will suffice, but for an optimal experience use:


<a rel="noopener" href="https://code.visualstudio.com/" target="_blank">Visual Studio Code</a> with the <a rel="noopener" href="https://marketplace.visualstudio.com/items?itemName=ms-dotnettools.csharp" target="_blank">C# for Visual Studio Code extension</a> 


– or –


<a rel="noopener" href="https://visualstudio.microsoft.com/downloads/" target="_blank">Visual Studio 2019</a> (The Community edition is free.) with the following workloads enabled: ASP.NET and web development, .NET Core cross-platform development.


<a rel="noopener" href="https://docs.microsoft.com/en-us/powershell/scripting/install/installing-powershell-core-on-windows?view=powershell-7.1" target="_blank">PowerShell</a> – You can use the latest PowerShell Core or the legacy Windows version.


<a rel="noopener" href="http://www.twilio.com/referral/taywZj" target="_blank">Twilio</a> account – Sign up for a free trial account (no credit card required) with this link and get an additional $10 credit when you upgrade to a regular account.


<a rel="noopener" href="https://www.twilio.com/docs/twilio-cli/quickstart#install-twilio-cli" target="_blank">Twilio CLI</a> – The Twilio command-line interface requires <a rel="noopener" href="https://nodejs.org/en/" target="_blank">Node.js</a> and npm (included with the Node.js installation).


<a rel="noopener" href="https://ngrok.com/" target="_blank">ngrok</a> – A free account is all that’s necessary.


There is a <a rel="noopener" href="https://github.com/Swimburger/TwilioBlazorPhonecalls" target="_blank">companion repository</a> available on GitHub for this tutorial. It contains the complete code for the solution you’re going to build.


## Understanding the use case {#understanding-the-use-case}

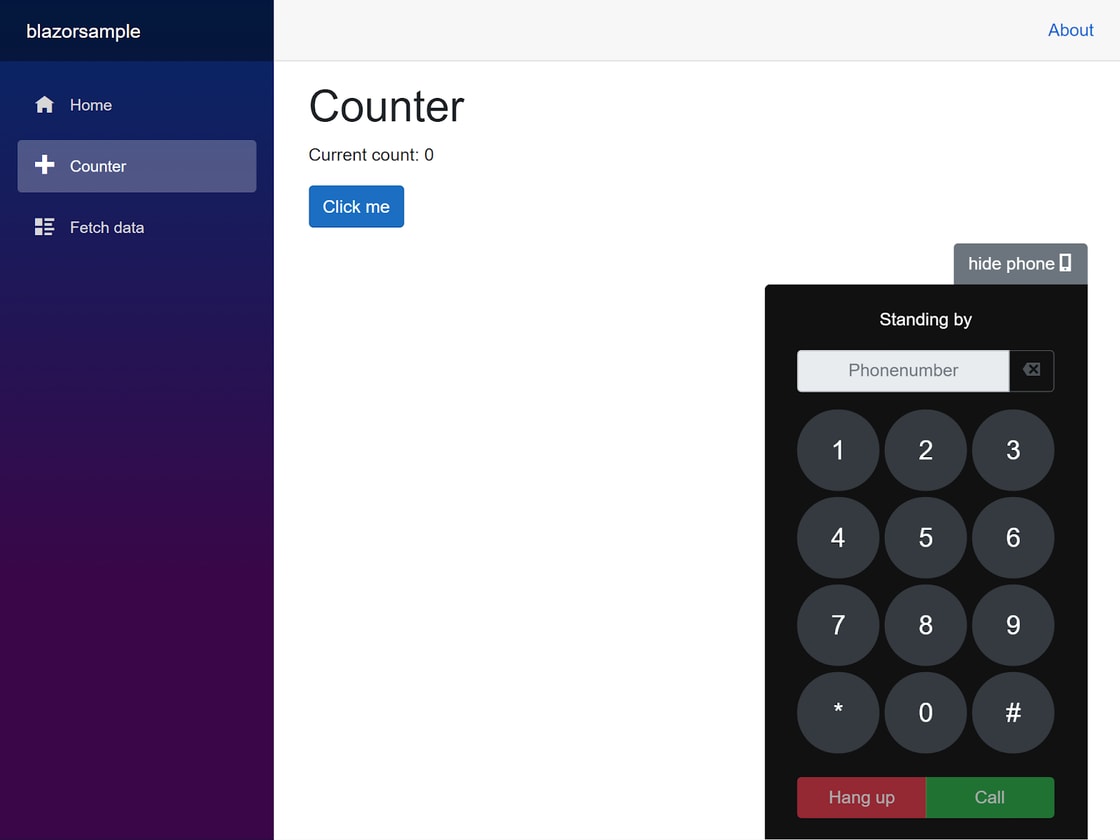
The goal of this application is to build a working single page Blazor WebAssembly application you can use to make and receive phone calls while still being able to interact with the application. To accomplish this, you will create a dialer component which will be docked on the bottom right of the screen.

Here’s a screenshot of the end result:

<picture>
  <img src="https://swimburger.net/cdn-cgi/image/format=auto,quality=90,width=1120/media/4g2hohwv/end-result-dialer.png" srcset="https://swimburger.net/cdn-cgi/image/format=auto,quality=90,width=430/media/4g2hohwv/end-result-dialer.png 430w, https://swimburger.net/cdn-cgi/image/format=auto,quality=90,width=645/media/4g2hohwv/end-result-dialer.png 645w, https://swimburger.net/cdn-cgi/image/format=auto,quality=90,width=718/media/4g2hohwv/end-result-dialer.png 718w, https://swimburger.net/cdn-cgi/image/format=auto,quality=90,width=860/media/4g2hohwv/end-result-dialer.png 860w, https://swimburger.net/cdn-cgi/image/format=auto,quality=90,width=1077/media/4g2hohwv/end-result-dialer.png 1077w, https://swimburger.net/cdn-cgi/image/format=auto,quality=90,width=1120/media/4g2hohwv/end-result-dialer.png 1120w, https://swimburger.net/cdn-cgi/image/format=auto,quality=90,width=1436/media/4g2hohwv/end-result-dialer.png 1436w" sizes="(max-width: 480px) 430px, (max-width: 768px) 718px, 1120px" width="1120" height="840" alt="Screenshot of the completed application showing the dialer component" loading="lazy" decoding="async">
</picture>

Here’s an animation of the dialer in action:

<p><img src="/media/optimized/z4ql1tnb-ac23338831.webp" alt="Animated screenshot of the app showing the dialer in use" width="960" height="720"></p>

You can use the dialer to dial phone numbers and call them. If a call is incoming, the dialer will vibrate to raise awareness of an incoming call to the user. (The phone numbers will be masked in the screenshots for privacy reasons.)

## Solution architecture {#solution-architecture}


The solution will consist of a client application implemented in Blazor WebAssembly and a server application implemented in ASP.NET Core. The client application will fetch an authentication token from the server, which will be used to authenticate the client with the Twilio service. Once authenticated, the client can initiate and receive calls routed through <a rel="noopener" href="https://www.twilio.com/voice" target="_blank">Twilio&nbsp;Voice</a>. When an outgoing or incoming call is made, Twilio will reach out to the server application to receive instructions, written in <a rel="noopener" href="https://www.twilio.com/docs/voice/twiml" target="_blank">TwiML</a>, on how to handle the call.


### Generating auth tokens to connect to Twilio {#generating-auth-tokens-to-connect-to-twilio}


Before you can connect to Twilio using the <a rel="noopener" href="https://www.twilio.com/docs/voice/client/javascript" target="_blank">Twilio&nbsp;Client&nbsp;JS&nbsp;SDK</a> you need to get an authentication token. You can request this auth token by making AJAX requests to your server application and have it generate the token. The auth token will hold the following configuration:


-   A Twilio Account String IDentifier (SID)
-   A boolean to opt into incoming voice calls
-   An identity string which is used as the client name – The client name is used to route incoming calls to the Twilio Client.
-   A TwiML Application SID for outgoing voice calls – The TwiML App SID identifies a <a rel="noopener" href="https://support.twilio.com/hc/en-us/articles/223180928-How-Do-I-Create-a-TwiML-App-" target="_blank">TwiML app</a>, which holds an SMS Webhook URL and a Voice Webhook URL. These webhooks are how Twilio knows which URLs to send HTTP requests to when you initiate a call using the JavaScript SDK.


<p class="panel panel--warning"><strong>Warning:</strong> In this tutorial anyone will be able to request these authentication tokens, which is a security risk. When implementing a token service, add your own authentication and authorization logic to make sure you generate tokens only for those who are supposed to be able to make phone calls using your application.</p>


### Making outgoing phone calls (from browser to phone) {#making-outgoing-phone-calls-from-browser-to-phone}


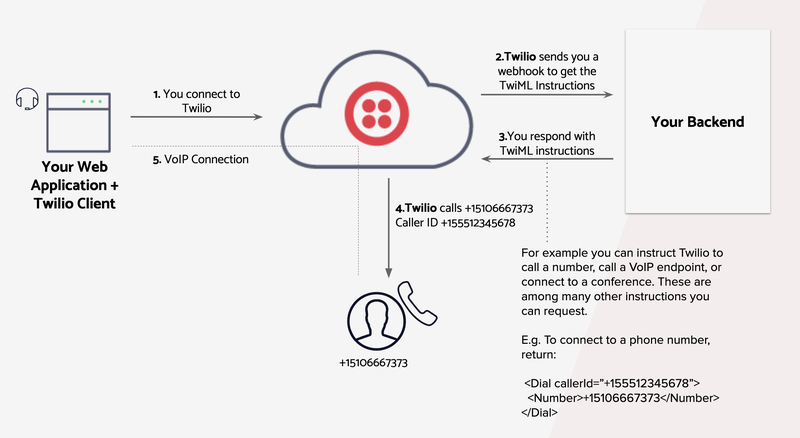
You can make outgoing phone calls using the Twilio Client JS SDK and a backend responding to webhooks. The workflow to make outgoing phone calls goes as follows:  


<picture>
  <img src="https://swimburger.net/cdn-cgi/image/format=auto,quality=90,width=1120/media/g1bnjg5k/voice_client_js_overview-width-800.png" srcset="https://swimburger.net/cdn-cgi/image/format=auto,quality=90,width=430/media/g1bnjg5k/voice_client_js_overview-width-800.png 430w, https://swimburger.net/cdn-cgi/image/format=auto,quality=90,width=645/media/g1bnjg5k/voice_client_js_overview-width-800.png 645w, https://swimburger.net/cdn-cgi/image/format=auto,quality=90,width=718/media/g1bnjg5k/voice_client_js_overview-width-800.png 718w" sizes="(max-width: 480px) 430px, (max-width: 768px) 718px, 1120px" width="1120" height="613" alt="Diagram of component interaction in phone calls made with Twilio Voice" loading="lazy" decoding="async">
</picture>


<em>Figure 1: Workflow diagram for outgoing phone calls (source: </em><em><a rel="noopener" href="https://www.twilio.com/docs/voice/client/javascript" target="_blank">Twilio documentation</a></em><em>)</em>


1.  Using the Twilio Client JS SDK, the browser connects to Twilio using a previously generated authentication token. Twilio decrypts this authentication token and reads the outgoing client scope, which holds a TwiML App SID. With this TwiML App SID, Twilio can fetch the voice webhook configured in your TwiML App.
2.  Twilio sends an HTTP request to the voice webhook configured in your TwiML App. This HTTP request holds metadata you can use to determine who to route the phone call to.
3.  Your server application returns TwiML instructions in the HTTP response to dial the desired number.
4.  Twilio will read your TwiML response and dial the phone number.
5.  The Twilio Client JS SDK will establish the VoIP connection between your browser and the phone number.


### Receiving incoming phone calls (from phone to browser) {#receiving-incoming-phone-calls-from-phone-to-browser}

You can also receive incoming phone calls using the Twilio Client JS SDK and a WebAPI server application responding to webhooks. The workflow for an incoming phone call goes as follows:


1. Your Twilio phone number is called and is received by Twilio Voice.
1. Twilio makes an HTTP request to the voice webhook URL configured on your Twilio phone number. This webhook URL is configured on your phone number, not your TwiML App voice webhook.
1. Your server application responds with TwiML instructions. For outgoing phone calls you instruct Twilio to <a rel="noopener" href="https://www.twilio.com/docs/voice/twiml/dial" target="_blank">&lt;Dial&gt;</a> a <a rel="noopener" href="https://www.twilio.com/docs/voice/twiml/number" target="_blank">&lt;Number&gt;</a>, but for the incoming phone call you want the call to be routed to the browser client. To do so, you have to instruct Twilio to &lt;Dial&gt; a <a rel="noopener" href="https://www.twilio.com/docs/voice/twiml/client" target="_blank">&lt;Client&gt;</a>. The specified Client should match the client in the incoming client scope part of the authentication token.
1. Twilio will read your TwiML response and dial the client. If no client is connected, the phone call is closed. If multiple clients are connected, the first to accept the call will establish the VoIP connection and other clients will stop ringing.
1. The Twilio JavaScript SDK will establish the VoIP connection between the client and the phone number.


## Creating Twilio resources {#creating-twilio-resources}

You need to create the following Twilio resources to be able to make and receive phone calls from the browser:


-   <a rel="noopener" href="https://www.twilio.com/docs/phone-numbers" target="_blank">Phone Number</a>
-   <a rel="noopener" href="https://support.twilio.com/hc/en-us/articles/223180928-How-Do-I-Create-a-TwiML-App-" target="_blank">TwiML Application</a>


You can create these resources with the <a rel="noopener" href="https://www.twilio.com/docs/twilio-cli/quickstart" target="_blank">Twilio CLI</a> or the <a rel="noopener" href="https://www.twilio.com/console" target="_blank">Twilio console</a> web interface.


Install the Twilio CLI on your machine by following the <a rel="noopener" href="https://www.twilio.com/docs/twilio-cli/quickstart" target="_blank">Twilio CLI Quickstart</a> instructions.


Log in using the Twilio CLI using the following command:

<pre style="color:#000000;background:#ffffff;">twilio <span style="color:#2a00ff; ">login</span>&#10;</pre>


You will be prompted to enter your Account SID and Auth Token. Both can be found on the right-hand side of the <a rel="noopener" href="https://www.twilio.com/console" target="_blank">Twilio console</a> home page.


Copy your **Account SID** and **Auth Token** someplace handy. You will need them later. They’re user secrets, so be sure to handle them securely. (For example, don’t put them in your source code.)


The server application will need a Twilio <a rel="noopener" href="https://www.twilio.com/docs/iam/keys/api-key-resource" target="_blank">API key</a> and secret. Browse to <a rel="noopener" href="https://www.twilio.com/console/project/api-keys" target="_blank">API Keys</a> in the Twilio console and create a standard API key.


Copy the **SID**, which is the API key, and the **secret** someplace handy and secure. These are also user secrets, so take all the appropriate precautions.


If you don’t have a Twilio phone number, you can get a local phone number using the following command, replacing “US” with the appropriate <a rel="noopener" href="https://en.wikipedia.org/wiki/ISO_3166-1_alpha-2" target="_blank">country code</a> for your location:


<pre style="color:#000000;background:#ffffff;">twilio <span style="color:#2a00ff; ">phone-numbers:buy:local</span>  <span style="color:#2a00ff; ">--country-code=US</span>&#10;</pre>

Note: Although you’ll be buying a phone number, the credit in your trial account will be applied to the charge. No credit card is required.

If you already have a Twilio phone number, you can list your phone numbers using the following command:

<pre style="color:#000000;background:#ffffff;">twilio <span style="color:#2a00ff; ">phone-numbers:list</span>&#10;</pre>

Copy the **phone number** that you want to use for this application someplace handy.

Run the following command to create a TwiML application:

<pre style="color:#000000;background:#ffffff;">twilio <span style="color:#2a00ff; ">api:core:applications:create</span> <span style="color:#2a00ff; ">--friendly-name</span> <span style="color:#2a00ff; ">TwilioBlazorPhonecalls</span>&#10;</pre>

You can give the application any friendly name that is meaningful to you.

If you already created a TwiML application, you can list your applications using the following command:

<pre style="color:#000000;background:#ffffff;">twilio <span style="color:#2a00ff; ">api:core:applications:list</span>&#10;</pre>

Copy the TwiML application **SID** someplace handy and secure.

You will need to configure the voice webhook URL later, but you don’t have a backend or public URL to configure it with yet.

Now you should have all of the following noted on the side for future use:


-   Account SID and Auth Token
-   API Key and Secret
-   Phone Number
-   TwiML Application SID


## Building the Twilio authentication token server {#building-the-twilio-authentication-token-server}

The token authentication server is the first of two C# projects you’ll create in this tutorial. It will be the backend server for the client, supplying authentication tokens obtained from Twilio. It will also handle Twilio webhooks.

In a production-grade application, it would be better if you create an internal backend and a publicly available server dedicated to handling Twilio webhooks. For the sake of simplicity, this tutorial combines these functions in a single server.

### Create the ASP.NET Core WebAPI application {#create-the-aspnet-core-webapi-application}

The token authentication server will be implemented as an ASP.NET Core WebAPI project. Using this platform, it will also provide REST APIs the Twilio webhooks will call.

Use the following commands to create the server project:

<pre style="color:#000000;background:#ffffff;">mkdir <span style="color:#2a00ff; ">TwilioBlazorPhonecalls</span>&#10;cd <span style="color:#2a00ff; ">TwilioBlazorPhonecalls</span>&#10;<span style="color:#3f7f59; "># creates folder and a webapi project inside the new folder</span>&#10;dotnet <span style="color:#2a00ff; ">new</span> <span style="color:#2a00ff; ">webapi</span> -o <span style="color:#2a00ff; ">TwilioBlazorPhonecalls.Server</span>&#10;&#10;<span style="color:#3f7f59; "># optionally, create a solution and add the server project to the solution</span>&#10;dotnet <span style="color:#2a00ff; ">new</span> <span style="color:#2a00ff; ">sln</span>&#10;dotnet <span style="color:#2a00ff; ">sln</span> <span style="color:#2a00ff; ">add</span> <span style="color:#2a00ff; ">TwilioBlazorPhonecalls.Server</span>&#10;</pre>


Later on, you’ll create a client application which will try to use the same ports by default (5000 and 5001) which is not possible. Use the following commands to change the used ports to 5002 and 5003 by updating the <em>launchSettings.json</em> file at <em>TwilioBlazorPhonecalls.Server/Properties/launchSettings.json</em>.


<pre style="color:#000000;background:#ffffff;">$launchSettingsContents = Get-Content -path <span style="color:#2a00ff; ">./TwilioBlazorPhonecalls.Server/Properties/launchSettings.json</span> -Raw&#10;$launchSettingsContents = $launchSettingsContents <span style="color:#7f0055; font-weight:bold; ">-replace</span> <span style="color:#2a00ff; ">'</span><span style="color:#2a00ff; ">https://localhost:5001;http://localhost:5000</span><span style="color:#2a00ff; ">'</span>,<span style="color:#2a00ff; ">'</span><span style="color:#2a00ff; ">https://localhost:5003;http://localhost:5002</span><span style="color:#2a00ff; ">'</span>&#10;Set-Content -Value $launchSettingsContents -Path <span style="color:#2a00ff; ">./TwilioBlazorPhonecalls.Server/Properties/launchSettings.json</span>&#10;</pre>

You can run your server project using this command:

<pre style="color:#000000;background:#ffffff;">dotnet <span style="color:#2a00ff; ">run</span> -p <span style="color:#2a00ff; ">TwilioBlazorPhonecalls.Server</span>&#10;</pre>

If you’re using Visual Studio to run your projects, use the Kestrel target instead of IIS Express.

For your convenience, you can also use the `dotnet watch run` alternative. This will automatically reload the .NET application as you edit. You can use this command to watch your project:

<pre style="color:#000000;background:#ffffff;">dotnet <span style="color:#2a00ff; ">watch</span> -p <span style="color:#2a00ff; ">TwilioBlazorPhonecalls.Server</span> <span style="color:#2a00ff; ">run</span>&#10;</pre>


<div class="block-rich_text">

<div class="rich-text">

By default, the ASP.NET Core Web API template comes with an existing controller and a model class. Remove the files for these classes:

</div>

</div>
<pre style="color:#000000;background:#ffffff;">rm <span style="color:#2a00ff; ">TwilioBlazorPhonecalls.Server\Controllers\WeatherForecastController.cs</span>&#10;rm <span style="color:#2a00ff; ">TwilioBlazorPhonecalls.Server\WeatherForecast.cs</span>&#10;</pre>


### Configure user secrets {#configure-user-secrets}

The server project will require access to all the previously noted configuration data, but you shouldn’t store this sensitive information directly inside the server project, which might cause accidental check-ins to source code control. 😱


Instead, you can use the `dotnet user-secrets` commands for the <a rel="noopener" href="https://docs.microsoft.com/en-us/aspnet/core/security/app-secrets?view=aspnetcore-5.0&amp;tabs=windows#how-the-secret-manager-tool-works" target="_blank">Secret Manager</a> to store the configuration in secret storage.


Paste the following PowerShell commands and enter the prompted configuration:

<pre style="color:#000000;background:#ffffff;">&amp;{&#10;    $TwilioAccountSid     = Read-Host <span style="color:#2a00ff; ">'</span><span style="color:#2a00ff; ">Enter your Twilio Account SID</span><span style="color:#2a00ff; ">'</span>&#10;    $TwilioPhoneNumber    = Read-Host <span style="color:#2a00ff; ">'</span><span style="color:#2a00ff; ">Enter your Twilio phone number</span><span style="color:#2a00ff; ">'</span>&#10;    $TwilioApiKey         = Read-Host <span style="color:#2a00ff; ">'</span><span style="color:#2a00ff; ">Enter your Twilio API key</span><span style="color:#2a00ff; ">'</span>&#10;    $TwilioApiSecret      = Read-Host <span style="color:#2a00ff; ">'</span><span style="color:#2a00ff; ">Enter your Twilio API secret</span><span style="color:#2a00ff; ">'</span> -AsSecureString&#10;    $TwiMLApplicationSid  = Read-Host <span style="color:#2a00ff; ">'</span><span style="color:#2a00ff; ">Enter your TwiML Application SID</span><span style="color:#2a00ff; ">'</span>&#10;&#10;    $ProjectName = <span style="color:#2a00ff; ">"</span><span style="color:#2a00ff; ">TwilioBlazorPhonecalls.Server</span><span style="color:#2a00ff; ">"</span>&#10;    dotnet <span style="color:#2a00ff; ">user-secrets</span> <span style="color:#2a00ff; ">init</span> <span style="color:#2a00ff; ">--project</span> $ProjectName&#10;    dotnet <span style="color:#2a00ff; ">user-secrets</span> <span style="color:#2a00ff; ">set</span> <span style="color:#2a00ff; ">"</span><span style="color:#2a00ff; ">TwilioAccountSid</span><span style="color:#2a00ff; ">"</span> $TwilioAccountSid <span style="color:#2a00ff; ">--project</span> $ProjectName&#10;    dotnet <span style="color:#2a00ff; ">user-secrets</span> <span style="color:#2a00ff; ">set</span> <span style="color:#2a00ff; ">"</span><span style="color:#2a00ff; ">TwilioPhoneNumber</span><span style="color:#2a00ff; ">"</span> $TwilioPhoneNumber <span style="color:#2a00ff; ">--project</span> $ProjectName&#10;    dotnet <span style="color:#2a00ff; ">user-secrets</span> <span style="color:#2a00ff; ">set</span> <span style="color:#2a00ff; ">"</span><span style="color:#2a00ff; ">TwilioApiKey</span><span style="color:#2a00ff; ">"</span> $TwilioApiKey <span style="color:#2a00ff; ">--project</span> $ProjectName&#10;&#10;    <span style="color:#3f7f59; "># set secret and mask the output with ***</span>&#10;    (dotnet <span style="color:#2a00ff; ">user-secrets</span> <span style="color:#2a00ff; ">set</span> <span style="color:#2a00ff; ">"</span><span style="color:#2a00ff; ">TwilioApiSecret</span><span style="color:#2a00ff; ">"</span> (ConvertFrom-SecureString $TwilioApiSecret -AsPlainText) <span style="color:#2a00ff; ">--project</span> $ProjectName) <span style="color:#2a00ff; ">`</span>&#10;        -replace (ConvertFrom-SecureString $TwilioApiSecret -AsPlainText), ((ConvertFrom-SecureString $TwilioApiSecret -AsPlainText) <span style="color:#7f0055; font-weight:bold; ">-replace</span> <span style="color:#2a00ff; ">"</span><span style="color:#2a00ff; ">.</span><span style="color:#2a00ff; ">"</span>, <span style="color:#2a00ff; ">"</span><span style="color:#2a00ff; ">*</span><span style="color:#2a00ff; ">"</span>)&#10;&#10;    dotnet <span style="color:#2a00ff; ">user-secrets</span> <span style="color:#2a00ff; ">set</span> <span style="color:#2a00ff; ">"</span><span style="color:#2a00ff; ">TwiMLApplicationSid</span><span style="color:#2a00ff; ">"</span> $TwiMLApplicationSid <span style="color:#2a00ff; ">--project</span> $ProjectName&#10;}&#10;</pre>

You will be prompted to provide the configuration you noted earlier and each prompt will be stored in .NET’s secret storage. ASP.NET Core loads in configuration from secret storage out of the box during development.


You can list the secrets using the `dotnet user-secrets list`. Learn more about `dotnet user-secrets` in <a rel="noopener" href="https://docs.microsoft.com/en-us/aspnet/core/security/app-secrets" target="_blank">Safe storage of app secrets in development in ASP.NET Core</a> on docs.microsoft.com.


<p class="panel panel--danger"><strong>Warning</strong>: The secrets are stored in <a rel="noopener" href="https://en.wikipedia.org/wiki/Plaintext" target="_blank">plaintext</a> in a file, <em>secrets.json</em>, in secret storage, and listing the secrets will display them in plaintext too. .NET’s secret storage is a tool for development purposes only.</p>


### Create a controller to generate Twilio authentication tokens {#create-a-controller-to-generate-twilio-authentication-tokens}


The browser application will need to connect to Twilio. To do so it will need an authentication token. In this section, you’ll create a <a rel="noopener" href="https://docs.microsoft.com/en-us/aspnet/web-api/overview/web-api-routing-and-actions/routing-and-action-selection" target="_blank">controller and an action</a> to generate authentication tokens which can be used to connect to Twilio.


Install the <a rel="noopener" href="https://www.nuget.org/packages/Twilio/" target="_blank">Twilio</a> NuGet package with the VS 2019 Package Manager, Package Manager Console, or the following .NET CLI command:


<pre style="color:#000000;background:#ffffff;">dotnet <span style="color:#2a00ff; ">add</span> <span style="color:#2a00ff; ">TwilioBlazorPhonecalls.Server</span> <span style="color:#2a00ff; ">package</span> <span style="color:#2a00ff; ">Twilio</span>&#10;</pre>


<div class="block-rich_text">

<div class="rich-text">

The Twilio REST API helper library in this package contains the necessary classes to generate these authentication tokens.


Create the following controller at <em>TwilioBlazorPhonecalls.Server\Controllers\TokenController.cs</em> with the following contents:

<pre style="color:#000000;background:#ffffff;"><span style="color:#7f0055; font-weight:bold; ">using</span> System;&#10;<span style="color:#7f0055; font-weight:bold; ">using</span> System.Collections.Generic;&#10;<span style="color:#7f0055; font-weight:bold; ">using</span> System.Linq;&#10;<span style="color:#7f0055; font-weight:bold; ">using</span> System.Threading.Tasks;&#10;<span style="color:#7f0055; font-weight:bold; ">using</span> Microsoft.AspNetCore.Mvc;&#10;<span style="color:#7f0055; font-weight:bold; ">using</span> Microsoft.Extensions.Configuration;&#10;<span style="color:#7f0055; font-weight:bold; ">using</span> Twilio.Jwt.AccessToken;&#10;&#10;<span style="color:#7f0055; font-weight:bold; ">namespace</span> TwilioBlazorPhonecalls.Server.Controllers&#10;{&#10;    [ApiController]&#10;    [Route(<span style="color:#2a00ff; ">"</span><span style="color:#2a00ff; ">[controller]</span><span style="color:#2a00ff; ">"</span>)]&#10;    <span style="color:#7f0055; font-weight:bold; ">public</span> <span style="color:#7f0055; font-weight:bold; ">class</span> TokenController : ControllerBase&#10;    {&#10;        <span style="color:#7f0055; font-weight:bold; ">private</span> <span style="color:#7f0055; font-weight:bold; ">readonly</span> IConfiguration configuration;&#10;        <span style="color:#7f0055; font-weight:bold; ">public</span> TokenController(IConfiguration configuration)&#10;        {&#10;            <span style="color:#7f0055; font-weight:bold; ">this</span>.configuration = configuration;&#10;        }&#10;&#10;        [HttpGet]&#10;        <span style="color:#7f0055; font-weight:bold; ">public</span> <span style="color:#7f0055; font-weight:bold; ">string</span> Get()&#10;        {&#10;            <span style="color:#7f0055; font-weight:bold; ">string</span> twilioAccountSid = configuration[<span style="color:#2a00ff; ">"</span><span style="color:#2a00ff; ">TwilioAccountSid</span><span style="color:#2a00ff; ">"</span>];&#10;            <span style="color:#7f0055; font-weight:bold; ">string</span> twilioApiKey = configuration[<span style="color:#2a00ff; ">"</span><span style="color:#2a00ff; ">TwilioApiKey</span><span style="color:#2a00ff; ">"</span>];&#10;            <span style="color:#7f0055; font-weight:bold; ">string</span> twilioApiSecret = configuration[<span style="color:#2a00ff; ">"</span><span style="color:#2a00ff; ">TwilioApiSecret</span><span style="color:#2a00ff; ">"</span>];&#10;            <span style="color:#7f0055; font-weight:bold; ">string</span> twiMLApplicationSid = configuration[<span style="color:#2a00ff; ">"</span><span style="color:#2a00ff; ">TwiMLApplicationSid</span><span style="color:#2a00ff; ">"</span>];&#10;            &#10;            <span style="color:#7f0055; font-weight:bold; ">var</span> grants = <span style="color:#7f0055; font-weight:bold; ">new</span> HashSet&lt;IGrant&gt;();&#10;            <span style="color:#3f7f59; ">// Create a Voice grant for this token</span>&#10;            grants.Add(<span style="color:#7f0055; font-weight:bold; ">new</span> VoiceGrant&#10;            {&#10;                OutgoingApplicationSid = twiMLApplicationSid,&#10;                IncomingAllow = <span style="color:#7f0055; font-weight:bold; ">true</span>&#10;            });&#10;&#10;            <span style="color:#3f7f59; ">// Create an Access Token generator</span>&#10;            <span style="color:#7f0055; font-weight:bold; ">var</span> token = <span style="color:#7f0055; font-weight:bold; ">new</span> Token(&#10;                twilioAccountSid,&#10;                twilioApiKey,&#10;                twilioApiSecret,&#10;                <span style="color:#3f7f59; ">// identity will be used as the client name for incoming dials</span>&#10;                identity: <span style="color:#2a00ff; ">"</span><span style="color:#2a00ff; ">blazor_client</span><span style="color:#2a00ff; ">"</span>,&#10;                grants: grants&#10;            );&#10;&#10;            <span style="color:#7f0055; font-weight:bold; ">return</span> token.ToJwt();&#10;        }&#10;    }&#10;}&#10;</pre>

An instance of the <code>IConfiguration</code> object is injected into the constructor by ASP.NET Core’s built-in dependency injection and then stored in a field. The TwilioAccountSid, TwilioApiKey, TwilioApiSecret, and TwiMLApplicationSid are all extracted from the configuration object.


When you create a <code>Token</code>, you can pass in different grants to provide access to specific Twilio functionality. The <code>VoiceGrant</code> will give the client access to the voice calling capabilities in Twilio and use your TwiML app to route outgoing voice calls. By setting <code>IncomingAllow</code> to true, you enable incoming voice calls.

<p>You can quickly verify whether this works by running the server and making an HTTP request to <em>https://localhost:5003/token</em>.</p>

Start the server:

<pre style="color:#000000;background:#ffffff;">dotnet <span style="color:#2a00ff; ">run</span> -p <span style="color:#2a00ff; ">TwilioBlazorPhonecalls.Server</span>&#10;</pre>

Open a separate shell and run the following line to make an HTTP request to the token controller:

<pre style="color:#000000;background:#ffffff;">Invoke-WebRequest <span style="color:#2a00ff; ">https://localhost:5003/token</span>&#10;</pre>

The response status code should be 200, and you can find the encrypted authentication token in the Content property.

### Configure Cross-Origin Resource Sharing {#configure-cross-origin-resource-sharing}

The client will request the authentication token from within the browser. By default, the browser will not allow this due to Cross-Origin Resource Sharing (CORS) security measures.


To explicitly allow the client to make CORS requests, modify the server <code>Startup</code> class in <em>TwilioBlazorPhonecalls.Server\Startup.cs</em> by adding <a rel="noopener" href="https://docs.microsoft.com/en-us/aspnet/core/security/cors?view=aspnetcore-5.0#cors-with-named-policy-and-middleware" target="_blank">CORS Middleware</a> with a named policy.


Locate the following statement in the <code>ConfigureServices</code> method:

<pre style="color:#000000;background:#ffffff;">services.AddControllers();&#10;</pre>

Insert the following code immediately above:

<pre style="color:#000000;background:#ffffff;">services.AddCors(options =&gt;&#10;{&#10;    options.AddPolicy(name: <span style="color:#2a00ff; ">"</span><span style="color:#2a00ff; ">BlazorClientPolicy</span><span style="color:#2a00ff; ">"</span>, builder =&gt;&#10;    {&#10;        builder.WithOrigins(<span style="color:#2a00ff; ">"</span><span style="color:#2a00ff; ">https://localhost:5001</span><span style="color:#2a00ff; ">"</span>, <span style="color:#2a00ff; ">"</span><span style="color:#2a00ff; ">http://localhost:5000</span><span style="color:#2a00ff; ">"</span>);&#10;    });&#10;});&#10;</pre>

In the <code>Configure</code> method, locate the following statement:

<pre style="color:#000000;background:#ffffff;">app.UseAuthorization();&#10;</pre>

Add the following line immediately above:

<pre style="color:#000000;background:#ffffff;">app.UseCors();&#10;</pre>
<div class="block-rich_text">

<div class="rich-text">

A CORS policy has been configured in the <code>Startup</code> class, but you need to add the <code>EnableCorsAttribute</code> to <code>TokenController.Get</code> method for the CORS policy to apply.


In the <em>Controllers/TokenController.cs</em> file, modify the <code>TokenController</code> class by adding the following <code>using</code> directive for CORS:

<pre style="color:#000000;background:#ffffff;"><span style="color:#7f0055; font-weight:bold; ">using</span> Microsoft.AspNetCore.Cors;&#10;</pre>

Decorate the \`Get\` method with the EnableCors attribute so the beginning of the class looks like the following:

<pre style="color:#000000;background:#ffffff;"><span style="color:#7f0055; font-weight:bold; ">namespace</span> TwilioBlazorPhonecalls.Server.Controllers&#10;{&#10;    [ApiController]&#10;    [Route(<span style="color:#2a00ff; ">"</span><span style="color:#2a00ff; ">[controller]</span><span style="color:#2a00ff; ">"</span>)]&#10;    <span style="color:#7f0055; font-weight:bold; ">public</span> <span style="color:#7f0055; font-weight:bold; ">class</span> TokenController : ControllerBase&#10;    {&#10;        [HttpGet]&#10;        [EnableCors(<span style="color:#2a00ff; ">"</span><span style="color:#2a00ff; ">BlazorClientPolicy</span><span style="color:#2a00ff; ">"</span>)]&#10;        <span style="color:#7f0055; font-weight:bold; ">public</span> <span style="color:#7f0055; font-weight:bold; ">string</span> Get()&#10;        ...&#10;    }&#10;}&#10;</pre>

Ellipsis (<code>"...</code>") in the preceding code block indicates a section redacted for brevity.


You can verify this works by simulating a CORS preflight check.


Start the server:

<pre style="color:#000000;background:#ffffff;">dotnet <span style="color:#2a00ff; ">run</span> -p <span style="color:#2a00ff; ">TwilioBlazorPhonecalls.Server</span>&#10;</pre>

Open a separate shell and run the following command to make an HTTP request simulating a CORS request against the token controller:

<pre style="color:#000000;background:#ffffff;">Invoke-WebRequest <span style="color:#2a00ff; ">https://localhost:5003/token</span> -Method <span style="color:#2a00ff; ">Options</span> -Headers @{&#10;    <span style="color:#2a00ff; ">"</span><span style="color:#2a00ff; ">Access-Control-Request-Method</span><span style="color:#2a00ff; ">"</span> = <span style="color:#2a00ff; ">"</span><span style="color:#2a00ff; ">GET</span><span style="color:#2a00ff; ">"</span>&#10;    <span style="color:#2a00ff; ">"</span><span style="color:#2a00ff; ">Access-Control-Request-Headers</span><span style="color:#2a00ff; ">"</span> = <span style="color:#2a00ff; ">"</span><span style="color:#2a00ff; ">origin, x-requested-with</span><span style="color:#2a00ff; ">"</span>&#10;    <span style="color:#2a00ff; ">"</span><span style="color:#2a00ff; ">Origin</span><span style="color:#2a00ff; ">"</span> = <span style="color:#2a00ff; ">"</span><span style="color:#2a00ff; ">https://localhost:5001</span><span style="color:#2a00ff; ">"</span>&#10;}&#10;</pre>

The response should contain this header:

<pre style="color:#000000;background:#ffffff;">Access-Control-Allow-Origin: <span style="color:#3f3fbf; ">https://localhost:5001</span>&#10;</pre>
<p>When the browser sees this header it will allow <em>https://localhost:5001</em> to make HTTP requests to the server.</p>

## Building the Blazor WebAssembly client {#building-the-blazor-webassembly-client}

Blazor provides two <a rel="noopener" href="https://docs.microsoft.com/en-us/aspnet/core/blazor/hosting-models?view=aspnetcore-5.0" target="_blank">hosting models</a>, Blazor WebAssembly and Blazor Server. In WebAssembly projects the app, dependencies, and the .NET runtime are downloaded to the client-side browser. In the Blazor Server model the app is executed on the server from within an ASP.NET Core app and the user interface in the browser is updated using SignalR.


The client project for this application will use Blazor WebAssembly so the client can function independently of the server and the Twilio and other JavaScript libraries can be executed on the client machine.

### Create a Blazor WebAssembly project {#create-a-blazor-webassembly-project}

Use the following commands to create the Blazor WebAssembly (WASM) project using the .NET <code>blazorwasm</code> project template:

<pre style="color:#000000;background:#ffffff;"><span style="color:#3f7f59; "># creates folder and a blazor WASM project inside the new folder</span>&#10;dotnet <span style="color:#2a00ff; ">new</span> <span style="color:#2a00ff; ">blazorwasm</span> -o <span style="color:#2a00ff; ">TwilioBlazorPhonecalls.Client</span>&#10;&#10;<span style="color:#3f7f59; "># optionally, add the client project to the solution</span>&#10;dotnet <span style="color:#2a00ff; ">sln</span> <span style="color:#2a00ff; ">add</span> <span style="color:#2a00ff; ">TwilioBlazorPhonecalls.Client</span>&#10;</pre>
<p class="panel panel--info"><strong>Tip:</strong> If you’re building your solution with Visual Studio 2019, you can run this command in the <a rel="noopener" href="https://visualstudiomagazine.com/articles/2019/08/20/vs-powershell.aspx" target="_blank">Developer PowerShell</a> window. Be sure you’re in the directory where the solution (<em>.sln</em>) file is located.</p>

You can run your client project by running the following command:

<pre style="color:#000000;background:#ffffff;">dotnet <span style="color:#2a00ff; ">run</span> -p <span style="color:#2a00ff; ">TwilioBlazorPhonecalls.Client</span>&#10;</pre>

If you’re using Visual Studio to run your projects, use the Kestrel target instead of IIS Express.


For your convenience, you can also use the <code>dotnet watch run</code> alternative. This will automatically reload the .NET application as you edit. You can use this command to watch your project:

<pre style="color:#000000;background:#ffffff;">dotnet <span style="color:#2a00ff; ">watch</span> -p <span style="color:#2a00ff; ">TwilioBlazorPhonecalls.Client</span> <span style="color:#2a00ff; ">run</span>&#10;</pre>
<p>You can access the Blazor WASM client at <em>https://localhost:5001</em>.</p>

### Add JavaScript and CSS {#add-javascript-and-css}

Create a new folder at <em>TwilioBlazorPhonecalls.Client\wwwroot\js</em> and create an empty JavaScript file at <em>TwilioBlazorPhonecalls.Client\wwwroot\js\dialer.js</em>.


Update <em>TwilioBlazorPhonecalls.Client\wwwroot\index.html</em> to load the new JavaScript file by adding the following HTML to the bottom of the <code>&lt;head&gt;</code> element:

<pre style="color:#000000;background:#ffffff;"><span style="color:#7f0055; ">&lt;</span><span style="color:#7f0055; font-weight:bold; ">script</span> src=<span style="color:#2a00ff; ">"js/dialer.js"</span><span style="color:#7f0055; ">&gt;</span><span style="color:#7f0055; ">&lt;/</span><span style="color:#7f0055; font-weight:bold; ">script</span><span style="color:#7f0055; ">&gt;</span>&#10;</pre>

Append the following CSS to the existing CSS file at <em>TwilioBlazorPhonecalls.Client\wwwroot\css\app.css</em>:

<pre style="color:#000000;background:#ffffff;"><span style="color:#3f7f59; ">/* APPEND THE CODE BELOW TO THE EXISTING CSS, DO NOT REMOVE THE EXISTING CSS */</span>&#10;.dialer {&#10;    <span style="color:#7f0055; font-weight:bold; ">background-color</span>: #111;&#10;    <span style="color:#7f0055; font-weight:bold; ">position</span>: fixed;&#10;    <span style="color:#7f0055; font-weight:bold; ">bottom</span>: -510px;&#10;    <span style="color:#7f0055; font-weight:bold; ">right</span>: 30px;&#10;    <span style="color:#7f0055; font-weight:bold; ">padding</span>: 20px 30px;&#10;    <span style="color:#7f0055; font-weight:bold; ">width</span>: 295px;&#10;    <span style="color:#7f0055; font-weight:bold; ">border-top-left-radius</span>: 5px;&#10;    <span style="color:#7f0055; font-weight:bold; ">transition</span>: 1s bottom;&#10;    <span style="color:#7f0055; font-weight:bold; ">transform</span>: translate3d(0, 0, 0);&#10;    backface-visibility: hidden;&#10;    perspective: 1000px;&#10;}&#10;&#10;.dialer--show-top {&#10;    <span style="color:#7f0055; font-weight:bold; ">bottom</span>: -450px;&#10;}&#10;&#10;.dialer--incoming-call {&#10;    <span style="color:#7f0055; font-weight:bold; ">animation</span>: shake 1s <span style="color:#7f0055; font-weight:bold; ">cubic-bezier</span>(.36, .07, .19, .97) infinite both;&#10;}&#10;&#10;.dialer--show {&#10;    <span style="color:#7f0055; font-weight:bold; ">bottom</span>: 0;&#10;}&#10;&#10;.show-hide-button {&#10;    <span style="color:#7f0055; font-weight:bold; ">position</span>: absolute;&#10;    <span style="color:#7f0055; font-weight:bold; ">top</span>: -38px;&#10;    <span style="color:#7f0055; font-weight:bold; ">right</span>: 0;&#10;    <span style="color:#7f0055; font-weight:bold; ">border-bottom-right-radius</span>: 0;&#10;    <span style="color:#7f0055; font-weight:bold; ">border-bottom-left-radius</span>: 0;&#10;}&#10;&#10;.dial-pad <span style="color:#7f0055; font-weight:bold; ">button</span> {&#10;    <span style="color:#7f0055; font-weight:bold; ">display</span>: block;&#10;    <span style="color:#7f0055; font-weight:bold; ">float</span>: left;&#10;    <span style="color:#7f0055; font-weight:bold; ">border-radius</span>: 37.5px;&#10;    <span style="color:#7f0055; font-weight:bold; ">width</span>: 75px;&#10;    <span style="color:#7f0055; font-weight:bold; ">height</span>: 75px;&#10;    <span style="color:#7f0055; font-weight:bold; ">margin-bottom</span>: 5px;&#10;    <span style="color:#7f0055; font-weight:bold; ">margin-right</span>: 5px;&#10;    <span style="color:#7f0055; font-weight:bold; ">font-size</span>: 24px;&#10;}&#10;&#10;.dial-pad <span style="color:#7f0055; font-weight:bold; ">button</span>:<span style="color:#7f0055; font-weight:bold; ">nth-child</span>(3n) {&#10;    <span style="color:#7f0055; font-weight:bold; ">margin-right</span>: 0;&#10;}&#10;&#10;@<span style="color:#7f0055; ">keyframes</span> <span style="color:#2a00ff; ">shake</span> {&#10;    5%,&#10;    45% {&#10;        <span style="color:#7f0055; font-weight:bold; ">transform</span>: translate3d(-1px, 0, 0);&#10;    }&#10;    10%,&#10;    40% {&#10;        <span style="color:#7f0055; font-weight:bold; ">transform</span>: translate3d(1px, 0, 0);&#10;    }&#10;    15%,&#10;    25%,&#10;    35% {&#10;        <span style="color:#7f0055; font-weight:bold; ">transform</span>: translate3d(-2px, 0, 0);&#10;    }&#10;    20%,&#10;    30% {&#10;        <span style="color:#7f0055; font-weight:bold; ">transform</span>: translate3d(2px, 0, 0);&#10;    }&#10;}&#10;</pre>

This is all the CSS necessary for the dialer component you are about to create.

### Create a dummy Dialer component {#create-a-dummy-dialer-component}

Create a new folder in the Blazor WASM client named <em>Components</em> and create a component file named <em>Dialer.razor</em>.


Update <em>TwilioBlazorPhonecalls.Client\Components\Dialer.razor</em> with the starter code below:

<pre style="color:#000000;background:#ffffff;">@using Microsoft.Extensions.Logging&#10;@implements IDisposable&#10;@inject ILogger<span style="color:#7f0055; ">&lt;</span><span style="color:#7f0055; ">Dialer</span><span style="color:#7f0055; ">&gt;</span> logger&#10;&#10;<span style="color:#7f0055; ">&lt;</span><span style="color:#7f0055; font-weight:bold; ">div</span> class=<span style="color:#2a00ff; ">"dialer </span>&#10;<span style="color:#2a00ff; ">&nbsp;&nbsp;&nbsp;&nbsp;@(hasIncomingConnection || isTwilioDeviceConnected ? "</span>dialer--show-top<span style="color:#2a00ff; ">" : "</span><span style="color:#2a00ff; ">") </span>&#10;<span style="color:#2a00ff; ">&nbsp;&nbsp;&nbsp;&nbsp;@(hasIncomingConnection ? "</span>dialer--incoming-call<span style="color:#2a00ff; ">" : "</span><span style="color:#2a00ff; ">") </span>&#10;<span style="color:#2a00ff; ">&nbsp;&nbsp;&nbsp;&nbsp;@(showDialer ? "</span>dialer--show<span style="color:#2a00ff; ">" : "</span>dialer--hide<span style="color:#2a00ff; ">")"</span><span style="color:#7f0055; ">&gt;</span>&#10;    <span style="color:#7f0055; ">&lt;</span><span style="color:#7f0055; font-weight:bold; ">button</span> &#10;        class=<span style="color:#2a00ff; ">"show-hide-button btn @(showDialer ? "</span>btn-secondary<span style="color:#2a00ff; ">" : "</span>btn-success<span style="color:#2a00ff; ">")"</span> &#10;        @onclick=<span style="color:#2a00ff; ">"@(() =&gt; showDialer = !showDialer)"</span><span style="color:#7f0055; ">&gt;</span>&#10;        @(showDialer ? "hide" : "show") phone <span style="color:#7f0055; ">&lt;</span><span style="color:#7f0055; font-weight:bold; ">span</span> class=<span style="color:#2a00ff; ">"oi oi-phone"</span><span style="color:#7f0055; ">&gt;</span><span style="color:#7f0055; ">&lt;/</span><span style="color:#7f0055; font-weight:bold; ">span</span><span style="color:#7f0055; ">&gt;</span>&#10;    <span style="color:#7f0055; ">&lt;/</span><span style="color:#7f0055; font-weight:bold; ">button</span><span style="color:#7f0055; ">&gt;</span>&#10;    <span style="color:#7f0055; ">&lt;</span><span style="color:#7f0055; font-weight:bold; ">p</span> class=<span style="color:#2a00ff; ">"text-center text-light"</span><span style="color:#7f0055; ">&gt;</span>@(message != "" ?message : "Standing by")<span style="color:#7f0055; ">&lt;/</span><span style="color:#7f0055; font-weight:bold; ">p</span><span style="color:#7f0055; ">&gt;</span>&#10;    <span style="color:#7f0055; ">&lt;</span><span style="color:#7f0055; font-weight:bold; ">div</span> class=<span style="color:#2a00ff; ">"input-group w-100 mb-3"</span><span style="color:#7f0055; ">&gt;</span>&#10;        <span style="color:#7f0055; ">&lt;</span><span style="color:#7f0055; font-weight:bold; ">input</span> &#10;            @bind=<span style="color:#2a00ff; ">"dialNumber"</span> &#10;            @bind:event=<span style="color:#2a00ff; ">"oninput"</span>&#10;            disabled=<span style="color:#2a00ff; ">"@(!isTwilioDeviceReady || isTwilioDeviceConnected || hasIncomingConnection)"</span> &#10;            type=<span style="color:#2a00ff; ">"text"</span> &#10;            class=<span style="color:#2a00ff; ">"form-control text-center"</span> &#10;            placeholder=<span style="color:#2a00ff; ">"Phone number"</span><span style="color:#7f0055; ">&gt;</span>&#10;        <span style="color:#7f0055; ">&lt;</span><span style="color:#7f0055; font-weight:bold; ">div</span> class=<span style="color:#2a00ff; ">"input-group-append"</span><span style="color:#7f0055; ">&gt;</span>&#10;            <span style="color:#7f0055; ">&lt;</span><span style="color:#7f0055; font-weight:bold; ">button</span> &#10;                @onclick=<span style="color:#2a00ff; ">"RemoveKey"</span> &#10;                disabled=<span style="color:#2a00ff; ">"@(!isTwilioDeviceReady || isTwilioDeviceConnected || hasIncomingConnection || dialNumber.Length == 0)"</span> &#10;                class=<span style="color:#2a00ff; ">"btn btn-outline-secondary"</span> &#10;                type=<span style="color:#2a00ff; ">"button"</span><span style="color:#7f0055; ">&gt;</span><span style="color:#7f0055; ">&lt;</span><span style="color:#7f0055; font-weight:bold; ">span</span><span style="color:#7f0055; "></span>&#10;                class=<span style="color:#2a00ff; ">"oi oi-delete"</span><span style="color:#7f0055; ">&gt;</span><span style="color:#7f0055; ">&lt;/</span><span style="color:#7f0055; font-weight:bold; ">span</span><span style="color:#7f0055; ">&gt;</span><span style="color:#7f0055; ">&lt;/</span><span style="color:#7f0055; font-weight:bold; ">button</span><span style="color:#7f0055; ">&gt;</span>&#10;        <span style="color:#7f0055; ">&lt;/</span><span style="color:#7f0055; font-weight:bold; ">div</span><span style="color:#7f0055; ">&gt;</span>&#10;    <span style="color:#7f0055; ">&lt;/</span><span style="color:#7f0055; font-weight:bold; ">div</span><span style="color:#7f0055; ">&gt;</span>&#10;    <span style="color:#7f0055; ">&lt;</span><span style="color:#7f0055; font-weight:bold; ">div</span> class=<span style="color:#2a00ff; ">"dial-pad clearfix w-100 mb-3"</span><span style="color:#7f0055; ">&gt;</span>&#10;        @foreach (var dialKey in dialKeys)&#10;        {&#10;            <span style="color:#7f0055; ">&lt;</span><span style="color:#7f0055; font-weight:bold; ">button</span> &#10;                @onclick=<span style="color:#2a00ff; ">"() =&gt; PressKey(dialKey)"</span> class=<span style="color:#2a00ff; ">"btn btn-dark"</span> type=<span style="color:#2a00ff; ">"button"</span>&#10;                disabled=<span style="color:#2a00ff; ">"@(!isTwilioDeviceReady)"</span>&#10;                <span style="color:#7f0055; ">&gt;</span>@d<span style="color:#7f0055; ">ialKey</span>&lt;/button<span style="color:#7f0055; ">&gt;</span>&#10;        }&#10;    <span style="color:#7f0055; ">&lt;/</span><span style="color:#7f0055; font-weight:bold; ">div</span><span style="color:#7f0055; ">&gt;</span>&#10;    <span style="color:#7f0055; ">&lt;</span><span style="color:#7f0055; font-weight:bold; ">div</span> class=<span style="color:#2a00ff; ">"btn-group w-100"</span><span style="color:#7f0055; ">&gt;</span>&#10;        @if(hasIncomingConnection){&#10;            <span style="color:#7f0055; ">&lt;</span><span style="color:#7f0055; font-weight:bold; ">button</span> &#10;                @onclick=<span style="color:#2a00ff; ">"RejectCall"</span> &#10;                type=<span style="color:#2a00ff; ">"button"</span> &#10;                class=<span style="color:#2a00ff; ">"btn btn-danger w-50"</span>&#10;                <span style="color:#7f0055; ">&gt;</span>Re<span style="color:#7f0055; ">ject</span>&lt;/button<span style="color:#7f0055; ">&gt;</span>&#10;            <span style="color:#7f0055; ">&lt;</span><span style="color:#7f0055; font-weight:bold; ">button</span> &#10;                @onclick=<span style="color:#2a00ff; ">"AcceptCall"</span> &#10;                type=<span style="color:#2a00ff; ">"button"</span> &#10;                class=<span style="color:#2a00ff; ">"btn btn-success w-50"</span>&#10;                <span style="color:#7f0055; ">&gt;</span>Ac<span style="color:#7f0055; ">cept</span>&lt;/button<span style="color:#7f0055; ">&gt;</span>&#10;        }else{&#10;            <span style="color:#7f0055; ">&lt;</span><span style="color:#7f0055; font-weight:bold; ">button</span> &#10;                @onclick=<span style="color:#2a00ff; ">"EndCall"</span> &#10;                disabled=<span style="color:#2a00ff; ">"@(!isTwilioDeviceReady || !isTwilioDeviceConnected)"</span> &#10;                type=<span style="color:#2a00ff; ">"button"</span> &#10;                class=<span style="color:#2a00ff; ">"btn btn-danger w-50"</span>&#10;                <span style="color:#7f0055; ">&gt;</span>Ha<span style="color:#7f0055; ">ng</span> up&lt;/button<span style="color:#7f0055; ">&gt;</span>&#10;            <span style="color:#7f0055; ">&lt;</span><span style="color:#7f0055; font-weight:bold; ">button</span> &#10;                @onclick=<span style="color:#2a00ff; ">"StartCall"</span> &#10;                disabled=<span style="color:#2a00ff; ">"@(!isTwilioDeviceReady || isTwilioDeviceConnected || dialNumber.Length == 0)"</span> &#10;                type=<span style="color:#2a00ff; ">"button"</span> &#10;                class=<span style="color:#2a00ff; ">"btn btn-success w-50"</span>&#10;                <span style="color:#7f0055; ">&gt;</span>Call<span style="color:#7f0055; ">&lt;/</span><span style="color:#7f0055; font-weight:bold; ">button</span><span style="color:#7f0055; ">&gt;</span>&#10;        }&#10;    <span style="color:#7f0055; ">&lt;/</span><span style="color:#7f0055; font-weight:bold; ">div</span><span style="color:#7f0055; ">&gt;</span>&#10;<span style="color:#7f0055; ">&lt;/</span><span style="color:#7f0055; font-weight:bold; ">div</span><span style="color:#7f0055; ">&gt;</span>&#10;&#10;@code{&#10;    <span style="color:#7f0055; font-weight:bold; ">private</span> <span style="color:#7f0055; font-weight:bold; ">static</span> <span style="color:#7f0055; font-weight:bold; ">readonly</span> <span style="color:#7f0055; font-weight:bold; ">string</span> dialKeys = <span style="color:#2a00ff; ">"</span><span style="color:#2a00ff; ">123456789*0#</span><span style="color:#2a00ff; ">"</span>;&#10;    <span style="color:#7f0055; font-weight:bold; ">private</span> <span style="color:#7f0055; font-weight:bold; ">bool</span> showDialer = <span style="color:#7f0055; font-weight:bold; ">false</span>;&#10;    <span style="color:#7f0055; font-weight:bold; ">private</span> <span style="color:#7f0055; font-weight:bold; ">string</span> message = <span style="color:#2a00ff; ">"</span><span style="color:#2a00ff; ">"</span>;&#10;    <span style="color:#7f0055; font-weight:bold; ">private</span> <span style="color:#7f0055; font-weight:bold; ">string</span> dialNumber = <span style="color:#2a00ff; ">"</span><span style="color:#2a00ff; ">"</span>;&#10;    <span style="color:#7f0055; font-weight:bold; ">private</span> <span style="color:#7f0055; font-weight:bold; ">bool</span> isTwilioDeviceReady = <span style="color:#7f0055; font-weight:bold; ">false</span>;&#10;    <span style="color:#7f0055; font-weight:bold; ">private</span> <span style="color:#7f0055; font-weight:bold; ">bool</span> isTwilioDeviceConnected = <span style="color:#7f0055; font-weight:bold; ">false</span>;&#10;    <span style="color:#7f0055; font-weight:bold; ">private</span> <span style="color:#7f0055; font-weight:bold; ">bool</span> hasIncomingConnection = <span style="color:#7f0055; font-weight:bold; ">false</span>;&#10;    &#10;    <span style="color:#7f0055; font-weight:bold; ">private</span> <span style="color:#7f0055; font-weight:bold; ">void</span> PressKey(<span style="color:#7f0055; font-weight:bold; ">char</span> key) =&gt; dialNumber += key;&#10;&#10;    <span style="color:#7f0055; font-weight:bold; ">private</span> <span style="color:#7f0055; font-weight:bold; ">void</span> RemoveKey() =&gt; dialNumber = dialNumber.Remove(dialNumber.Length - 1);&#10;&#10;    <span style="color:#7f0055; font-weight:bold; ">private</span> async Task StartCall()&#10;    {&#10;        <span style="color:#3f7f59; ">// TO IMPLEMENT</span>&#10;    }&#10;&#10;    <span style="color:#7f0055; font-weight:bold; ">private</span> async Task EndCall()&#10;    {&#10;        <span style="color:#3f7f59; ">// TO IMPLEMENT</span>&#10;    }&#10;&#10;    <span style="color:#7f0055; font-weight:bold; ">private</span> async Task RejectCall()&#10;    {&#10;        hasIncomingConnection = <span style="color:#7f0055; font-weight:bold; ">false</span>;&#10;        message = <span style="color:#2a00ff; ">"</span><span style="color:#2a00ff; ">"</span>;&#10;        <span style="color:#3f7f59; ">// TO IMPLEMENT</span>&#10;    }&#10;&#10;    <span style="color:#7f0055; font-weight:bold; ">private</span> async Task AcceptCall()&#10;    {&#10;        <span style="color:#3f7f59; ">// TO IMPLEMENT</span>&#10;    }&#10;&#10;    <span style="color:#7f0055; font-weight:bold; ">protected</span> <span style="color:#7f0055; font-weight:bold; ">override</span> async Task OnInitializedAsync()&#10;    {&#10;        <span style="color:#3f7f59; ">// TO IMPLEMENT</span>&#10;    }&#10;&#10;    <span style="color:#7f0055; font-weight:bold; ">public</span> <span style="color:#7f0055; font-weight:bold; ">void</span> Dispose()&#10;    {&#10;        <span style="color:#3f7f59; ">// TO IMPLEMENT</span>&#10;    }&#10;}&#10;</pre>

The HTML and CSS of the Dialer component are completed, the stub .NET methods are wired up to the buttons, and the private fields are bound to render the component. The only things left to do are implement the C#, implement the JavaScript, and integrate both — which is what you’ll do later in this tutorial.


Add the new component to the bottom of <em>TwilioBlazorPhonecalls.Client\App.razor</em>:

<pre style="color:#000000;background:#ffffff;">@using TwilioBlazorPhonecalls.Client.Components&#10;<span style="color:#7f0055; ">&lt;</span><span style="color:#7f0055; ">Router</span> AppAssembly=<span style="color:#2a00ff; ">"@typeof(Program).Assembly"</span><span style="color:#7f0055; ">&gt;</span>&#10;    <span style="color:#7f0055; ">&lt;</span><span style="color:#7f0055; ">Found</span> Context=<span style="color:#2a00ff; ">"routeData"</span><span style="color:#7f0055; ">&gt;</span>&#10;        <span style="color:#7f0055; ">&lt;</span><span style="color:#7f0055; ">RouteView</span> RouteData=<span style="color:#2a00ff; ">"@routeData"</span> DefaultLayout=<span style="color:#2a00ff; ">"@typeof(MainLayout)"</span> <span style="color:#7f0055; ">/&gt;</span>&#10;    <span style="color:#7f0055; ">&lt;/</span><span style="color:#7f0055; ">Found</span><span style="color:#7f0055; ">&gt;</span>&#10;    <span style="color:#7f0055; ">&lt;</span><span style="color:#7f0055; ">NotFound</span><span style="color:#7f0055; ">&gt;</span>&#10;        <span style="color:#7f0055; ">&lt;</span><span style="color:#7f0055; ">LayoutView</span> Layout=<span style="color:#2a00ff; ">"@typeof(MainLayout)"</span><span style="color:#7f0055; ">&gt;</span>&#10;            <span style="color:#7f0055; ">&lt;</span><span style="color:#7f0055; font-weight:bold; ">p</span><span style="color:#7f0055; ">&gt;</span>Sorry, there's nothing at this address.<span style="color:#7f0055; ">&lt;/</span><span style="color:#7f0055; font-weight:bold; ">p</span><span style="color:#7f0055; ">&gt;</span>&#10;        <span style="color:#7f0055; ">&lt;/</span><span style="color:#7f0055; ">LayoutView</span><span style="color:#7f0055; ">&gt;</span>&#10;    <span style="color:#7f0055; ">&lt;/</span><span style="color:#7f0055; ">NotFound</span><span style="color:#7f0055; ">&gt;</span>&#10;<span style="color:#7f0055; ">&lt;/</span><span style="color:#7f0055; ">Router</span><span style="color:#7f0055; ">&gt;</span>&#10;<span style="color:#7f0055; ">&lt;</span><span style="color:#7f0055; ">Dialer</span> <span style="color:#7f0055; ">/&gt;</span>&#10;</pre>

When you run the client you will see the fully-styled dialer component.

## Installing the Twilio Client JS SDK {#installing-the-twilio-client-js-sdk}

The Twilio Client JS SDK contains functionality to connect to Twilio and make VoIP calls from JavaScript client applications.


To get started you can install the <a rel="noopener" href="https://www.npmjs.com/package/twilio-client" target="_blank">twilio-client</a> npm package. Twilio strongly recommends including <em>twilio.js</em> in your applications via npm before going to production. Learn more in the <a rel="noopener" href="https://www.twilio.com/docs/voice/client/javascript/changelog" target="_blank">Twilio Client JavaScript SDK Changelog</a>.


To make this tutorial more convenient, you can use <em>twilio.js</em> directly from the Twilio CDN.


Add the following Twilio CDN script reference before the <em>js/dialer.js</em> reference in <em>TwilioBlazorPhonecalls.Client\wwwroot\index.html</em>:

</div>

</div>

</div>

</div>
<div class="block-rich_text">

<pre style="color:#000000;background:#ffffff;"><span style="color:#7f0055; ">&lt;</span><span style="color:#7f0055; font-weight:bold; ">script</span> src=<span style="color:#2a00ff; ">"https://sdk.twilio.com/js/client/v1.13/twilio.js"</span><span style="color:#7f0055; ">&gt;</span><span style="color:#7f0055; ">&lt;/</span><span style="color:#7f0055; font-weight:bold; ">script</span><span style="color:#7f0055; ">&gt;</span>&#10;</pre>

</div>
<div class="block-rich_text">

You can learn more about the <a rel="noopener" href="https://www.twilio.com/docs/voice/client/javascript" target="_blank">Twilio Client JS SDK</a> in Twilio’s documentation.

## Managing Twilio calls with JavaScript {#managing-twilio-calls-with-javascript}

Now that the Twilio Client JS SDK has been installed in the Blazor Client you can start using the library to manage calls.


Inside <em>TwilioBlazorPhonecalls.Client\wwwroot\js\dialer.js</em>, you’ll need to add JavaScript functions that are accessible from .NET.


Declare a global variable called <code>dialer</code> or explicitly declare the <code>dialer</code> variable as a property on the <code>window</code> object, which achieves the same result. Initialize the <code>dialer</code> variable with an object holding the following properties and functions.


Add the following JavaScript code to <em>TwilioBlazorPhonecalls.Client\wwwroot\js\dialer.js</em>:

<pre style="color:#000000;background:#ffffff;">window.dialer = {&#10;    device: <span style="color:#7f0055; font-weight:bold; ">new</span> Twilio.Device(),&#10;    setupTwilioDevice: <span style="color:#7f0055; font-weight:bold; ">function</span> (jwtToken) {&#10;        <span style="color:#7f0055; font-weight:bold; ">var</span> options = {&#10;            closeProtection: <span style="color:#7f0055; font-weight:bold; ">true</span> <span style="color:#3f7f59; ">// will warn user if you try to close browser window during an active call</span>&#10;        };&#10;        <span style="color:#7f0055; font-weight:bold; ">this</span>.device.setup(jwtToken, options);&#10;    },&#10;    setupTwilioEvents: <span style="color:#7f0055; font-weight:bold; ">function</span> () {&#10;        <span style="color:#3f7f59; ">// inside of Twilio events scope the 'this' context is redefined and will not point to 'window.dialer'</span>&#10;        <span style="color:#3f7f59; ">// the variable 'self' is introduced to conveniently access the 'this' context from the outer scope inside of the events scope</span>&#10;        <span style="color:#7f0055; font-weight:bold; ">var</span> self = <span style="color:#7f0055; font-weight:bold; ">this</span>;&#10;        <span style="color:#7f0055; font-weight:bold; ">this</span>.device.on(<span style="color:#2a00ff; ">'</span><span style="color:#2a00ff; ">ready</span><span style="color:#2a00ff; ">'</span>, <span style="color:#7f0055; font-weight:bold; ">function</span> () {&#10;            <span style="color:#3f7f59; ">// notify Blazor Component</span>&#10;        });&#10;&#10;        <span style="color:#7f0055; font-weight:bold; ">this</span>.device.on(<span style="color:#2a00ff; ">'</span><span style="color:#2a00ff; ">error</span><span style="color:#2a00ff; ">'</span>, <span style="color:#7f0055; font-weight:bold; ">function</span> (error) {&#10;            console.error(error);&#10;            <span style="color:#3f7f59; ">// notify Blazor Component</span>&#10;        });&#10;&#10;        <span style="color:#7f0055; font-weight:bold; ">this</span>.device.on(<span style="color:#2a00ff; ">'</span><span style="color:#2a00ff; ">connect</span><span style="color:#2a00ff; ">'</span>, <span style="color:#7f0055; font-weight:bold; ">function</span> (connection) {&#10;            <span style="color:#7f0055; font-weight:bold; ">if</span> (connection.direction === <span style="color:#2a00ff; ">"</span><span style="color:#2a00ff; ">OUTGOING</span><span style="color:#2a00ff; ">"</span>) {&#10;                <span style="color:#3f7f59; ">// notify Blazor Component</span>&#10;            } <span style="color:#7f0055; font-weight:bold; ">else</span> {&#10;                <span style="color:#3f7f59; ">// notify Blazor Component</span>&#10;            }&#10;        });&#10;&#10;        <span style="color:#7f0055; font-weight:bold; ">this</span>.device.on(<span style="color:#2a00ff; ">'</span><span style="color:#2a00ff; ">disconnect</span><span style="color:#2a00ff; ">'</span>, <span style="color:#7f0055; font-weight:bold; ">function</span> () {&#10;            <span style="color:#3f7f59; ">// notify Blazor Component</span>&#10;        });&#10;&#10;        <span style="color:#7f0055; font-weight:bold; ">this</span>.device.on(<span style="color:#2a00ff; ">'</span><span style="color:#2a00ff; ">incoming</span><span style="color:#2a00ff; ">'</span>, <span style="color:#7f0055; font-weight:bold; ">function</span> (connection) {&#10;            <span style="color:#3f7f59; ">// notify Blazor Component</span>&#10;        });&#10;&#10;        <span style="color:#7f0055; font-weight:bold; ">this</span>.device.on(<span style="color:#2a00ff; ">'</span><span style="color:#2a00ff; ">cancel</span><span style="color:#2a00ff; ">'</span>, <span style="color:#7f0055; font-weight:bold; ">function</span> () {&#10;            <span style="color:#3f7f59; ">// notify Blazor Component</span>&#10;        });&#10;    },&#10;    startCall: <span style="color:#7f0055; font-weight:bold; ">function</span> (phoneNumber) {&#10;        <span style="color:#3f7f59; ">// To parameter is a defined property by Twilio, but you could just as well use any other property name</span>&#10;        <span style="color:#3f7f59; ">// and it will be passed to your TwiML webhook as meta data</span>&#10;        <span style="color:#7f0055; font-weight:bold; ">this</span>.device.connect({ <span style="color:#2a00ff; ">"</span><span style="color:#2a00ff; ">To</span><span style="color:#2a00ff; ">"</span>: phoneNumber });&#10;    },&#10;    endCall: <span style="color:#7f0055; font-weight:bold; ">function</span> () {&#10;        <span style="color:#7f0055; font-weight:bold; ">var</span> connection = <span style="color:#7f0055; font-weight:bold; ">this</span>.device.activeConnection();&#10;        <span style="color:#7f0055; font-weight:bold; ">if</span> (connection) {&#10;            connection.disconnect();&#10;        }&#10;    },&#10;    acceptCall: <span style="color:#7f0055; font-weight:bold; ">function</span> () {&#10;        <span style="color:#7f0055; font-weight:bold; ">var</span> connection = <span style="color:#7f0055; font-weight:bold; ">this</span>.device.activeConnection();&#10;        <span style="color:#7f0055; font-weight:bold; ">if</span> (connection) {&#10;            connection.accept();&#10;        }&#10;    },&#10;    rejectCall: <span style="color:#7f0055; font-weight:bold; ">function</span> () {&#10;        <span style="color:#7f0055; font-weight:bold; ">var</span> connection = <span style="color:#7f0055; font-weight:bold; ">this</span>.device.activeConnection();&#10;        <span style="color:#7f0055; font-weight:bold; ">if</span> (connection) {&#10;            connection.reject();&#10;        }&#10;    },&#10;    destroy: <span style="color:#7f0055; font-weight:bold; ">function</span> () {&#10;        <span style="color:#7f0055; font-weight:bold; ">this</span>.device.destroy();&#10;    }&#10;};&#10;</pre>

Here’s an overview of the properties and functions inside of the <code>dialer</code> object:


<strong>device</strong>: <code>Twilio.Device</code> is a virtual phone, if you will. This class holds the functions to connect to Twilio, accept calls, deny calls, etc. On page load, an instance of <code>Twilio.Device</code> will be created and stored in <code>window.dialer.device</code>.


<strong>setupTwilioDevice</strong>: This function accepts a <code>jwtToken</code> argument, a <a rel="noopener" href="https://jwt.io/" target="_blank">JSON Web Token</a> that is the authentication token necessary to connect to Twilio. This token also includes the necessary information for Twilio to identify your TwiML application holding your voice webhook URL. The <code>jwtToken</code> will be passed in from Blazor .NET after having been  generated by your server project.


This function will call the <code>setup</code> function on the <code>Twilio.Device</code> instance, which will perform the authentication against Twilio.


<strong>setupTwilioEvents</strong>: This function configures all relevant events for the dialer component:


- <strong>ready</strong>: triggers when the <code>Twilio.Device</code> is ready to make and receive phone calls after successfully authenticating with Twilio
- <strong>error</strong>: triggers when any error occurs
- <strong>connect</strong>: triggers when an incoming or outgoing connection is established
- <strong>disconnect</strong>: triggers when the connection is closed
- <strong>incoming</strong>: triggers when there’s an incoming connection
- <strong>cancel</strong>: triggers when a connection was closed before it was accepted


When these events occur, the relevant information should be passed to the Blazor Dialer component in .NET so it can update its state appropriately. You’ll replace the stubs with functional code in a forthcoming step.


<strong>startCall</strong>: use this function to initiate a phone call to the specified <code>phonenumber</code>. This function accepts a <code>phonenumber</code> which will be passed to the <code>connect</code> function on the <code>Twilio.Device</code> instance. The <code>phonenumber</code> is passed as metadata to the voice webhook configured in your TwiML application.


This function is step 1 of the <em>Figure 1: Workflow diagram for outgoing phone calls</em> and initiates the entire workflow.


<strong>endCall</strong>: When there’s an active phone call, you can use this function to end the call.<br>It retrieves the active connection using the <code>activeConnection</code> function on the <code>Twilio.Device</code> instance. If the <code>activeConnection</code> function returns a connection, the <code>disconnect</code> function will be called on the connection which will close the connection.


<strong>acceptCall</strong>: When there’s an incoming phone call, you can use this function to accept the call. It retrieves the active connection using the <code>activeConnection</code> function on the <code>Twilio.Device</code> instance. If the <code>activeConnection</code> function returns a connection, the <code>accept</code> function will be called on the connection which will start the phone call.


<strong>rejectCall</strong>: When there’s an incoming phone call, you can use this function to reject the call. It retrieves the active connection using the <code>activeConnection</code> function on the <code>Twilio.Device</code> instance. If the <code>activeConnection</code> function returns a connection, the <code>reject</code> function will be called on the connection which will reject the phone call.


<strong>destroy</strong>: This function calls the <code>destroy</code> function on the <code>Twilio.Device</code> instance. It cleans up all event listeners, connections, etc. You should call this function to clean up any resources when removing the Dialer component from the Blazor application.

## Integrating JavaScript with the Blazor Dialer component {#integrating-javascript-with-the-blazor-dialer-component}

Blazor introduced a way to call JavaScript functions from .NET, and .NET methods from JavaScript, a process referred to as JavaScript Interop.

### Call JavaScript functions from the Blazor Dialer component {#call-javascript-functions-from-the-blazor-dialer-component}

To invoke JavaScript functions from Blazor you need an instance of the <code>IJSRuntime</code> interface.


You can obtain an instance using <a rel="noopener" href="https://docs.microsoft.com/en-us/aspnet/core/blazor/fundamentals/dependency-injection" target="_blank">ASP.NET Core Blazor dependency injection</a>. If you want to have the <code>IJSRuntime</code> injected into a <em>.razor</em> component, use the <code>@inject</code> directive at the top of your component, like this:

<pre style="color:#000000;background:#ffffff;">@inject IJSRuntime js&#10;</pre>

There are two instance methods used to call JavaScript functions from .NET using the <code>IJSRuntime</code> class:


<strong>InvokeAsync</strong>: This method will invoke the specified JavaScript function. It has one required parameter: a string to specify which JavaScript function to run. After the required parameter, you can pass as many extra parameters as you need to. Those subsequent parameters will be passed along to the JavaScript function.


You also must specify the return type you are expecting to receive from the JavaScript function using the generic type parameter. Blazor will try to convert the JavaScript return value to the requested .NET type.


<strong>InvokeVoidAsync</strong>: As the name gives away, this method functions like InvokeAsync, but it doesn't return the JavaScript return value.

<p class="panel panel--info"><strong>Note</strong>: Even though the JavaScript return value isn't returned to you, it is still converted to a .NET type and then discarded. This behavior will change in future versions so that the JavaScript return value isn't unnecessarily converted.</p>

For more details on JavaScript interop, read <a rel="noopener" href="https://swimburger.net/blog/dotnet/communicating-between-dotnet-and-javascript-in-blazor-with-in-browser-samples" target="_blank">Communicating between .NET and JavaScript in Blazor with in-browser samples</a>.


Update <em>TwilioBlazorPhonecalls.Client\Components\Dialer.razor</em> so an instance of <code>IJSRuntime</code> is injected by adding the following line below <code>@inject ILogger&lt;Dialer&gt; logger</code>:

<pre style="color:#000000;background:#ffffff;">@inject IJSRuntime js&#10;</pre>

Wire up the .NET methods in <em>Dialer.razor</em> so they call the relevant JavaScript functions using <code>InvokeVoidAsync</code> by replacing the existing methods with <code>// TO IMPLEMENT</code> comments using the following C# code:

<pre style="color:#000000;background:#ffffff;"><span style="color:#7f0055; font-weight:bold; ">private</span> async Task StartCall()&#10;{&#10;    await js.InvokeVoidAsync(<span style="color:#2a00ff; ">"</span><span style="color:#2a00ff; ">dialer.startCall</span><span style="color:#2a00ff; ">"</span>, dialNumber);&#10;}&#10;&#10;<span style="color:#7f0055; font-weight:bold; ">private</span> async Task EndCall()&#10;{&#10;    await js.InvokeVoidAsync(<span style="color:#2a00ff; ">"</span><span style="color:#2a00ff; ">dialer.endCall</span><span style="color:#2a00ff; ">"</span>);&#10;}&#10;&#10;<span style="color:#7f0055; font-weight:bold; ">private</span> async Task AcceptCall()&#10;{&#10;    await js.InvokeVoidAsync(<span style="color:#2a00ff; ">"</span><span style="color:#2a00ff; ">dialer.acceptCall</span><span style="color:#2a00ff; ">"</span>);&#10;}&#10;&#10;<span style="color:#7f0055; font-weight:bold; ">private</span> async Task RejectCall()&#10;{&#10;    hasIncomingConnection = <span style="color:#7f0055; font-weight:bold; ">false</span>;&#10;    message = <span style="color:#2a00ff; ">"</span><span style="color:#2a00ff; ">"</span>;&#10;    await js.InvokeVoidAsync(<span style="color:#2a00ff; ">"</span><span style="color:#2a00ff; ">dialer.rejectCall</span><span style="color:#2a00ff; ">"</span>);&#10;}&#10;&#10;<span style="color:#7f0055; font-weight:bold; ">protected</span> <span style="color:#7f0055; font-weight:bold; ">override</span> async Task OnInitializedAsync()&#10;{&#10;    await js.InvokeVoidAsync(<span style="color:#2a00ff; ">"</span><span style="color:#2a00ff; ">dialer.setupTwilioEvents</span><span style="color:#2a00ff; ">"</span>);&#10;    <span style="color:#7f0055; font-weight:bold; ">var</span> jwtToken = await GetTwilioAuthenticationTokenAsync();&#10;    await js.InvokeVoidAsync(<span style="color:#2a00ff; ">"</span><span style="color:#2a00ff; ">dialer.setupTwilioDevice</span><span style="color:#2a00ff; ">"</span>, jwtToken);&#10;}&#10;&#10;<span style="color:#7f0055; font-weight:bold; ">private</span> async Task&lt;<span style="color:#7f0055; font-weight:bold; ">string</span>&gt; GetTwilioAuthenticationTokenAsync()&#10;{&#10;    <span style="color:#3f7f59; ">// </span><span style="color:#ffffff; background:#808000; ">TODO: jwtToken will need to be retrieved from the backend using HttpClient</span>&#10;    <span style="color:#3f7f59; ">// use a dummy value for now </span>&#10;    <span style="color:#7f0055; font-weight:bold; ">return</span> <span style="color:#2a00ff; ">"</span><span style="color:#2a00ff; ">TEMP TOKEN (WILL NOT WORK)</span><span style="color:#2a00ff; ">"</span>;&#10;}&#10;&#10;<span style="color:#3f7f59; ">// IAsyncDisposable isn't supported in Blazor .NET Core 3.1, but will be in future versions</span>&#10;<span style="color:#3f7f59; ">// for now use IDisposable and fire and forget a task to call dialer.destroy</span>&#10;<span style="color:#7f0055; font-weight:bold; ">public</span> <span style="color:#7f0055; font-weight:bold; ">void</span> Dispose()&#10;{&#10;    js.InvokeVoidAsync(<span style="color:#2a00ff; ">"</span><span style="color:#2a00ff; ">dialer.destroy</span><span style="color:#2a00ff; ">"</span>);&#10;}&#10;</pre>

The new code does the following:


<strong>StartCall</strong>: Invoked when clicking the “Call” button. Invokes the <code>dialer.startCall</code> JavaScript function and passes <code>dialNumber</code> (bound to input) as a parameter.


<strong>EndCall</strong>: Invoked when clicking the “Hang up” button. Invokes the <code>dialer.endCall</code> JavaScript function.


<strong>AcceptCall</strong>: Invoked when clicking the “Accept” button. The “Accept” button is only visible when the boolean field <code>hasIncomingConnection</code> is set to true. Invokes the  <code>dialer.acceptCall</code> JavaScript function.


<strong>RejectCall</strong>: Invoked when clicking the “Reject” button. The “Reject” button is only visible when the boolean field <code>hasIncomingConnection</code> is set to true. Invokes the <code>dialer.rejectCall</code> JavaScript function.


<strong>Dispose</strong>: Not all Blazor components need to implement the <code>IDisposible</code> interface, but if you have some resources to clean up you should implement it. In this case, the <code>dialer.destroy</code> JavaScript function is invoked inside the <code>Dispose</code> method. You can’t await the async <code>InvokeVoidAsync</code>, but you can still call it and it will “fire and forget”.

<p class="panel panel--info"><strong>Note</strong>: In .NET 5.0, Blazor supports <code>IAsyncDisposable</code>, so you can await the async method. You can see the implementation <a rel="noopener" href="https://github.com/Swimburger/TwilioBlazorPhonecalls/blob/dotnet-5/TwilioBlazorPhonecalls.Client/Components/Dialer.razor" target="_blank">here</a> in the companion repository.</p>

### Fetch the Twilio authentication token {#fetch-the-twilio-authentication-token}

Instead of returning a dummy string as an authentication token, you need to fetch the authentication token from the <code>TokenController</code> from the server.

<p>Add a static <code>HttpClient</code> at the top of the code section of <em>Dialer.razor</em> and update the <code>GetTwilioAuthenticationTokenAsync</code> method to send a GET request to <em>https://localhost:5003/token</em> by inserting the following statement after <code>@code</code>:</p>
<pre style="color:#000000;background:#ffffff;"><span style="color:#7f0055; font-weight:bold; ">private</span> <span style="color:#7f0055; font-weight:bold; ">static</span> <span style="color:#7f0055; font-weight:bold; ">readonly</span> HttpClient httpClient = <span style="color:#7f0055; font-weight:bold; ">new</span> HttpClient();&#10;</pre>

Replace the body of the method so it looks like the following:

<pre style="color:#000000;background:#ffffff;"><span style="color:#7f0055; font-weight:bold; ">private</span> async Task&lt;<span style="color:#7f0055; font-weight:bold; ">string</span>&gt; GetTwilioAuthenticationTokenAsync()&#10;{&#10;    <span style="color:#7f0055; font-weight:bold; ">var</span> jwtToken = await httpClient.GetStringAsync(<span style="color:#2a00ff; ">"</span><span style="color:#2a00ff; ">https://localhost:5003/token</span><span style="color:#2a00ff; ">"</span>);&#10;    <span style="color:#7f0055; font-weight:bold; ">return</span> jwtToken;&#10;}&#10;</pre>

If you’ve been coding this solution in Visual Studio 2019, all your errors and warnings should be resolved at this point.

### Call .NET methods from JavaScript {#call-net-methods-from-javascript}

In addition to calling JavaScript functions from .NET, you can also call .NET methods from JavaScript. You must decorate the .NET methods you want to expose to JavaScript using the <a rel="noopener" href="https://docs.microsoft.com/en-us/dotnet/api/microsoft.jsinterop.jsinvokableattribute?view=aspnetcore-5.0" target="_blank">JSInvokable</a> attribute.


You can call .NET instance methods, but you need a reference to the object before you can invoke its methods. You can create a <code>DotNetObjectReference</code> instance by calling <code>DotNetObjectReference.Create</code>. You need to pass in the object you want a reference to as a parameter. When a <code>DotNetObjectReference</code> is returned to JavaScript from a .NET method or passed to a JavaScript function, it is converted to a JavaScript object which you can use to call the methods on the .NET object.


The JavaScript object converted from a DotNetObjectReference instance has two functions to invoke .NET methods:


<strong>invokeMethod</strong>: Invokes the specified .NET method and returns the .NET value converted as a JavaScript value. The first parameter is the identifier/method name of the .NET method. Any subsequent parameters will be converted to .NET values and passed to the .NET method.


<strong>invokeMethodAsync</strong>: Invokes the specified .NET method and returns a JavaScript Promise. When the Promise is fulfilled, the Promise result will be the return value from the .NET method. The first parameter is the identifier/method name of the .NET method. Any subsequent parameters will be converted to .NET values and passed to the .NET method.


For more details on JavaScript interop, read:


- <a href="https://swimburger.net/blog/dotnet/communicating-between-dotnet-and-javascript-in-blazor-with-in-browser-samples">Communicating between .NET and JavaScript in Blazor with in-browser samples</a>


The Blazor Dialer component needs to create a <code>DotNetObjectReference</code> pointing to itself and then pass it to a JavaScript function to store it.


In the <em>TwilioBlazorPhonecalls.Client</em><em>/Components/Dialer.razor</em> file, add the following field declaration to the existing private member variables:


<pre style="color:#000000;background:#ffffff;"><span style="color:#7f0055; font-weight:bold; ">protected</span> <span style="color:#7f0055; font-weight:bold; ">override</span> async Task OnInitializedAsync()&#10;{&#10;    dotNetObjectReference = DotNetObjectReference.Create(<span style="color:#7f0055; font-weight:bold; ">this</span>);&#10;    await js.InvokeVoidAsync(<span style="color:#2a00ff; ">"</span><span style="color:#2a00ff; ">dialer.setDotNetObjectReference</span><span style="color:#2a00ff; ">"</span>, dotNetObjectReference);&#10;    await js.InvokeVoidAsync(<span style="color:#2a00ff; ">"</span><span style="color:#2a00ff; ">dialer.setupTwilioEvents</span><span style="color:#2a00ff; ">"</span>);&#10;    <span style="color:#7f0055; font-weight:bold; ">var</span> jwtToken = await GetTwilioAuthenticationTokenAsync();&#10;    await js.InvokeVoidAsync(<span style="color:#2a00ff; ">"</span><span style="color:#2a00ff; ">dialer.setupTwilioDevice</span><span style="color:#2a00ff; ">"</span>, jwtToken);&#10;}&#10;</pre>

The <code>Dispose</code> method should dispose of the object reference, so add a statement so the contents look like the following:

<pre style="color:#000000;background:#ffffff;"><span style="color:#7f0055; font-weight:bold; ">public</span> <span style="color:#7f0055; font-weight:bold; ">void</span> Dispose()&#10;{&#10;    js.InvokeVoidAsync(<span style="color:#2a00ff; ">"</span><span style="color:#2a00ff; ">dialer.destroy</span><span style="color:#2a00ff; ">"</span>);&#10;    dotNetObjectReference?.Dispose();&#10;}&#10;</pre>

The Dialer component invokes the JavaScript function <code>dialer.setDotNetObjectReference</code>, which still needs to be created.


Update the <em>TwilioBlazorPhonecalls.Client\wwwroot\js\dialer.js</em> file so the beginning of <code>window.dialer</code> object looks like the following:

<pre style="color:#000000;background:#ffffff;">window.dialer = {&#10;    device: <span style="color:#7f0055; font-weight:bold; ">new</span> Twilio.Device(),&#10;    dotNetObjectReference: <span style="color:#7f0055; font-weight:bold; ">null</span>,&#10;    setDotNetObjectReference: <span style="color:#7f0055; font-weight:bold; ">function</span> (dotNetObjectReference) {&#10;        <span style="color:#7f0055; font-weight:bold; ">this</span>.dotNetObjectReference = dotNetObjectReference;&#10;    },&#10;    setupTwilioDevice: <span style="color:#7f0055; font-weight:bold; ">function</span> (jwtToken) {&#10;        <span style="color:#7f0055; font-weight:bold; ">var</span> options = {&#10;            closeProtection: <span style="color:#7f0055; font-weight:bold; ">true</span> <span style="color:#3f7f59; ">// will warn user if you try to close browser window during an active call</span>&#10;        };&#10;        <span style="color:#7f0055; font-weight:bold; ">this</span>.device.setup(jwtToken, options);&#10;    },&#10;...&#10;</pre>

Once the <code>dotNetObjectReference</code> property is set you can call .NET methods on the Blazor Dialer component. Update the <code>dialer.setupTwilioEvents</code> function so every event calls back into the Dialer component.


Replace the existing <code>setupTwilioEvents</code> function with the follow code:

<pre style="color:#000000;background:#ffffff;">setupTwilioEvents: <span style="color:#7f0055; font-weight:bold; ">function</span> () {&#10;    <span style="color:#3f7f59; ">// Inside of Twilio events scope the 'this' context is redefined and will not point to 'window.dialer'</span>&#10;    <span style="color:#3f7f59; ">// The variable 'self' is introduced to conveniently access the 'this' context from the outer scope inside of the events scope</span>&#10;    <span style="color:#7f0055; font-weight:bold; ">var</span> self = <span style="color:#7f0055; font-weight:bold; ">this</span>;&#10;    <span style="color:#7f0055; font-weight:bold; ">this</span>.device.on(<span style="color:#2a00ff; ">'</span><span style="color:#2a00ff; ">ready</span><span style="color:#2a00ff; ">'</span>, <span style="color:#7f0055; font-weight:bold; ">function</span> () {&#10;        self.dotNetObjectReference.invokeMethod(<span style="color:#2a00ff; ">'</span><span style="color:#2a00ff; ">OnTwilioDeviceReady</span><span style="color:#2a00ff; ">'</span>);&#10;    });&#10;&#10;    <span style="color:#7f0055; font-weight:bold; ">this</span>.device.on(<span style="color:#2a00ff; ">'</span><span style="color:#2a00ff; ">error</span><span style="color:#2a00ff; ">'</span>, <span style="color:#7f0055; font-weight:bold; ">function</span> (error) {&#10;        console.error(error);&#10;        self.dotNetObjectReference.invokeMethod(<span style="color:#2a00ff; ">'</span><span style="color:#2a00ff; ">OnTwilioDeviceError</span><span style="color:#2a00ff; ">'</span>, error.message);&#10;    });&#10;&#10;    <span style="color:#7f0055; font-weight:bold; ">this</span>.device.on(<span style="color:#2a00ff; ">'</span><span style="color:#2a00ff; ">connect</span><span style="color:#2a00ff; ">'</span>, <span style="color:#7f0055; font-weight:bold; ">function</span> (connection) {&#10;        <span style="color:#7f0055; font-weight:bold; ">if</span> (connection.direction === <span style="color:#2a00ff; ">"</span><span style="color:#2a00ff; ">OUTGOING</span><span style="color:#2a00ff; ">"</span>) {&#10;            self.dotNetObjectReference.invokeMethod(<span style="color:#2a00ff; ">'</span><span style="color:#2a00ff; ">OnTwilioDeviceConnected</span><span style="color:#2a00ff; ">'</span>, connection.message[<span style="color:#2a00ff; ">'</span><span style="color:#2a00ff; ">To</span><span style="color:#2a00ff; ">'</span>]);&#10;        } <span style="color:#7f0055; font-weight:bold; ">else</span> {&#10;            self.dotNetObjectReference.invokeMethod(<span style="color:#2a00ff; ">'</span><span style="color:#2a00ff; ">OnTwilioDeviceConnected</span><span style="color:#2a00ff; ">'</span>, connection.parameters[<span style="color:#2a00ff; ">'</span><span style="color:#2a00ff; ">From</span><span style="color:#2a00ff; ">'</span>]);&#10;        }&#10;    });&#10;&#10;    <span style="color:#7f0055; font-weight:bold; ">this</span>.device.on(<span style="color:#2a00ff; ">'</span><span style="color:#2a00ff; ">disconnect</span><span style="color:#2a00ff; ">'</span>, <span style="color:#7f0055; font-weight:bold; ">function</span> () {&#10;        self.dotNetObjectReference.invokeMethod(<span style="color:#2a00ff; ">'</span><span style="color:#2a00ff; ">OnTwilioDeviceDisconnected</span><span style="color:#2a00ff; ">'</span>);&#10;    });&#10;&#10;    <span style="color:#7f0055; font-weight:bold; ">this</span>.device.on(<span style="color:#2a00ff; ">'</span><span style="color:#2a00ff; ">incoming</span><span style="color:#2a00ff; ">'</span>, <span style="color:#7f0055; font-weight:bold; ">function</span> (connection) {&#10;        self.dotNetObjectReference.invokeMethod(<span style="color:#2a00ff; ">'</span><span style="color:#2a00ff; ">OnTwilioDeviceIncomingConnection</span><span style="color:#2a00ff; ">'</span>, connection.parameters[<span style="color:#2a00ff; ">'</span><span style="color:#2a00ff; ">From</span><span style="color:#2a00ff; ">'</span>]);&#10;    });&#10;&#10;    <span style="color:#7f0055; font-weight:bold; ">this</span>.device.on(<span style="color:#2a00ff; ">'</span><span style="color:#2a00ff; ">cancel</span><span style="color:#2a00ff; ">'</span>, <span style="color:#7f0055; font-weight:bold; ">function</span> () {&#10;        self.dotNetObjectReference.invokeMethod(<span style="color:#2a00ff; ">'</span><span style="color:#2a00ff; ">OnTwilioDeviceCanceled</span><span style="color:#2a00ff; ">'</span>);&#10;    });&#10;}&#10;</pre>

These .NET methods do not yet exist. Create the following .NET methods in <em>TwilioBlazorPhonecalls.Client\Components\Dialer.razor</em> by inserting the following C# code in the <code>@code</code> section between the fields and the existing methods:

<pre style="color:#000000;background:#ffffff;">[JSInvokable]&#10;<span style="color:#7f0055; font-weight:bold; ">public</span> <span style="color:#7f0055; font-weight:bold; ">void</span> OnTwilioDeviceReady()&#10;{&#10;    isTwilioDeviceReady = <span style="color:#7f0055; font-weight:bold; ">true</span>;&#10;    StateHasChanged();&#10;}&#10;&#10;[JSInvokable]&#10;<span style="color:#7f0055; font-weight:bold; ">public</span> <span style="color:#7f0055; font-weight:bold; ">void</span> OnTwilioDeviceError(<span style="color:#7f0055; font-weight:bold; ">string</span> error)&#10;{&#10;    message = error;&#10;    logger.LogError(error);&#10;    StateHasChanged();&#10;}&#10;&#10;[JSInvokable]&#10;<span style="color:#7f0055; font-weight:bold; ">public</span> <span style="color:#7f0055; font-weight:bold; ">void</span> OnTwilioDeviceConnected(<span style="color:#7f0055; font-weight:bold; ">string</span> phoneNumber)&#10;{&#10;    isTwilioDeviceConnected = <span style="color:#7f0055; font-weight:bold; ">true</span>;&#10;    hasIncomingConnection = <span style="color:#7f0055; font-weight:bold; ">false</span>;&#10;    message = $<span style="color:#2a00ff; ">"</span><span style="color:#2a00ff; ">Calling {phoneNumber}</span><span style="color:#2a00ff; ">"</span>;&#10;    StateHasChanged();&#10;}&#10;&#10;[JSInvokable]&#10;<span style="color:#7f0055; font-weight:bold; ">public</span> <span style="color:#7f0055; font-weight:bold; ">void</span> OnTwilioDeviceDisconnected()&#10;{&#10;    isTwilioDeviceConnected = <span style="color:#7f0055; font-weight:bold; ">false</span>;&#10;    hasIncomingConnection = <span style="color:#7f0055; font-weight:bold; ">false</span>;&#10;    message = <span style="color:#2a00ff; ">"</span><span style="color:#2a00ff; ">"</span>;&#10;    StateHasChanged();&#10;}&#10;&#10;[JSInvokable]&#10;<span style="color:#7f0055; font-weight:bold; ">public</span> <span style="color:#7f0055; font-weight:bold; ">void</span> OnTwilioDeviceIncomingConnection(<span style="color:#7f0055; font-weight:bold; ">string</span> phoneNumber)&#10;{&#10;    hasIncomingConnection = <span style="color:#7f0055; font-weight:bold; ">true</span>;&#10;    message = $<span style="color:#2a00ff; ">"</span><span style="color:#2a00ff; ">{phoneNumber} is calling you</span><span style="color:#2a00ff; ">"</span>;&#10;    StateHasChanged();&#10;}&#10;&#10;[JSInvokable]&#10;<span style="color:#7f0055; font-weight:bold; ">public</span> <span style="color:#7f0055; font-weight:bold; ">void</span> OnTwilioDeviceCanceled()&#10;{&#10;    hasIncomingConnection = <span style="color:#7f0055; font-weight:bold; ">false</span>;&#10;    message = <span style="color:#2a00ff; ">"</span><span style="color:#2a00ff; ">"</span>;&#10;    StateHasChanged();&#10;}&#10;</pre>

Each of these methods which respond to events in the <code>Twilio.Device</code> will modify the local state and call the <code>StateHasChanged</code> method to trigger a re-render of the component.

### Test the code {#test-the-code}

At this point you have a partially functional Twilio Voice client. To test this, run the client:

<pre style="color:#000000;background:#ffffff;">dotnet <span style="color:#2a00ff; ">run</span> -p <span style="color:#2a00ff; ">TwilioBlazorPhonecalls.Client</span>&#10;</pre>

Open a second shell and run the server:

<pre style="color:#000000;background:#ffffff;">dotnet <span style="color:#2a00ff; ">run</span> -p <span style="color:#2a00ff; ">TwilioBlazorPhonecalls.Server</span>&#10;</pre>
<p>Open your browser and navigate to <em>https://localhost:5001/</em>. You can find the Dialer component at the bottom right.</p>

At this point the virtual Twilio device is configured and the authentication was successful, but when you try to initiate a call you hear the following voice message:


“We are sorry, an application error has occurred.”


This is because no voice webhook URL is configured to route the connection. Your next step is to implement the webhooks.

## Implementing voice webhooks {#implementing-voice-webhooks}

The client is completed, but calls are not going out or coming in due to the lack of voice webhooks. In this section you will do the following:


- Add a controller to route phone calls
- Add a controller action to route outgoing phone calls
- Add a controller action to route incoming phone calls
- Use ngrok to make your local server publicly accessible
- Configure voice webhook URL on TwiML application for outgoing phone calls
- Configure voice webhook URL on Twilio phone number for incoming phone calls

### Implement outgoing phone calls webhook {#implement-outgoing-phone-calls-webhook}

Add the <a rel="noopener" href="https://www.nuget.org/packages/Twilio.AspNet.Core/" target="_blank">Twilio.AspNet.Core</a> NuGet package to the <em>TwilioBlazorPhonecalls.Server</em> server project:

<pre style="color:#000000;background:#ffffff;">dotnet <span style="color:#2a00ff; ">add</span> <span style="color:#2a00ff; ">TwilioBlazorPhonecalls.Server</span> <span style="color:#2a00ff; ">package</span> <span style="color:#2a00ff; ">Twilio.AspNet.Core</span>&#10;</pre>

This library adds some convenient classes which help with implementing Twilio webhooks. Learn more at the <a rel="noopener" href="https://github.com/twilio/twilio-aspnet" target="_blank">Twilio.AspNet.Core GitHub repository</a>.


Create a new controller at <em>TwilioBlazorPhonecalls.Server\Controllers\VoiceController.cs</em>:

<pre style="color:#000000;background:#ffffff;"><span style="color:#7f0055; font-weight:bold; ">using</span> System;&#10;<span style="color:#7f0055; font-weight:bold; ">using</span> System.Linq;&#10;<span style="color:#7f0055; font-weight:bold; ">using</span> Microsoft.AspNetCore.Mvc;&#10;<span style="color:#7f0055; font-weight:bold; ">using</span> Microsoft.Extensions.Configuration;&#10;<span style="color:#7f0055; font-weight:bold; ">using</span> Microsoft.Extensions.Logging;&#10;<span style="color:#7f0055; font-weight:bold; ">using</span> Twilio.AspNet.Core;&#10;<span style="color:#7f0055; font-weight:bold; ">using</span> Twilio.TwiML;&#10;<span style="color:#7f0055; font-weight:bold; ">using</span> Twilio.TwiML.Voice;&#10;&#10;<span style="color:#7f0055; font-weight:bold; ">namespace</span> TwilioBlazorPhonecalls.Server.Controllers&#10;{&#10;    [ApiController]&#10;    <span style="color:#7f0055; font-weight:bold; ">public</span> <span style="color:#7f0055; font-weight:bold; ">class</span> VoiceController : TwilioController&#10;    {&#10;        <span style="color:#7f0055; font-weight:bold; ">private</span> <span style="color:#7f0055; font-weight:bold; ">readonly</span> IConfiguration configuration;&#10;        <span style="color:#7f0055; font-weight:bold; ">private</span> <span style="color:#7f0055; font-weight:bold; ">readonly</span> ILogger&lt;VoiceController&gt; logger;&#10;&#10;        <span style="color:#7f0055; font-weight:bold; ">public</span> VoiceController(IConfiguration configuration, ILogger&lt;VoiceController&gt; logger)&#10;        {&#10;            <span style="color:#7f0055; font-weight:bold; ">this</span>.configuration = configuration;&#10;            <span style="color:#7f0055; font-weight:bold; ">this</span>.logger = logger;&#10;        }&#10;&#10;        [HttpPost]&#10;        [Route(<span style="color:#2a00ff; ">"</span><span style="color:#2a00ff; ">voice/outgoing</span><span style="color:#2a00ff; ">"</span>)]&#10;        <span style="color:#7f0055; font-weight:bold; ">public</span> TwiMLResult Outgoing([FromForm] <span style="color:#7f0055; font-weight:bold; ">string</span> to)&#10;        {&#10;            <span style="color:#7f0055; font-weight:bold; ">string</span> twilioPhoneNumber = configuration[<span style="color:#2a00ff; ">"</span><span style="color:#2a00ff; ">TwilioPhoneNumber</span><span style="color:#2a00ff; ">"</span>];&#10;            <span style="color:#7f0055; font-weight:bold; ">var</span> response = <span style="color:#7f0055; font-weight:bold; ">new</span> VoiceResponse();&#10;            <span style="color:#7f0055; font-weight:bold; ">var</span> dial = <span style="color:#7f0055; font-weight:bold; ">new</span> Dial();&#10;            logger.LogInformation($<span style="color:#2a00ff; ">"</span><span style="color:#2a00ff; ">Calling {to}</span><span style="color:#2a00ff; ">"</span>);&#10;            dial.CallerId = twilioPhoneNumber;&#10;            dial.Number(to);&#10;            response.Append(dial);&#10;            <span style="color:#7f0055; font-weight:bold; ">return</span> TwiML(response);&#10;        }&#10;    }&#10;}&#10;</pre>

Note how <code>VoiceController</code> inherits from the <code>TwilioController</code> class provided by the <a rel="noopener" href="https://www.nuget.org/packages/Twilio.AspNet.Core/" target="_blank">Twilio.AspNet.Core</a> library. The <code>TwilioController</code> class provides the <code>TwiML</code> method which you can use to return <code>VoiceResponse</code> and <code>MessagingResponse</code> instances.


When the Blazor client connects to Twilio, Twilio will send an HTTP POST request to your webhook with many <code>&lt;form&gt;</code> parameters including the metadata passed along to <code>Twilio.Device.connect</code> JavaScript function. Your webhook creates a TwiML response that instructs Twilio to <code>Dial</code> the phone number in the <code>to</code> parameter from the phone number specified in the <code>CallerId</code> which is your Twilio phone number.


To quickly verify if this works and what it looks like, run the server again:

<pre style="color:#000000;background:#ffffff;">dotnet <span style="color:#2a00ff; ">run</span> -p <span style="color:#2a00ff; ">TwilioBlazorPhonecalls.Server</span>&#10;</pre>
<div class="block-rich_text">

<div class="rich-text">

While the server is running, open a separate shell and run this command, replacing the value for <code>To</code> with your Twilio phone number:

<pre style="color:#000000;background:#ffffff;">Invoke-WebRequest <span style="color:#2a00ff; ">https://localhost:5003/voice/outgoing</span> -Method <span style="color:#2a00ff; ">Post</span> -Body @{<span style="color:#2a00ff; ">"</span><span style="color:#2a00ff; ">To</span><span style="color:#2a00ff; ">"</span> = <span style="color:#2a00ff; ">"</span><span style="color:#2a00ff; ">+1234567890</span><span style="color:#2a00ff; ">"</span>}&#10;</pre>

The response should have an HTTP status code 200, and the response content should look like this:

<pre style="color:#000000;background:#ffffff;"><span style="color:#7f0055; ">&lt;?</span><span style="color:#7f0055; font-weight:bold; ">xml</span><span style="color:#7f0055; "> </span><span style="color:#7f0055; ">version</span><span style="color:#7f0055; ">=</span><span style="color:#2a00ff; ">"</span><span style="color:#7f0055; font-weight:bold; ">1.0</span><span style="color:#2a00ff; ">"</span><span style="color:#7f0055; "> </span><span style="color:#7f0055; ">encoding</span><span style="color:#7f0055; ">=</span><span style="color:#2a00ff; ">"</span><span style="color:#2a00ff; ">utf-8</span><span style="color:#2a00ff; ">"</span><span style="color:#7f0055; ">?&gt;</span>&#10;<span style="color:#7f0055; ">&lt;</span><span style="color:#7f0055; ">Response</span><span style="color:#7f0055; ">&gt;</span>&#10;    <span style="color:#7f0055; ">&lt;</span><span style="color:#7f0055; ">Dial</span> callerId=<span style="color:#2a00ff; ">"</span><span style="color:#2a00ff; ">YOUR_TWILIO_PHONE_NUMBER</span><span style="color:#2a00ff; ">"</span><span style="color:#7f0055; ">&gt;</span>&#10;        <span style="color:#7f0055; ">&lt;</span><span style="color:#7f0055; ">Number</span><span style="color:#7f0055; ">&gt;</span>+1234567890<span style="color:#7f0055; ">&lt;/</span><span style="color:#7f0055; ">Number</span><span style="color:#7f0055; ">&gt;</span>&#10;    <span style="color:#7f0055; ">&lt;/</span><span style="color:#7f0055; ">Dial</span><span style="color:#7f0055; ">&gt;</span>&#10;<span style="color:#7f0055; ">&lt;/</span><span style="color:#7f0055; ">Response</span><span style="color:#7f0055; ">&gt;</span>&#10;</pre>

### Make the local webhook server publicly accessible using ngrok {#make-the-local-webhook-server-publicly-accessible-using-ngrok}

Twilio can’t access your controllers and actions because your server is running on your local network. You can use ngrok to make your server public for testing. Ngrok is a free service that allows you to setup a TCP tunnel from your local machine to their publicly available service.

<p>You run the ngrok CLI tool on your machine and ngrok will tunnel it to a URL which looks similar to <em>https://66a605a7ced5.ngrok.io</em> — with a different subdomain. Every time you start the ngrok tool, the subdomain is different, providing security for your local machine through obfuscation. For a reserved domain and other features, you can <a rel="noopener" href="https://ngrok.com/pricing" target="_blank">upgrade</a> to a paid plan.</p>

Once ngrok has been setup, run this command to make your server accessible to the public:

<pre style="color:#000000;background:#ffffff;">./ngrok <span style="color:#2a00ff; ">http</span> <span style="color:#2a00ff; ">https://localhost:5003</span>&#10;</pre>

The output will show the public ngrok URLs. Run your server using a separate shell:

<pre style="color:#000000;background:#ffffff;">dotnet <span style="color:#2a00ff; ">run</span> -p <span style="color:#2a00ff; ">TwilioBlazorPhonecalls.Server</span>&#10;</pre>

To quickly verify the ngrok tunnel is working, you can run this PowerShell command again but with the public ngrok URL:

<pre style="color:#000000;background:#ffffff;">Invoke-WebRequest <span style="color:#2a00ff; ">https://[YOUR_SUBDOMAIN].ngrok.io/voice/outgoing</span> -Method <span style="color:#2a00ff; ">Post</span> -Body @{<span style="color:#2a00ff; ">"</span><span style="color:#2a00ff; ">To</span><span style="color:#2a00ff; ">"</span> = <span style="color:#2a00ff; ">"</span><span style="color:#2a00ff; ">+1234567890</span><span style="color:#2a00ff; ">"</span>}&#10;</pre>

The result should be the same as before.

### Configure the TwiML application voice webhook {#configure-the-twiml-application-voice-webhook}

Now that your server is publicly available using ngrok, you can configure the voice webhook URL on your TwiML application.


Run the following command to update the voice webhook for your TwiML application:

<pre style="color:#000000;background:#ffffff;">twilio <span style="color:#2a00ff; ">api:core:applications:update</span> <span style="color:#2a00ff; ">--sid=[YOUR_TWIML_APPLICATION_SID]</span> <span style="color:#2a00ff; ">--voice-url=https://[YOUR_SUBDOMAIN].ngrok.io/voice/outgoing</span> <span style="color:#2a00ff; ">--voice-method=POST</span>&#10;</pre>

Replace [YOUR_TWIML_APPLICATION_SID] with the SID of your TwiML application and change the subdomain of the ngrok URL to your ngrok subdomain.

<p>In addition to setting up a tunnel, the ngrok tool also hosts a local dashboard and API on your machine which have a lot of useful data. By default, this dashboard is hosted at <em>http://127.0.0.1:4040/</em>.</p>

Instead of copying and pasting the webhook URL and updating the voice webhook URL whenever you restart ngrok, you can automate this connection using PowerShell and ngrok’s local API.


Create a PowerShell file <em>UpdateTwilioWebhooks.ps1</em> and insert the code below:

<pre style="color:#000000;background:#ffffff;">$ApplicationSid = <span style="color:#2a00ff; ">"</span><span style="color:#2a00ff; ">YOUR_TWIML_APPLICATION_SID</span><span style="color:#2a00ff; ">"</span>&#10;&#10;<span style="color:#3f7f59; "># Make sure ngrok is running before running this</span>&#10;$NgrokApi = <span style="color:#2a00ff; ">'</span><span style="color:#2a00ff; ">http://127.0.0.1:4040/api</span><span style="color:#2a00ff; ">'</span>&#10;$TwilioTunnelsObject = (Invoke-WebRequest <span style="color:#2a00ff; ">"</span><span style="color:#2a00ff; ">$NgrokApi</span><span style="color:#2a00ff; ">/tunnels</span><span style="color:#2a00ff; ">"</span>).Content <span style="color:#7f0055; font-weight:bold; ">|</span> ConvertFrom-Json&#10;$PublicBaseUrl = $TwilioTunnelsObject.tunnels.public_url <span style="color:#7f0055; font-weight:bold; ">|</span> Where-Object {$_.StartsWith(<span style="color:#2a00ff; ">'</span><span style="color:#2a00ff; ">https</span><span style="color:#2a00ff; ">'</span>)}&#10;&#10;$PublicOutgoingVoiceUrl = <span style="color:#2a00ff; ">"</span><span style="color:#2a00ff; ">$PublicBaseUrl</span><span style="color:#2a00ff; ">/voice/outgoing</span><span style="color:#2a00ff; ">"</span>&#10;twilio <span style="color:#2a00ff; ">api:core:applications:update</span> <span style="color:#2a00ff; ">--sid=</span><span style="color:#2a00ff; ">$ApplicationSid</span> <span style="color:#2a00ff; ">--voice-url=</span><span style="color:#2a00ff; ">$PublicOutgoingVoiceUrl</span> <span style="color:#2a00ff; ">--voice-method=POST</span>&#10;</pre>

Make sure to replace YOUR_TWIML_APPLICATION_SID with your TwiML application SID.


Whenever your ngrok URL changes, you can update the webhook URL by invoking the script like this:

<pre style="color:#000000;background:#ffffff;">./UpdateTwilioWebhooks.ps1&#10;</pre>

### Test outgoing phone calls {#test-outgoing-phone-calls}

The entire workflow for outgoing phone calls is developed. Test your application by opening separate shells to run these commands:


-   Run the client using `dotnet run -p TwilioBlazorPhonecalls.Client`
-   Run the server using `dotnet run -p TwilioBlazorPhonecalls.Server`
-   Run ngrok to tunnel the server `./ngrok http https://localhost:5003`
-   Update the TwiML application voice webhook URL by running *UpdateTwilioWebhooks.ps1*

<p>Now that everything is running, open a browser and navigate to <em>https://localhost:5001/</em>.<br>Click the <strong>Show phone</strong> button on the bottom right, enter a phone number, and click the <strong>Call</strong> button. You should now be successfully calling the entered phone number.</p>

### Implement the incoming phone calls webhook {#implement-the-incoming-phone-calls-webhook}

You are able to make outgoing phone calls, but still need to implement how to receive phone calls when your Twilio phone number is dialed.


Add an action for incoming voice calls to <em>TwilioBlazorPhonecalls.Server\Controllers\VoiceController.cs</em>:

<pre style="color:#000000;background:#ffffff;">[HttpPost]&#10;[Route(<span style="color:#2a00ff; ">"</span><span style="color:#2a00ff; ">voice/incoming</span><span style="color:#2a00ff; ">"</span>)]&#10;<span style="color:#7f0055; font-weight:bold; ">public</span> TwiMLResult Incoming([FromForm] <span style="color:#7f0055; font-weight:bold; ">string</span> from)&#10;{&#10;    logger.LogInformation($<span style="color:#2a00ff; ">"</span><span style="color:#2a00ff; ">Receiving call from {from}</span><span style="color:#2a00ff; ">"</span>);&#10;    <span style="color:#7f0055; font-weight:bold; ">var</span> response = <span style="color:#7f0055; font-weight:bold; ">new</span> VoiceResponse();&#10;    <span style="color:#7f0055; font-weight:bold; ">var</span> dial = <span style="color:#7f0055; font-weight:bold; ">new</span> Dial();&#10;    logger.LogInformation($<span style="color:#2a00ff; ">"</span><span style="color:#2a00ff; ">Calling blazor_client</span><span style="color:#2a00ff; ">"</span>);&#10;    dial.CallerId = from;&#10;    <span style="color:#3f7f59; ">// client has to match the identity specified in TokenController</span>&#10;    dial.Client(<span style="color:#2a00ff; ">"</span><span style="color:#2a00ff; ">blazor_client</span><span style="color:#2a00ff; ">"</span>); &#10;    response.Append(dial);&#10;    <span style="color:#7f0055; font-weight:bold; ">return</span> TwiML(response);&#10;}&#10;</pre>

When your Twilio phone number is called, Twilio will send an HTTP POST request to your webhook with form parameters including the phone number that is initiating the call in the <code>from</code> parameter.


Your webhook creates a TwiML response that instructs Twilio to <code>Dial</code> the <code>blazor_client</code>. This <code>blazor_client</code> string has to match the identity string specified on <code>Token</code> in the <code>TokenController</code>.


When Twilio receives this TwiML, Twilio will call all clients connected using <code>blazor_client</code> as the client name. The first client to pick up will establish a VoIP connection and the Dialer on the other clients will stop ringing.


To quickly verify if this works and see what it looks like, run the server again:

<pre style="color:#000000;background:#ffffff;">dotnet <span style="color:#2a00ff; ">run</span> -p <span style="color:#2a00ff; ">TwilioBlazorPhonecalls.Server</span>&#10;</pre>

While the server is running, open a separate shell and run this command:

<pre style="color:#000000;background:#ffffff;">Invoke-WebRequest <span style="color:#2a00ff; ">https://localhost:5003/voice/incoming</span> -Method <span style="color:#2a00ff; ">Post</span> -Body @{<span style="color:#2a00ff; ">"</span><span style="color:#2a00ff; ">From</span><span style="color:#2a00ff; ">"</span> = <span style="color:#2a00ff; ">"</span><span style="color:#2a00ff; ">+1234567890</span><span style="color:#2a00ff; ">"</span>}&#10;</pre>

The response should have an HTTP status code 200, and the response content should look like this:

<pre style="color:#000000;background:#ffffff;"><span style="color:#7f0055; ">&lt;?</span><span style="color:#7f0055; font-weight:bold; ">xml</span><span style="color:#7f0055; "> </span><span style="color:#7f0055; ">version</span><span style="color:#7f0055; ">=</span><span style="color:#2a00ff; ">"</span><span style="color:#7f0055; font-weight:bold; ">1.0</span><span style="color:#2a00ff; ">"</span><span style="color:#7f0055; "> </span><span style="color:#7f0055; ">encoding</span><span style="color:#7f0055; ">=</span><span style="color:#2a00ff; ">"</span><span style="color:#2a00ff; ">utf-8</span><span style="color:#2a00ff; ">"</span><span style="color:#7f0055; ">?&gt;</span>&#10;<span style="color:#7f0055; ">&lt;</span><span style="color:#7f0055; ">Response</span><span style="color:#7f0055; ">&gt;</span>&#10;    <span style="color:#7f0055; ">&lt;</span><span style="color:#7f0055; ">Dial</span> callerId=<span style="color:#2a00ff; ">"</span><span style="color:#2a00ff; ">+1234567890</span><span style="color:#2a00ff; ">"</span><span style="color:#7f0055; ">&gt;</span>&#10;        <span style="color:#7f0055; ">&lt;</span><span style="color:#7f0055; ">Client</span><span style="color:#7f0055; ">&gt;</span>blazor_client<span style="color:#7f0055; ">&lt;/</span><span style="color:#7f0055; ">Client</span><span style="color:#7f0055; ">&gt;</span>&#10;    <span style="color:#7f0055; ">&lt;/</span><span style="color:#7f0055; ">Dial</span><span style="color:#7f0055; ">&gt;</span>&#10;<span style="color:#7f0055; ">&lt;/</span><span style="color:#7f0055; ">Response</span><span style="color:#7f0055; ">&gt;</span>&#10;</pre>

### Configure the phone number voice webhook {#configure-the-phone-number-voice-webhook}

To handle incoming phone calls you need to configure the voice webhook on your Twilio phone number. Just as before, make sure ngrok is running to tunnel your server:

<pre style="color:#000000;background:#ffffff;">./ngrok <span style="color:#2a00ff; ">http</span> <span style="color:#2a00ff; ">https://localhost:5003</span>&#10;</pre>

Take note of the forwarding URL starting with <code>https</code> and use it to configure the webhook with the Twilio CLI:

<pre style="color:#000000;background:#ffffff;">twilio <span style="color:#2a00ff; ">phone-numbers:update</span> <span style="color:#2a00ff; ">[YOUR_TWILIO_PHONE_NUMBER]</span> <span style="color:#2a00ff; ">--voice-url=https://[YOUR_SUBDOMAIN].ngrok.io/voice/incoming</span> <span style="color:#2a00ff; ">--voice-method=POST</span>&#10;</pre>

Replace [YOUR_TWILIO_PHONE_NUMBER] with your Twilio phone number and [YOUR_SUBDOMAIN] with your ngrok subdomain.


Alternatively, you can extend <em>UpdateTwilioWebhooks.ps1</em> to also update the phone number voice webhook URL:

<pre style="color:#000000;background:#ffffff;">$ApplicationSid = <span style="color:#2a00ff; ">"</span><span style="color:#2a00ff; ">YOUR_TWIML_APPLICATION_SID</span><span style="color:#2a00ff; ">"</span>&#10;$TwilioPhonenumber = <span style="color:#2a00ff; ">"</span><span style="color:#2a00ff; ">YOUR_TWILIO_PHONE_NUMBER</span><span style="color:#2a00ff; ">"</span>&#10;&#10;<span style="color:#3f7f59; "># Make sure ngrok is running before running this</span>&#10;$NgrokApi = <span style="color:#2a00ff; ">'</span><span style="color:#2a00ff; ">http://127.0.0.1:4040/api</span><span style="color:#2a00ff; ">'</span>&#10;$TwilioTunnelsObject = (Invoke-WebRequest <span style="color:#2a00ff; ">"</span><span style="color:#2a00ff; ">$NgrokApi</span><span style="color:#2a00ff; ">/tunnels</span><span style="color:#2a00ff; ">"</span>).Content <span style="color:#7f0055; font-weight:bold; ">|</span> ConvertFrom-Json&#10;$PublicBaseUrl = $TwilioTunnelsObject.tunnels.public_url <span style="color:#7f0055; font-weight:bold; ">|</span> Where-Object {$_.StartsWith(<span style="color:#2a00ff; ">'</span><span style="color:#2a00ff; ">https</span><span style="color:#2a00ff; ">'</span>)}&#10;&#10;$PublicOutgoingVoiceUrl = <span style="color:#2a00ff; ">"</span><span style="color:#2a00ff; ">$PublicBaseUrl</span><span style="color:#2a00ff; ">/voice/outgoing</span><span style="color:#2a00ff; ">"</span>&#10;twilio <span style="color:#2a00ff; ">api:core:applications:update</span> <span style="color:#2a00ff; ">--sid=</span><span style="color:#2a00ff; ">$ApplicationSid</span> <span style="color:#2a00ff; ">--voice-url=</span><span style="color:#2a00ff; ">$PublicOutgoingVoiceUrl</span> <span style="color:#2a00ff; ">--voice-method=POST</span>&#10;&#10;$PublicIncomingVoiceUrl = <span style="color:#2a00ff; ">"</span><span style="color:#2a00ff; ">$PublicBaseUrl</span><span style="color:#2a00ff; ">/voice/incoming</span><span style="color:#2a00ff; ">"</span>&#10;twilio <span style="color:#2a00ff; ">phone-numbers:update</span> $TwilioPhonenumber <span style="color:#2a00ff; ">--voice-url=</span><span style="color:#2a00ff; ">$PublicIncomingVoiceUrl</span> <span style="color:#2a00ff; ">--voice-method=POST</span>&#10;</pre>

### Test incoming phone calls {#test-incoming-phone-calls}

The entire workflow for incoming phone calls is developed. Test your application by opening separate shells to run these commands:


-   Run the client using `dotnet run -p TwilioBlazorPhonecalls.Client`
-   Run the server using `dotnet run -p TwilioBlazorPhonecalls.Server`
-   Run ngrok to tunnel the server `./ngrok http https://localhost:5003`
-   Update the webhooks by running *UpdateTwilioWebhooks.ps1*

<p>Now that everything is running, open a browser and navigate to <em>https://localhost:5001/</em>.<br>With your real phone, call your Twilio phone number. The Dialer component should start ringing. Click the <strong>Show phone</strong> button and then click the <strong>Accept</strong> button. You should now be successfully calling your Blazor WASM application from your phone.</p>

Take pride in your accomplishment and share it with your colleagues! 🙌

## Enhancements and security warnings {#enhancements-and-security-warnings}

This tutorial hardcoded some URLs and IDs. All these hardcoded values should be coming from external configuration. The source code in the <a rel="noopener" href="https://github.com/Swimburger/TwilioBlazorPhonecalls" target="_blank">GitHub repository</a> for this tutorial uses ASP.NET Core’s configuration APIs to externalize configuration.


Currently, anyone who can access the server can request an authentication token to connect to Twilio. You can split the server into two servers, one for handling authentication tokens and one for handling webhooks. This way you can keep your token server on a private network while still serving your webhooks publicly.


Additionally, you should also add some authentication and authorization logic to the token controller so only authorized users can make and receive phone calls.


Since webhooks always need to be public, anyone could call them and potentially pretend to be Twilio making HTTP calls. To verify the HTTP calls are authentic and originate from Twilio, see <a rel="noopener" href="https://www.twilio.com/docs/usage/tutorials/how-to-secure-your-csharp-aspnet-core-app-by-validating-incoming-twilio-requests" target="_blank">Secure your C# / ASP.NET Core app by validating incoming Twilio requests</a> in the Twilio docs.


If your Twilio phone number is called, but no clients are connected, the call will be cancelled abruptly which is confusing to the caller. The client could also be busy taking another call already, or the person could be too busy to pick up. You can specify a webhook URL on the <code>Dial.Action</code> attribute. Twilio sends a request to this webhook when the call has ended. You can use this webhook to send a proper response to the user using TwiML. Read Twilio’s best practices on <a rel="noopener" href="https://www.twilio.com/docs/voice/client/best-practices#gracefully-handle-no-answer-situations" target="_blank">how to gracefully handle no-answer situations</a>. You can find code to do this in the project <a rel="noopener" href="https://github.com/Swimburger/TwilioBlazorPhonecalls/blob/voice-mail-fallback/TwilioBlazorPhonecalls.Server/Controllers/VoiceController.cs" target="_blank">here</a>.


You can implement this project using the new .NET 5.0 and C# 9 to take advantage of the latest improvements in the framework and language. There’s a complete version of the project with some of these features in the <a rel="noopener" href="https://github.com/Swimburger/TwilioBlazorPhonecalls/tree/dotnet-5" target="_blank">dotnet-5</a> branch of the companion repository.

## Summary {#summary}

In this tutorial you learned how to:


- Use the Twilio CLI to buy phone numbers, create TwiML applications, and update webhook URLs
- Create a ASP.NET Core controller to generate Twilio authentication tokens
- Call JavaScript functions from .NET in Blazor WASM
- Call .NET functions from JavaScript in Blazor WASM
- Use Twilio Client JS SDK to make and receive phone calls from the browser
- Route incoming and outgoing phone calls using TwiML and webhooks
- Make your local server publicly available using ngrok


You also got a few tips for turning this demo code into a secure production application.

## Additional resources {#additional-resources}

Check out the following resources for more information on the topics and tools presented in this tutorial:


<a href="https://swimburger.net/blog/dotnet/communicating-between-dotnet-and-javascript-in-blazor-with-in-browser-samples">Communicating between .NET and JavaScript in Blazor with in-browser samples</a> – This article walks you through JavaScript interop with live samples in the browser.


<a rel="noopener" href="https://docs.microsoft.com/en-us/aspnet/core/blazor/call-javascript-from-dotnet" target="_blank">Call JavaScript functions from .NET methods in ASP.NET Core Blazor</a> – This .NET documentation explains how to call JavaScript functions from .NET in Blazor.


<a rel="noopener" href="https://docs.microsoft.com/en-us/aspnet/core/blazor/call-dotnet-from-javascript" target="_blank">Call .NET methods from JavaScript functions in ASP.NET Core Blazor</a> – This .NET documentation explains how to call .NET methods from JavaScript in Blazor.


<a rel="noopener" href="https://www.twilio.com/docs/iam/access-tokens" target="_blank">Twilio API: Access Tokens</a> – This documentation guides you through generating access tokens granting access to voice, chat, and video functionality in Twilio.


<a rel="noopener" href="https://www.twilio.com/docs/voice/tutorials/browser-calls-csharp-mvc" target="_blank">Browser Calls with C# and ASP.NET MVC</a> – This tutorial shows you how to make an ASP.NET MVC app to make voice calls from the browser

</div>

</div>

</div>
